Building a lab, but simpler
In a previous post, we discussed why you might want a hacking lab and how to make one. This post is a follow on designed to help someone interested in web hacking; it’s to let you get set up quickly, try a few simple tools and maybe (just maybe…) you’ll progress on to a full blown lab in time.
What’s our goal?
This post is short. You’re here to get set up with a simple web hacking lab, maybe you want to dip your toes into the Pen Testing world, maybe you’re a web dev human wanting to try some of these security tools. There’ll be no protracted setup, just install a couple of tools and take them for a spin.
The Setup
The core setup of this lab is a browser and a proxy; we use the browser to view and interact with web pages on the client side (javascript, HTML etc.), we use the proxy to catch all that network traffic the browser sends back to the servers.
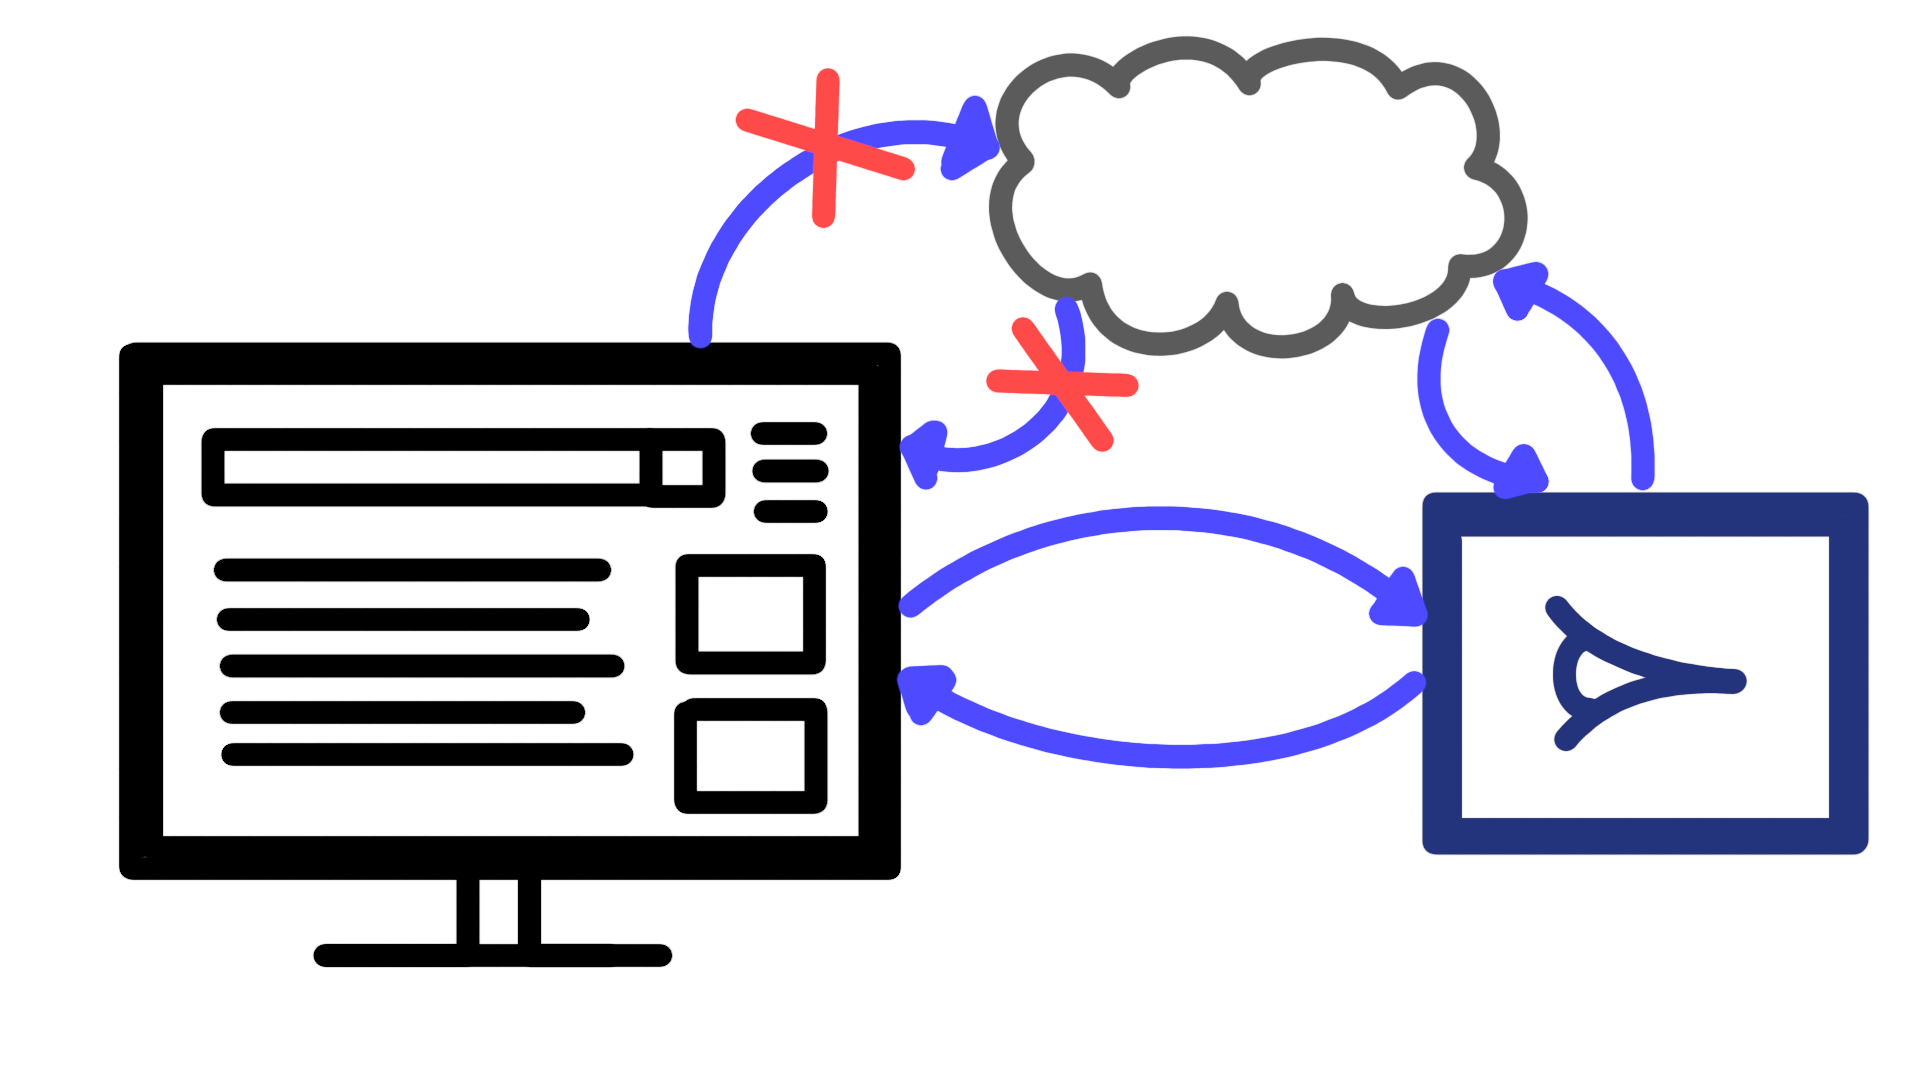
The addition of this proxy element will allow you to really get a solid grounding in web hacking; even if you’re not into manipulating requests, you can leave that proxy running and just use it view and understand the web protocols in play when you browse, as you become more confident, you can start to use that proxy to edit requests, scan for known vulnerabilities, or carry out automated tests you configure yourself.
Let’s get the software
Straight to it! In this build, you’ll be installing a couple of applications on your machine; first up, the proxy!
Get me a proxy!
The proxy we’re talking about here gets installed on your machine and your browser doesn’t get to talk to the internet without going through it first. There are really two main options in the web testing world - OWASP ZAP and PortSwigger’s Burpsuite.

BurpSuite is a testing proxy from ProtSwigger, available on most platforms and devices. It’s a paid tool, but the community version gives you most of the features for free.

ZAP is a free open source proxy from OWASP. It’s available on most platforms and has no built-in limits on functionality.
Take your pick of these, both have a free version. Burp is a well honed commercial tool, but you will have to put up with limits on some of the automation later on down the line; ZAP isn’t as clean or ‘slick’ as Burp but it’s totally free and has no limitations in a free version.
Follow a link, download the package for your OS and install. Note that ZAP is a Java application, so you may need to first download 64 bit Java for your OS, restarting if you need to. 64 Bit!
Still not sure which proxy to pick? I quite like ZAP if you’re choosing one to get started with (but I have both), the ability to add add-ons for tests is quite beginner friendly and doesn’t require you to mess around with lists of attack words for fuzzing.
Browser time
Full disclosure, you can skip this step and use the browser you already have, especially if the browser you have is Firefox!
That said, I prefer to have a separate browser (or at least a separate instance of my browser) for testing and general surfing, because it’s simpler, faster and doesn’t cause problems when you start auto-manipulating traffic down the line. The main benefit to you, while you’re getting to grips with your proxy, is that all that personal usage while you test - music, google, forums etc. - won’t be accidentally processed by your proxy; if this happens, you can end up with big project files, a slower machine and a general bad time.

If you use Chrome day to day (or anything non-firefox, actually), I’d suggest you grab a copy of Firefox and use this for your test browser.
If you use firefox already (good on you!), I’d recommend you add a testing profile, you can open your other profile and have separate cookies, history, proxies and keep that testing traffic away from your personal. To get set up:
- Open a new tab.
- Type about:proflies.
- Press Create a New Profile.
- Do what you’re told by the Wizard.
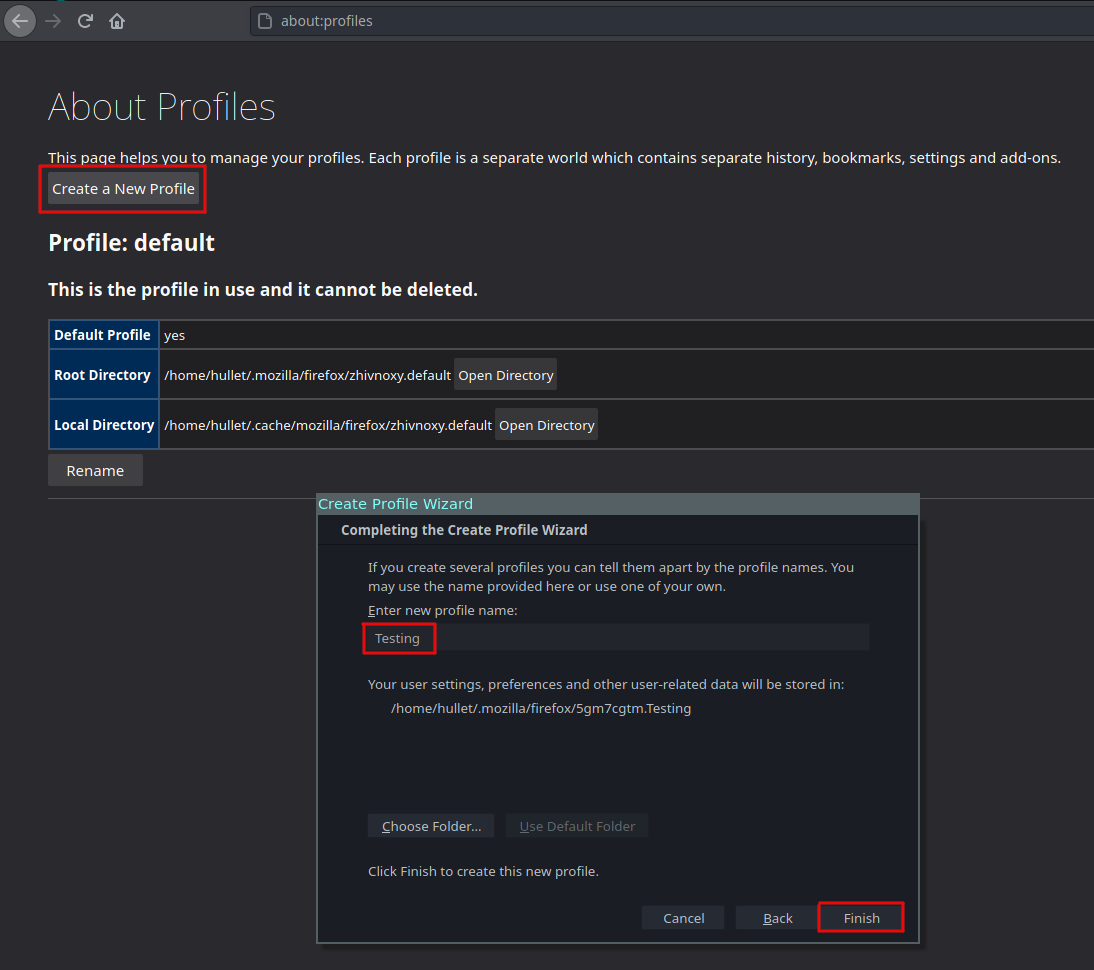
Now you’ve added a new profile, you can launch your other profile in a new window from that about:profiles page. Why not pin about:profiles into a tab if you’re using dual Firefox profiles?
P.S. It is possible to use Chrome to do this testing, I’m just biased. Keep reading!
Set that browser up
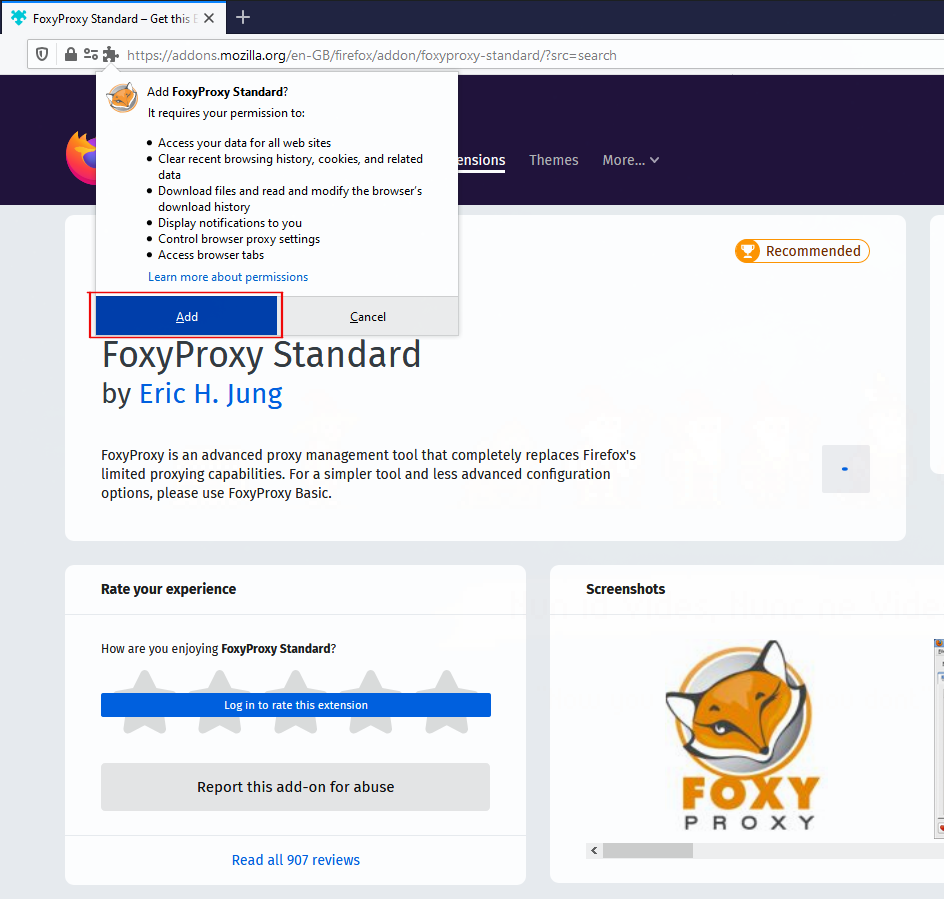
To get the most from this setup, make a few tweaks to your browser. The main tweak I’d suggest is adding a proxy manager add-on (or extension if you went Chrome); this will allow you to quickly turn your proxy on and off, something you’ll find endlessly helpful.
FoxyProxy is the standard in proxy managers and is available for both Chrome and Firefox. Adding this to your broswer isn’t risk-free so check you know what you’re doing and on you go!
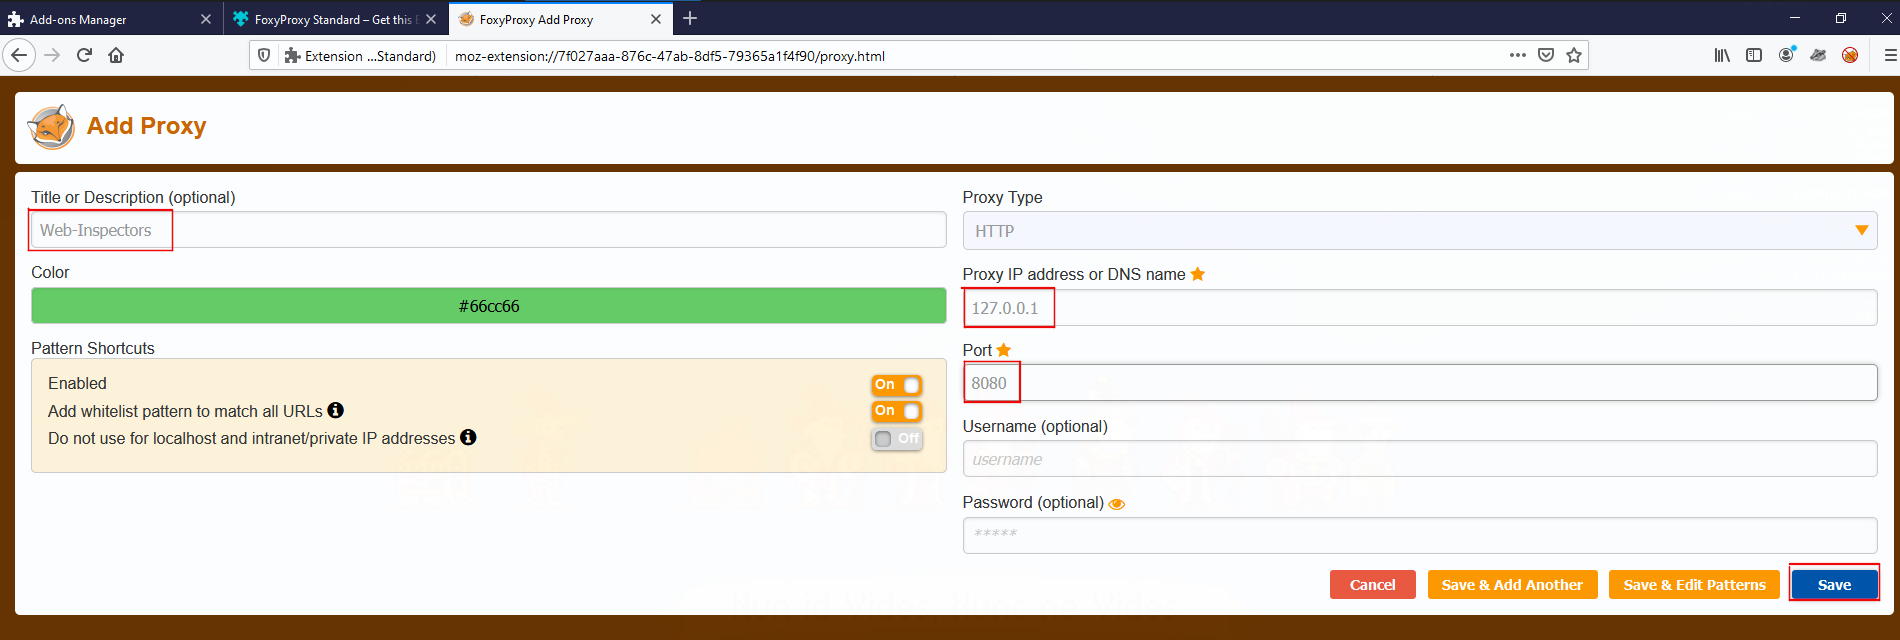
Once you’ve installed Foxy Proxy, set it up to talk to Burp or ZAP; both of these are the same settings - IP Address 127.0.0.1 (your localhost) and port: 8080.
Once this is done, I’d also suggest deciding if you’d like to add any developer tool add-ons, or configure the browser to auto delete cookies, never save passwords etc. These settings can cause minor issues down the line.
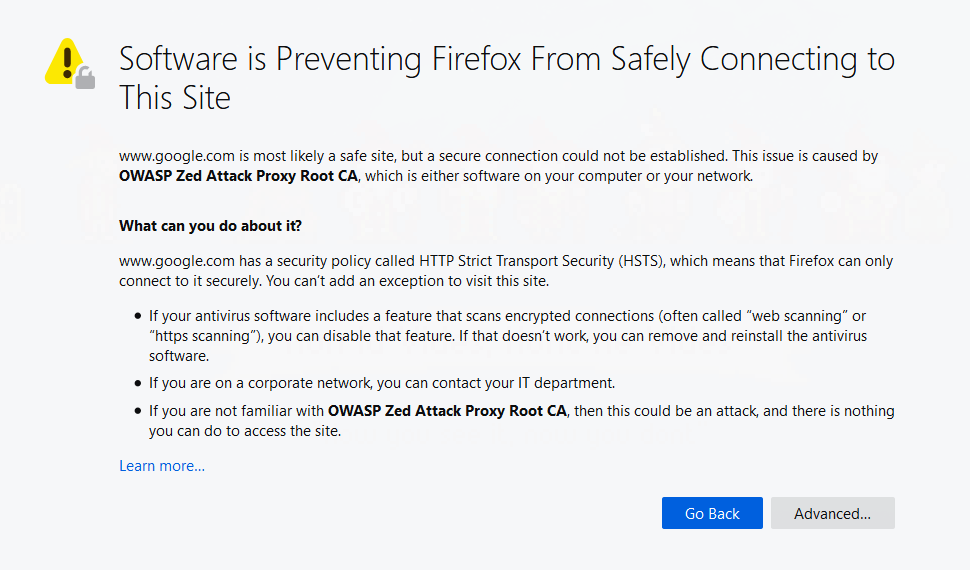
The last step is to configure your proxys certificate in your browser; you need to do this becuase your proxy will turn all that lovely https traffic into http so it can inspect it, before re-https-ing it to go back to your browser. Your browser is clever and thinks it’s being hacked (this is good - good browser!), but we’re not, really, so adding the proxy’s certificate to our browsers list will get rid of all those horrible danger warnings.
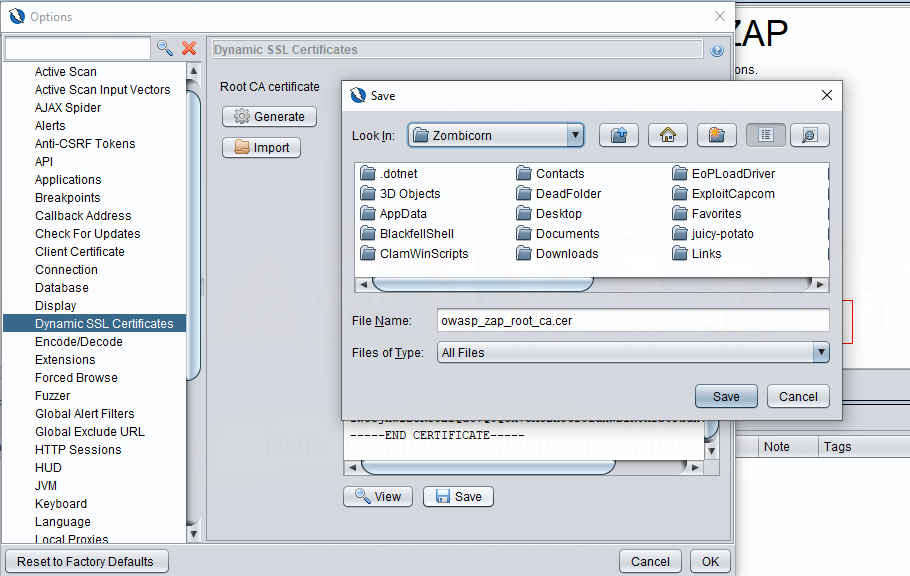
This is simple enough to do and BurpSuite Documentation covers it nicely. The process in ZAP is identical once you’ve saved your certificate, the export process in ZAP is as follows:
- in the menu ribbon go to Tools > Options.
- Go to Dynamic SSL Certificates in the left pane.
- Press save and save the file somewhere sensible.
- Follow the import process as per the Burpsuite link.
Once you’ve imported your root CA, your nasty errors should be gone, woo!
That’s it!
That’s your setup, turn on your proxy and fire up the browser; your last setup points are to hit the little fox icon and switch to your proxies option.
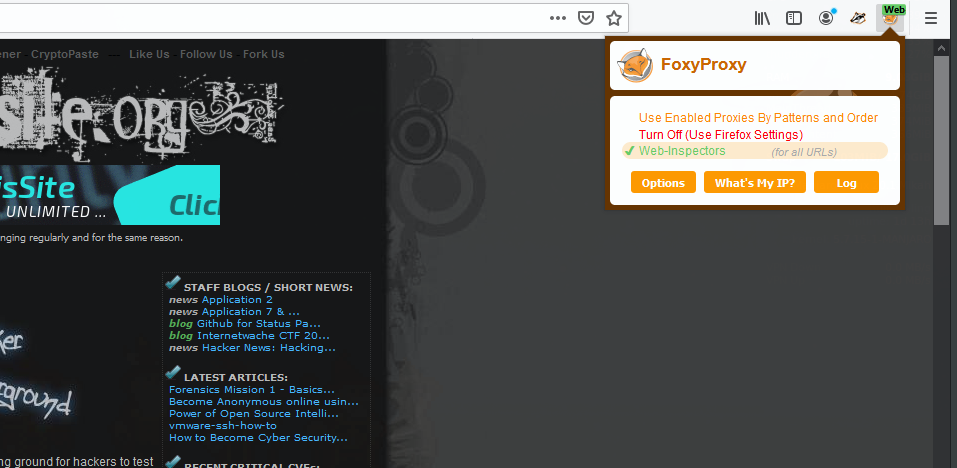
You should now be able to browse on to any site and see traffic in your proxy. Nice.
Burp don’t work
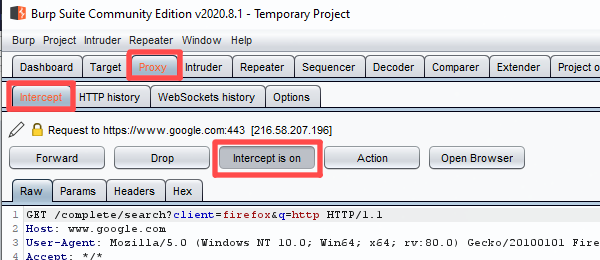
A quick snagging note, if you’re using Burp, you may find your traffic isn’t being forwarded and you may see some errors on the front tab of the application.

This initial nothingness is because Burp starts in intercept mode, meaning it blocks all web traffic until you give it the green light; this is intentional, but simple to turn off, just head over to the intercept tab and toggle it off and you’re good to go.
Now what?
Well now it’s the small task of learning to test!
Both ZAP and Burp have good documentation, OWASP are the Open Web Application Security Project, so underestandably, they have lots of great resources for you:
- ZAP In Ten, a video series around ZAP.
- The OWASP Top Ten, the infamous ‘top ten’ web application security risks seen in the wild.
- OWASP Juice Shop, a vulnerable web application to train against.
- The Web Testing Guide, a methodology for web testing.
In addition to the above, I’d suggest starting with their introductory material on ZAP in the OWASP Academy, especially if you’re just starting out.
With all that said of OWASP, PortSwigger have one of my favourite intro-to-web platforms in their Web Security Academy; it’s got free exercises you can go through online and the guidance and hints are spot on.
Example?
Ok, Ok. Let’s do an example. I really like the Portswigger Academy, so let’s try an SQL Injection exercise available on that site. I’ve created an account, logged in and headed over to the challenge area. Beware, spoilers!
I’ve chosen the first injection challenge:
https://portswigger.net/web-security/sql-injection/retreive-hidden-data
Heading over there and hitting start challenge will redirect you to a very long, complex URL, which is your testing playground.
I’m using ZAP on Windows, with Firefox; I’ve made sure my proxy is activated and started the challenge, but to make sure our testing is within scope, we should first add the site to our context in ZAP (or scope if you’re using Burp).
Now, browsing around the vulnerable site, we can find some category views, which the challenge brief tells us are vulnerable, we can see what we’re dealing with.
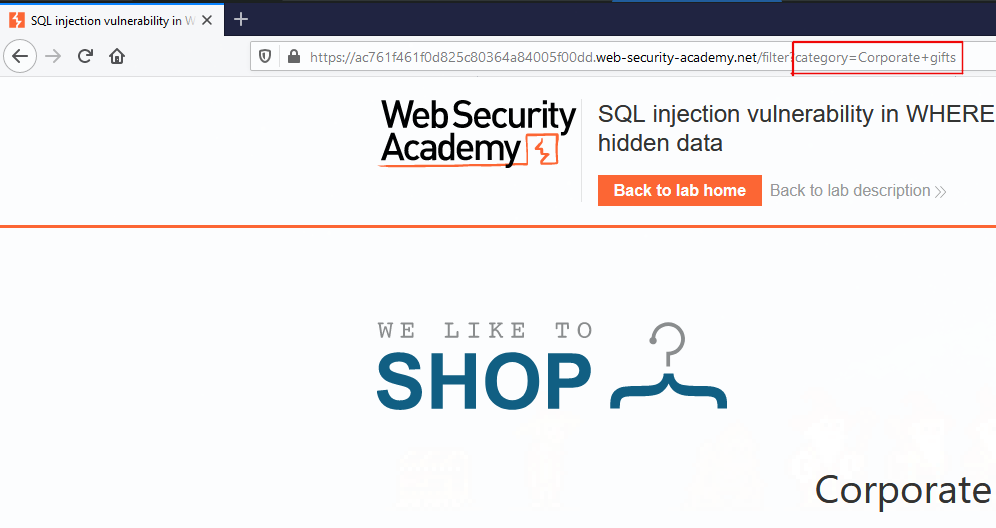
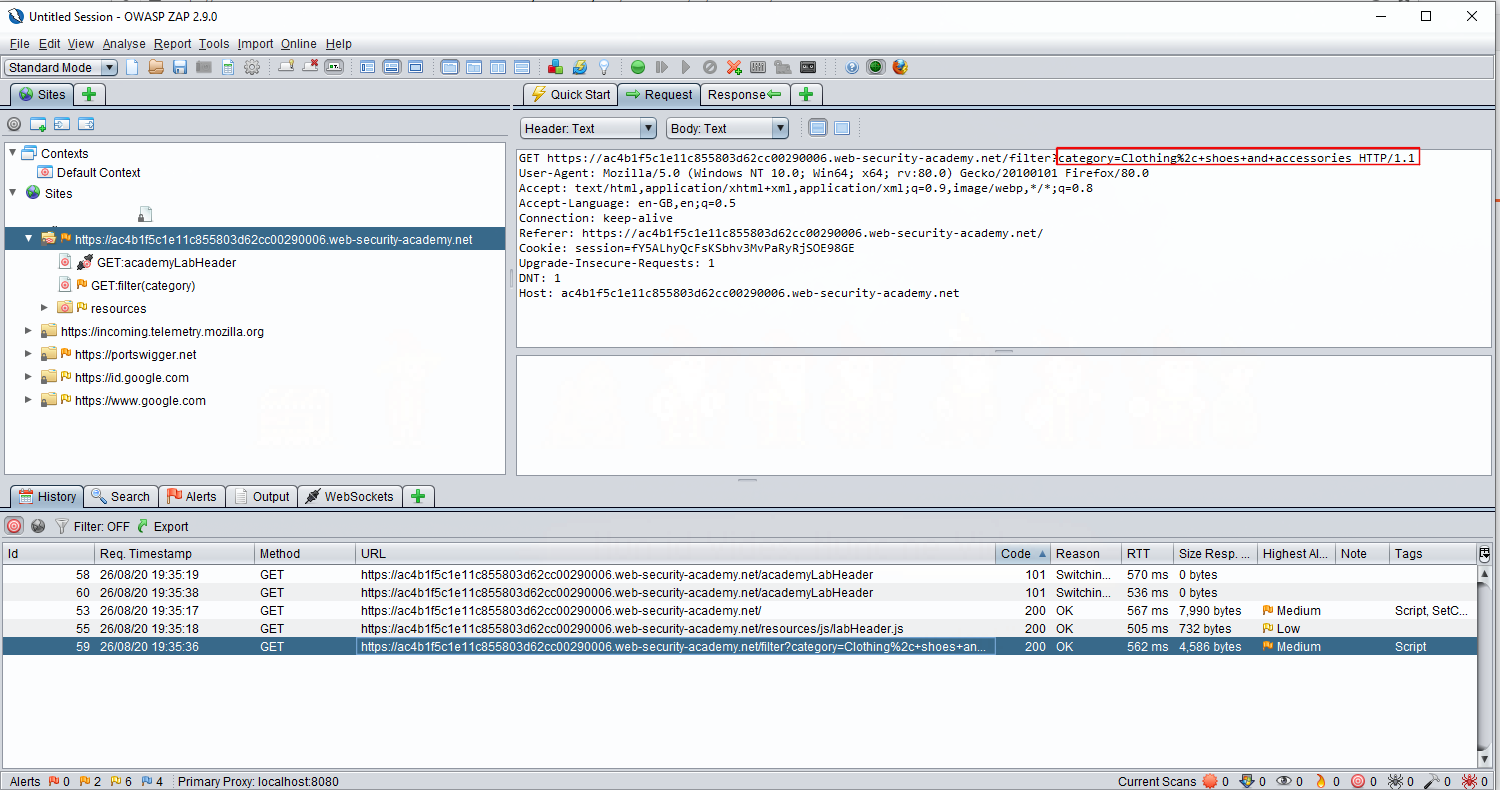
Now we’re going to use ZAP to help us find the SQL injection vulnerability on this page; there aren’t really any inputs on the page itself, but notice that the category parameter in the URL is passed to the application, this is a valid input to attack. We can look at this request going up to the server in ZAP; this is where the proxy makes its money!
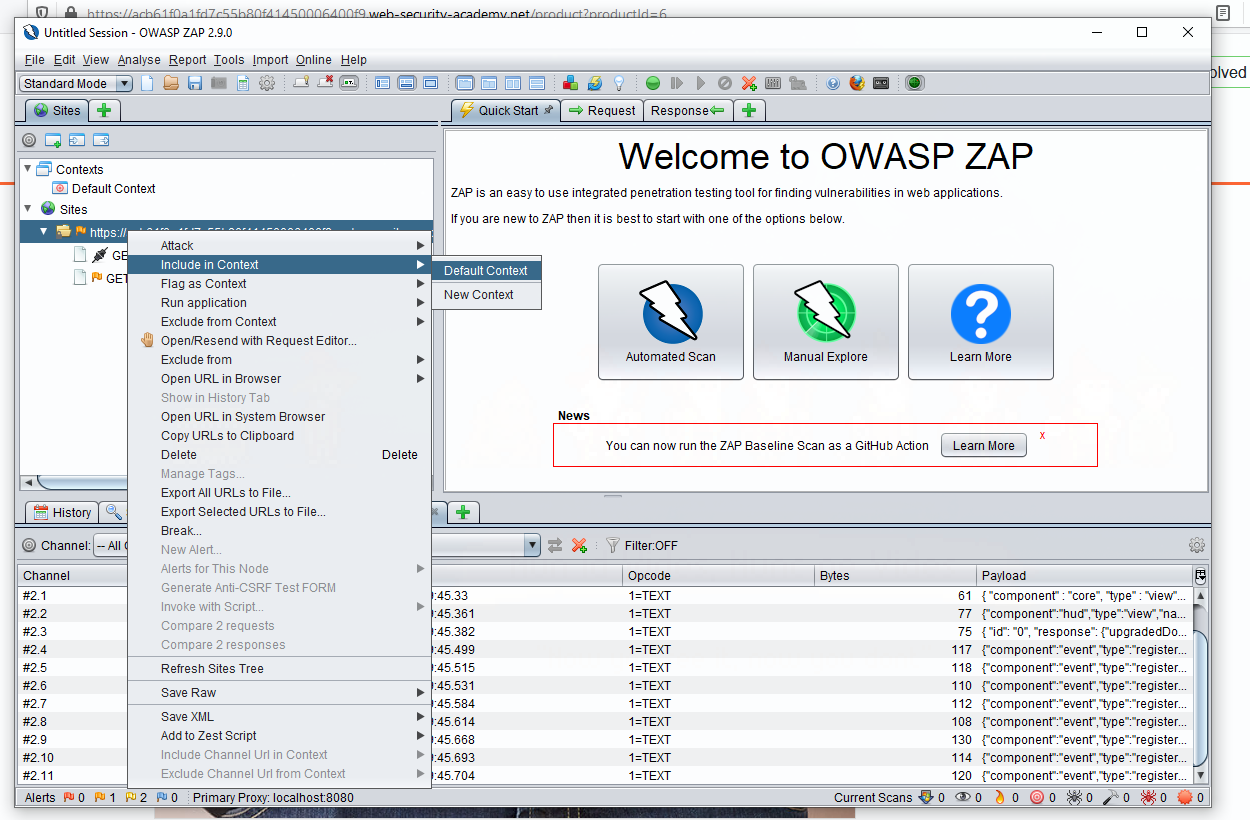
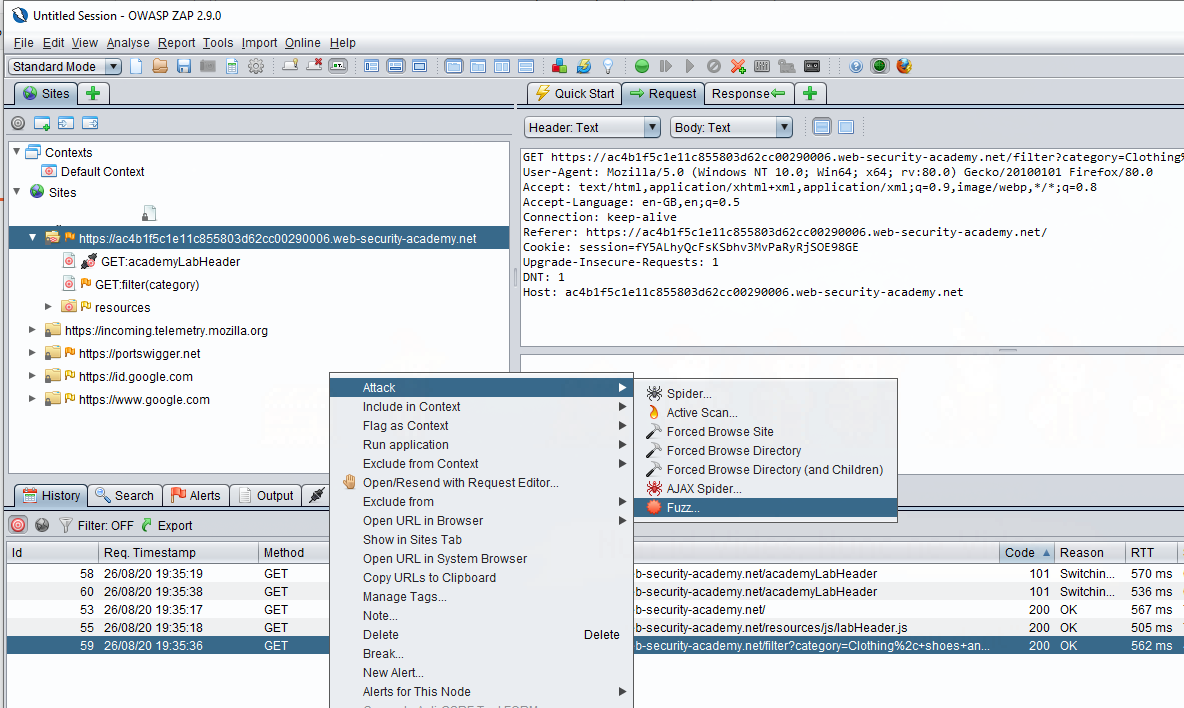
ZAP’s fuzzer allows us to attack this category parameter automagically; if using Burp, we could carry out a similar attack using send to intruder. In Zap, simply right click the request you want to attack, press attack, then fuzz.
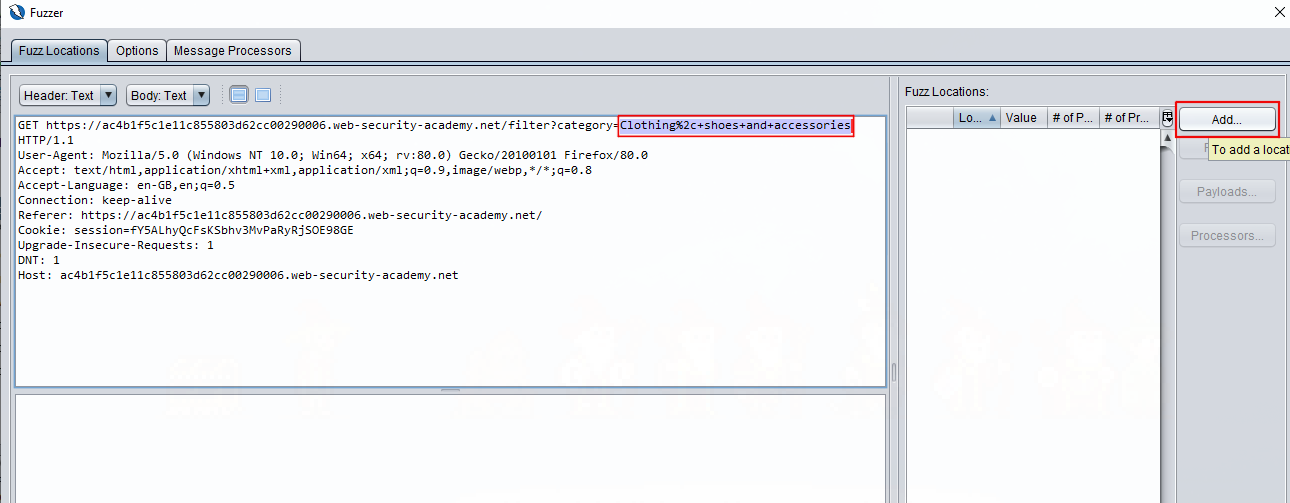
Opening the Fuzz dialogue against the request in question, we’re presented with the request again; in this window, we can configure how we want to alter the request. To get started, we select the part of the request we want to edit and press add.
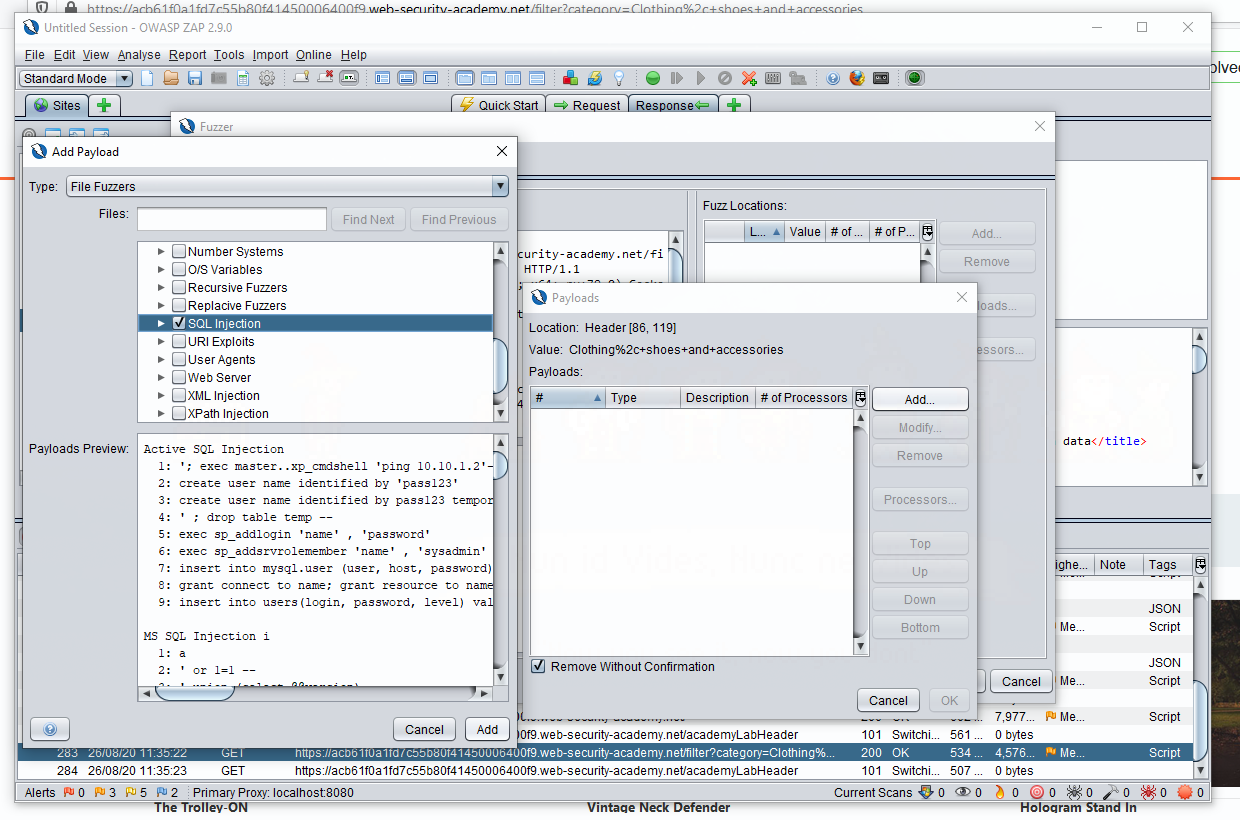
This will open more windows (!) which allow you to configure how that part of the request will be fuzzed. We know we’re looking for SQL injection and ZAP comes pre-configured with lists of known SQL injection strings; we’ll configure this fuzzer so that the valid category gets replaced with these SQL query strings one-by-one.
When the payload window opens, press add, now the Add payload window opens and we have a choice of fuzzer type; we can do powerful things here, but to keep things simple, we select file fuzzers from the first drop-down. From here, expand out jbrofuzz and scroll down to SQL Injection, check that box and press add.
Now when we start the fuzzer, that text we highlighted earlier will be replaced with everything in that SQL Injection list, one entry at a time; we could add more payloads here to try other injections afterwards, but we’ll leave it at that for now.
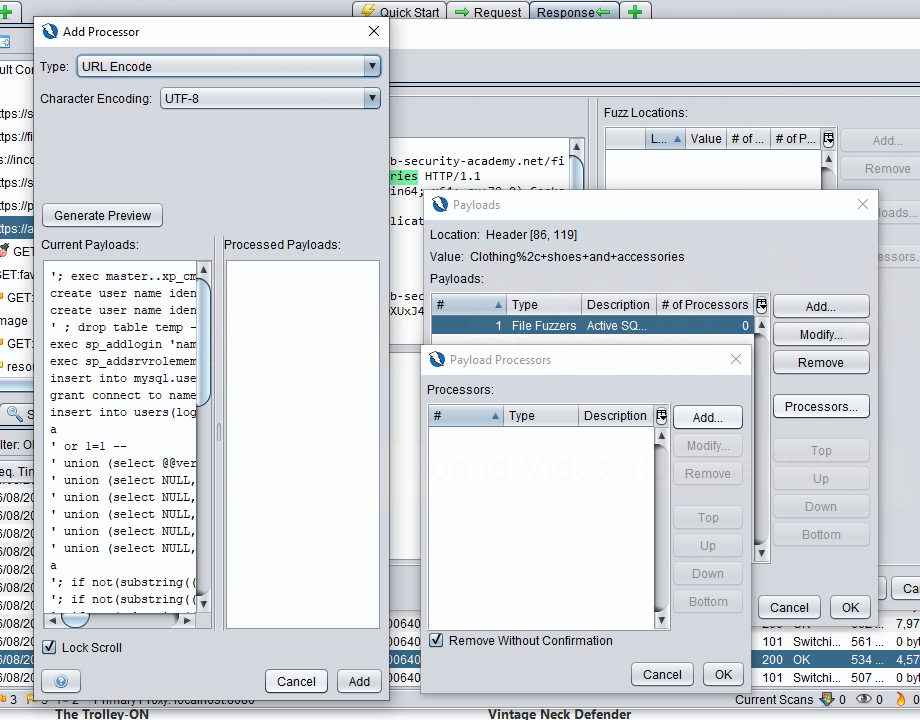
Now ZAP won’t URL encode these payloads, meaning that if there are special characters in that file fuzzer list, we may end up sending a malformed request and missing a finding (Bad!); to get around this, highlight the payload you added and press processors. Again, press add once more to open the Add Processor window, URL Encode should already be selected; just press Add and the processor will be applied.
Now OK your way out of everything and press start fuzzer; this should run for a few seconds. Once it’s done, sort the results pane by response size and you should se some that are significantly different from the rest!
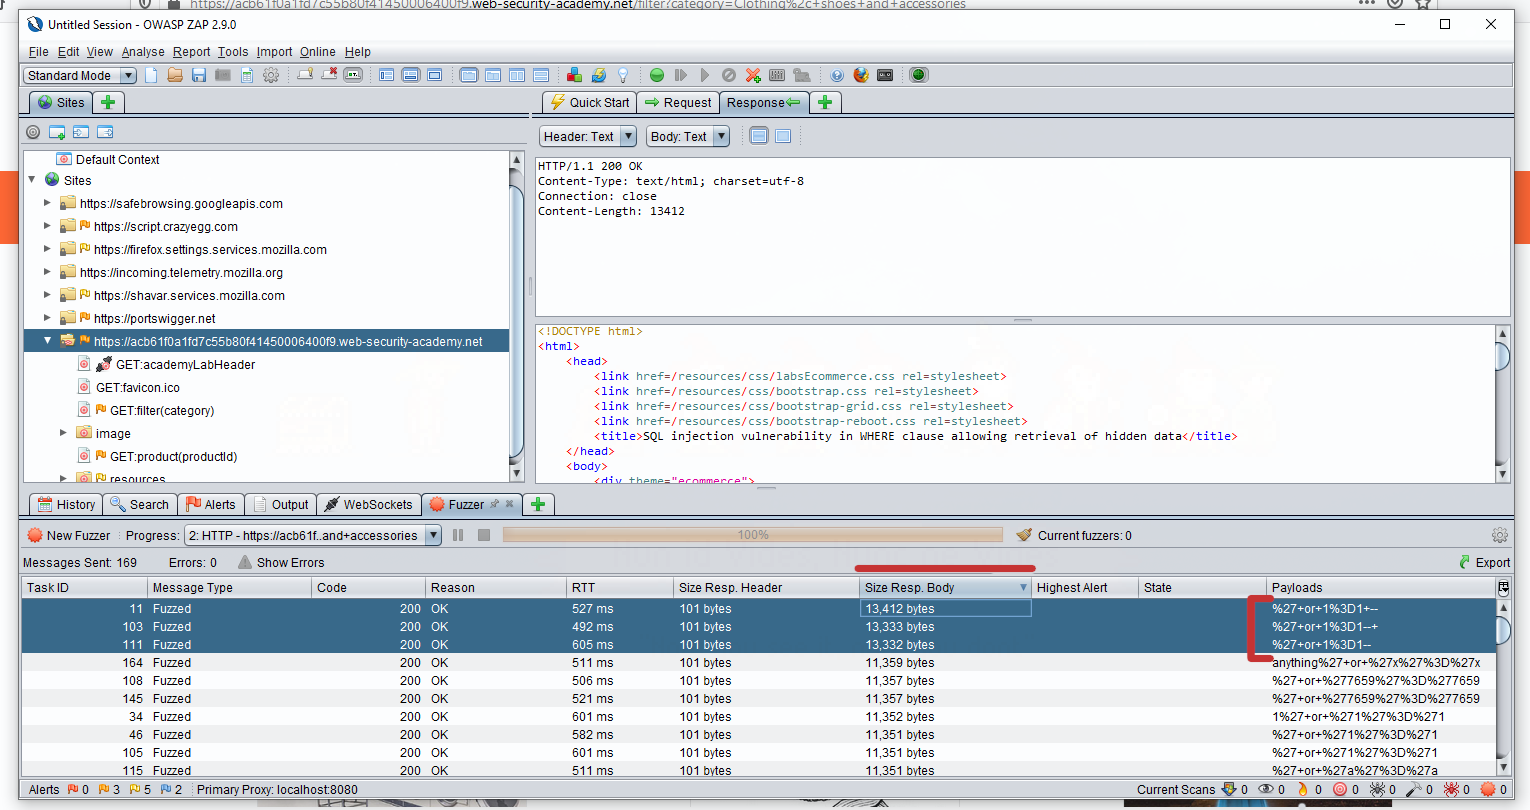
Inspecting these responses, we see that they include some text to the effefct that we won!, so congratulations, you have solved the lab!
It turns out that the solutions were all variations on ’ or 1 = 1;–, a classic SQL injection. You could have found this manually, but you just did it using an automated tool in a way that will allow you to succed if the challenge is a bit tougher.
Taking it to the next level
Now what? Well keep testing!
Why not progress with PortSwigger Academy or complete a challenge of your choosing? Use your mini lab to learn about different web vulnerabilities, or push the capabilities of your proxy to the next level with some of the proxy tutorial resources we looked at.
In addition to your proxy, there are lots of web testing tools you can get into using. You can simply install tools as you discover you need them, or alternatively, if you’re enjoying this whole thing, using a Kali Linux Virtual machine as I explained in my Previous Lab Post will probably be the easiest way to get up and running with a complete suite of testing tools quickly.
That’s you, stay safe, always have authorization and happy hacking!