Point Dexter’s Lab
In the last post we discussed how to start your security learning journey. Hopefully you know why you want a lab and have an idea of what you’d like yours to do; let’s cut to the good bit, making it.
Building a lab isn’t just a step towards learning, it’s part of it; treat this as a chance to learn and hone some of the skills you’ll be developing in your lab.
What we’ll be building
I’m going to walk though building a virtual lab in this tutorial; I’m going to use wholly free software and install some basic virtual machines to play with. This is just an example though, your lab can look however you want; I’ll discuss alternative and customisation options later on in the article; you are free to substitute these (or other) alternatives wherever you like.
What is Virtualisation?
Virtualisation is a large topic (Wikipedia may help here), but for our purposes, all we need to know is that it’s like running a computer within a computer. People work with Virtual Machines all over the technology industry and throughout this post, I’ll often shorten Virtual Machine to VM.
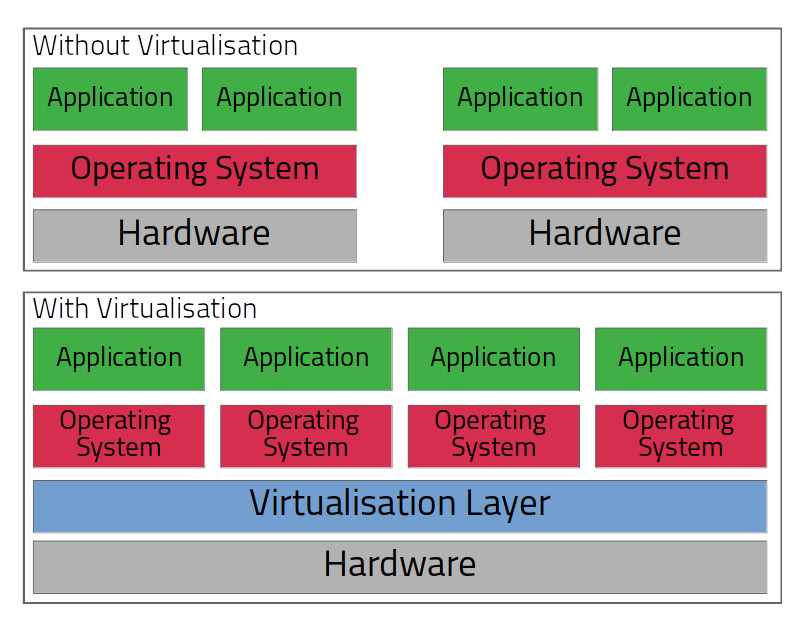
Why bother with VMs? In a nutshell, they give us hardware independence (you can run many machines on a single host), they give us isolation (you can manage workloads, processes, files and memory independently), and they give us portability (VMs can be moved and managed on the host as easily as a file). VMs can be networked virtually, which lets you control how machines talk to each other, the host, or the internet, all without the need for any specific networking hardware. As if that wasn’t reason enough, you can back up and restore VMs with a single click.
Convinced yet? Well there are downsides to Virtualisation; the only one you really need to think about is performance, you’ll need good hardware to virtualise an attacker and a victim machine at the same time (we’ll cover that later!). You should also note that the separation you get between VMs and hosts isn’t as good as using separate physical machines, as VMs can ‘escape’ if exposed to certain (rare) exploits and bugs. If you ever need to worry about that, you should know about it.
Design of This Lab
The lab I’m building would look like this if I made it of physical equipment:
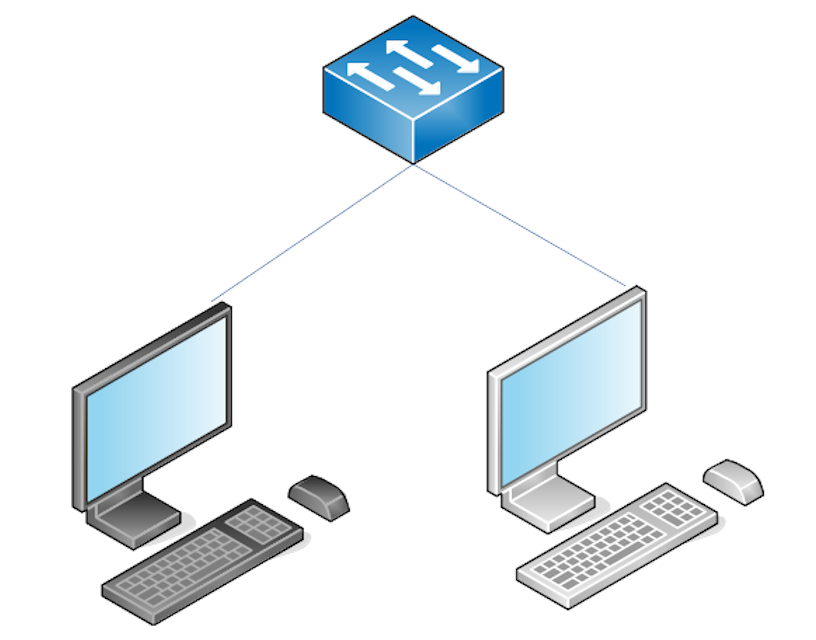
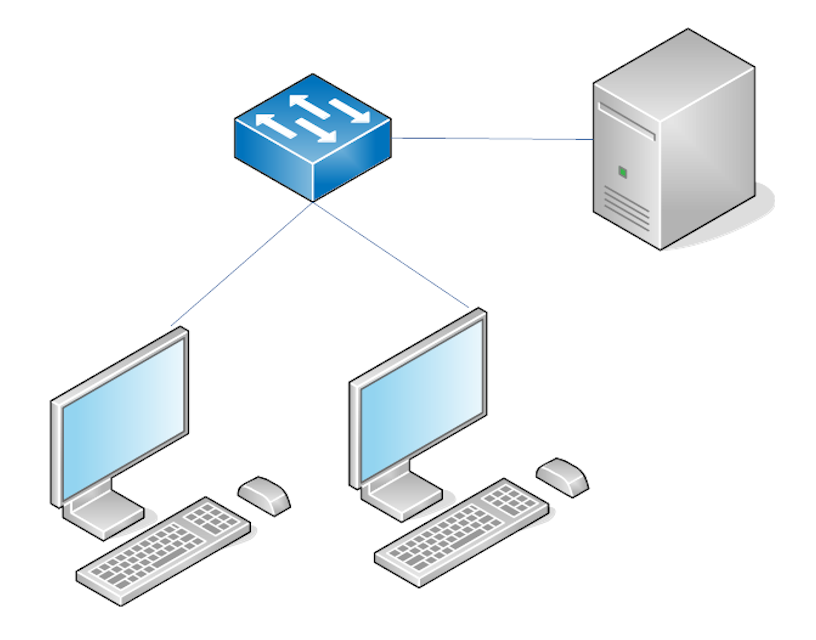
In this simple lab setup, our attacker and victim can communicate, allowing us to simulate attacks in a safe environment. If I didn’t want an attacker-victim setup and instead wanted to learn some basic Windows administration, my lab might instead look like this:
You may be beginning to understand that the possibilities with a lab setup are endless, what you build is totally up to you! You can add and remove machines to learn different things.
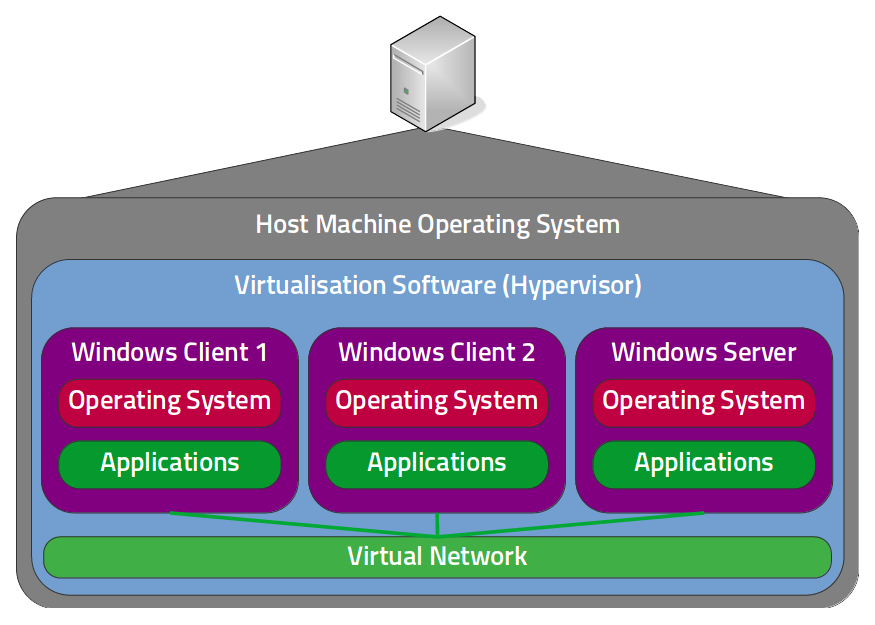
Whilst these diagrams are technically what we’re aiming for, the lab in this walkthrough won’t have physical machines and switches, it will use virtual machines and networking. The below design is logically equivalent to the first physical lab diagram, but is configured using virtual machines instead:
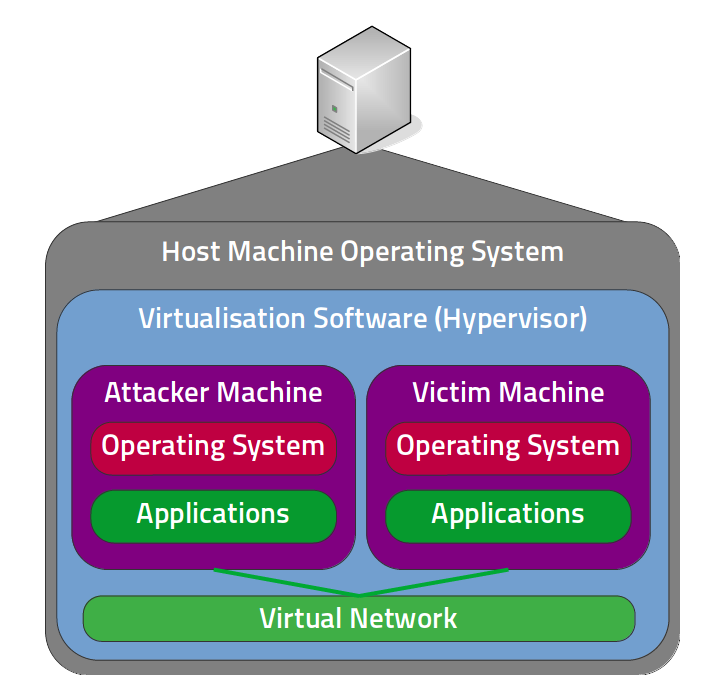
This requires a lot less equipment! In fact, now it’s only one machine; the virtual machines can be created and destroyed at will (or moved to some storage media - handy). With this setup, we can manage our communications via virtual networks, removing the requirement for networking equipment, and if you use a laptop, the whole thing is now portable!
A design exercise for the reader
If you want to think about this way of working further, try to picture the equivalent virtual architecture diagram for the ‘physical’ windows lab we saw earlier.
Can you picture or sketch your virtual equivalent to our simple Windows lab?
Hopefully you didn’t sneak a peek, below is how I would draw this out:
As you go further in this article, I hope you’ll find that using this VM based approach gives you the flexibility to learn whatever you want.
Let’s Build it!
So now you know what our overall architecture is, let’s get down to making it happen!
Get Hardware

Hardware selection isn’t usually an option for most people this guide is aimed at, as they tend to be working with what they already have; that said, there are some hardware considerations you’ll need to make to be successful with this lab design, so everybody read on!
Hardware Virtualisation
First and foremost check that your hardware & BIOS supports hardware virtualisation and enable it in your BIOS; this is a technology that accelerates the performance of your virtual machines considerably. Whilst it’s possible to run without this, you’re gonna have a bad time…

Hardware Resources
Virtual Machines will use up every kind of resource your host needs; you can assign limits to these as you set up VMs, but you’ll need to make sure your host has enough overhead to run all it’s VMs, as well as the host operating system.
I argue that RAM is the most important requirement for your virtual lab; the VMs we use will be sucking RAM from the host machine, by the time you’re running a 4G RAM attacker (realistic) and a 1G RAM victim (optimistic), you’ve hit 5G without anything for your host OS.
Processing power is my next most important requirement, followed by storage speed and space; whilst some people use removable media for managing storage of multiple VMs, a good amount of storage will make life much easier. Dedicated graphics isn’t a hard requirement, but will make your experience a little smoother, spend on this, but do so last.
I like to give real advice to readers, so here it comes (careful what you wish for!) - for this lab setup (in 2019) I suggest people use a minimum of 8GB RAM, something like an i5, or A8 processor, and aim for 500GB hard drive space, slipping to 256GB at a push (especially if this means you get to use an SSD). If you have cash leftover, spend it following the preferences I just described above, or on non-upgrade-able components (usually processors if laptops), with a view to upgrading the rest in future.
If these sound a little bit out of reach for you, don’t worry!, I have some options for you later in the post.
Hypervisor Installation
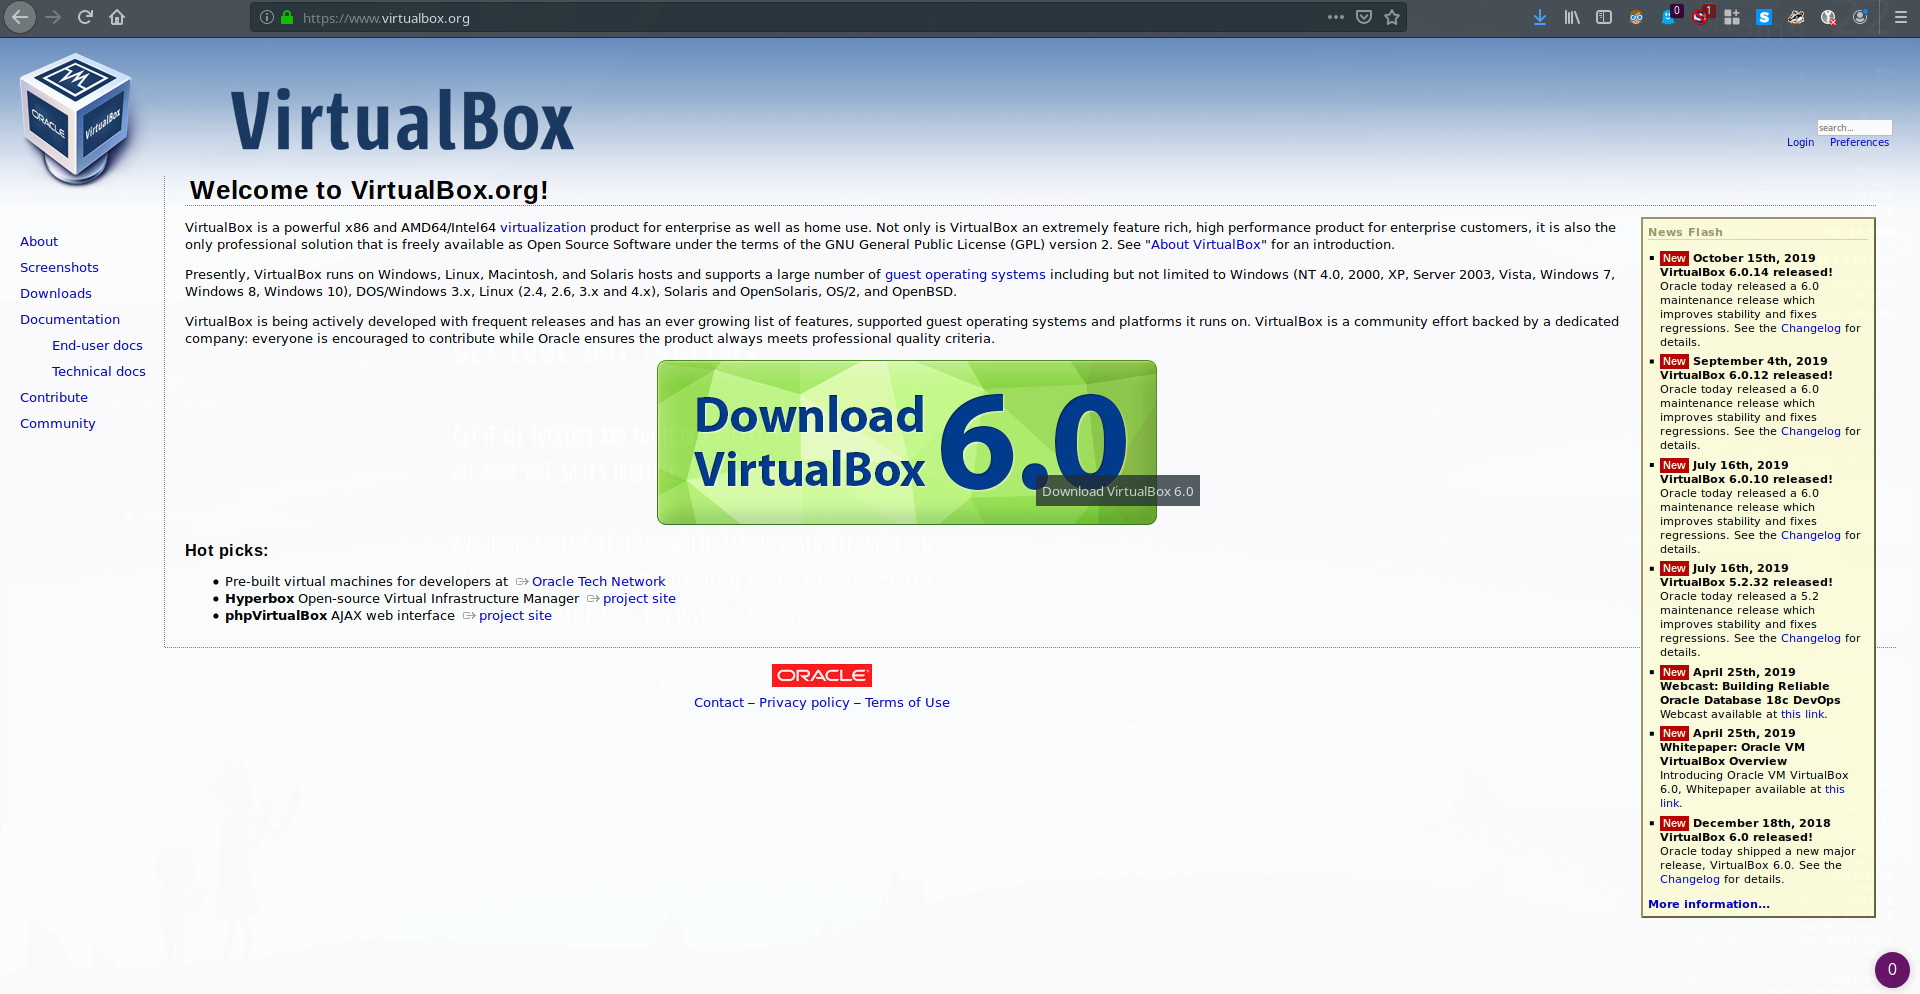
Your Hypervisor will run and manage your VMs; there are many options available to you, but I like free and easy, especially if you’re just wanting to dip your toes in and try this lab business! You can get Oracle Virtualbox for free and they make install incredibly easy.
Installing VirtualBox on Windows
Installing on Windows is easy! Head over to the VirtualBox Downloads Page and get hold of the installer.
Once you have the installer, it’s good practice to verify its integrity; you can do this by opening a PowerShell prompt and typing the following:
PS C:\> Get-FileHash -Path .\<path_to_your_file> -Algorithm Sha256
Compare the output from this command with the hash list for the version you’ve downloaded; if the hashes match, you’re good to start! If you’re feeling fancy, you can do this:
PS C:> if ( $( $( certutil -hashfile <path_to_your_file> sha256)[1] -replace " ","") -eq "<your_hash_value_here>") {echo "Hash is good"}
However you run your hash check, once you’ve verified the file integrity is good, run the installer and take the usual next>next>finish approach. You’re done!
Installing VirtualBox on Linux
If you’re using a Linux host machine, chances are that you probably don’t need me to tell you how to install VirtualBox, but just in case (and only for the really simple installs), here we go.
If you’re running Ubuntu or a derivative, good news, you have this very probably in your repo, so you can run:
~$ sudo apt install virtualbox
And you’re done! Have fun.
If you’re running Arch Linux or a derivative, good news, you also have this in your repo, so you can run the following, replacing
~$ sudo pacman -S virtualbox
~$ echo "vboxdrv" | sudo tee -a /etc/modules-load.d/virtualbox.conf
~$ sudo usermod -aG vboxusers <user_name>
This is slightly longer because you had to do some module loading and group configuration changes; this saves you having to load the vboxdrv kernel module every time you run virtualbox, because…

If you’re running almost anything else, or if that didn’t work, VirtualBox publish really nice, exhaustive installation instructions for various Linux Distributions and I recommend you follow them (I’d be a bit concerned if you didn’t take a look anyway).
VirtualBox Extensions
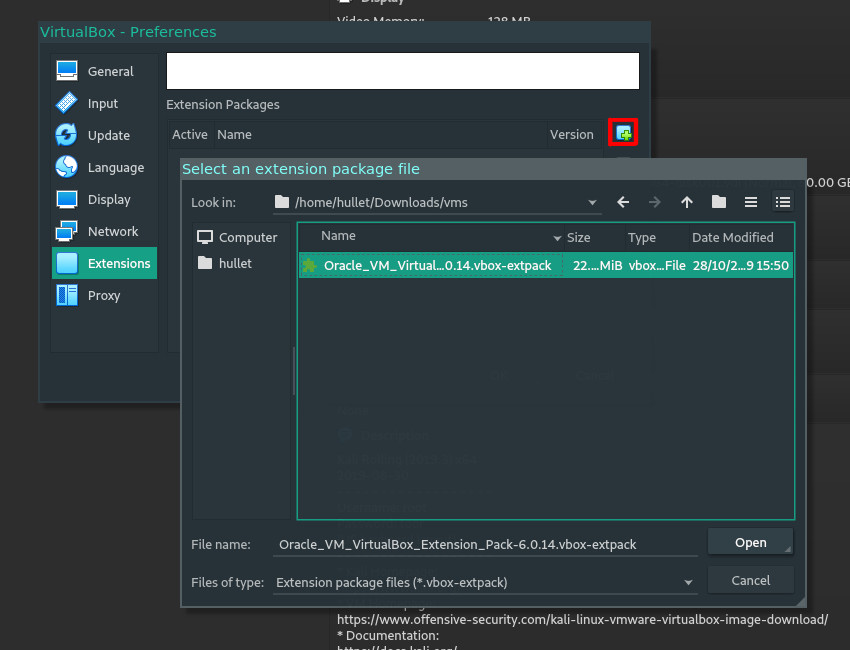
However and wherever you installed VirtualBox, You’re probably going to want the extension pack; this isn’t essential, but adds a lot of functionality I find quite useful. Read up on the documentation and decide whether to go for it.
If you choose to install the pack, it’s easily accessible on the VirtualBox Downloads Page:

Just download the extension pack and import it directly from within VirtualBox, by navigating to File>Preferences>Extensions and pressing the green plus to add your new file.
Once you follow the wizard, that’s it, you’re winning!
Get some Virtual Machines!
When VirtualBox is installed, you want some virtual machines (VMs) to actually run in it, otherwise you’ve installed a glorified system performance hindrance.
Attacker VMs
First, we’ll install our attacker machine and configure it; most people start with Kali Linux, a security focused distribution, and we’ll be following the trend. The good folks at Offensive Security prepare a Kali Virtual Machine you can download directly, but make sure you pick the VirtualBox version!
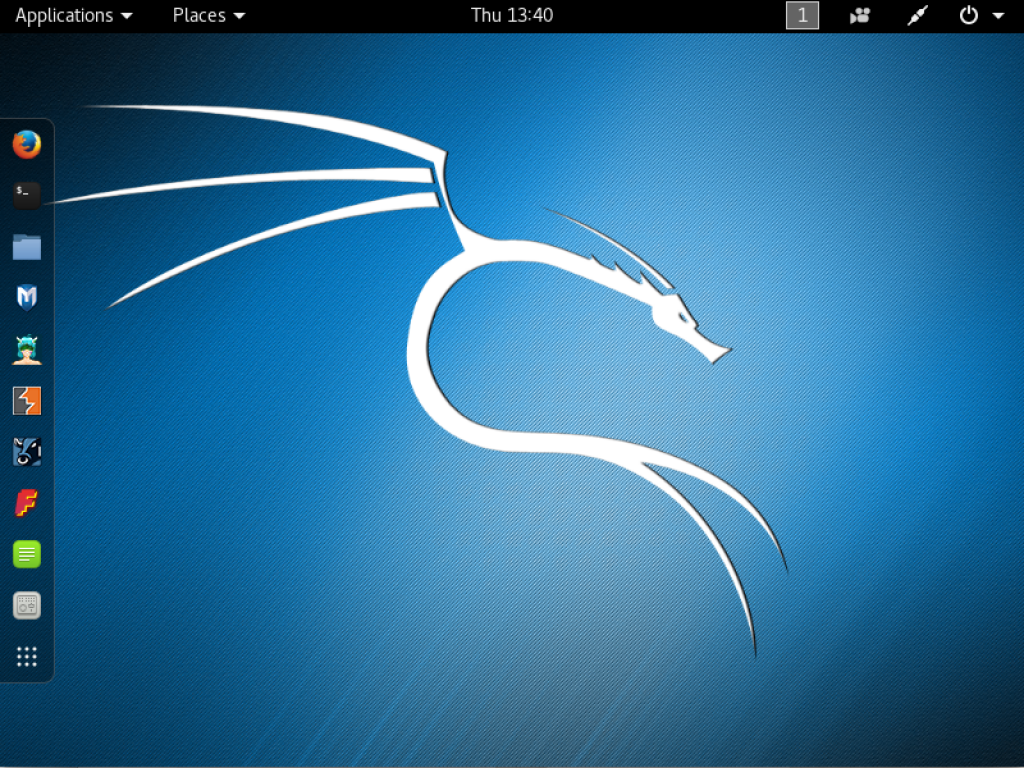
Kali Linux is a Linux Distribution, preloaded with a huge number of tools and resources, designed specifically for Penetration Testing
Download these files and check the integrity of the downloaded files; this is worth doing for the time it takes to complete, as it gives us some protection from corrupted or tampered download links. You may even want to follow the more extensive GPG based verification on the Kali Downloads page, if you have GPG installed. Otherwise, SHA256 hashes are usually available and can be generated in PowerShell:
Get-Filehash -Path./<insert-path-to-file-here> -Algorithm sha256
Or if you’re on Linux, Bash:
~$ sha256sum .<insert-path-to-file-here>
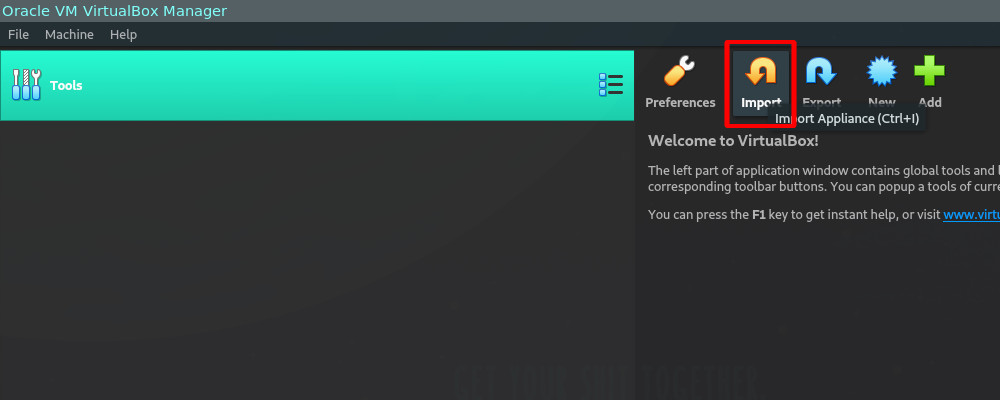
If the hashes match those on the Kali Download page, then head back over to VirtualBox; next up, we’ll import the file we just downloaded, to do this either press Ctrl+I, press the big orange arrow on the VM Manager panel, or open the file menu and go to ‘import appliance’.
Then, it’s a simple case of browsing to the downloaded file and selecting it for import.
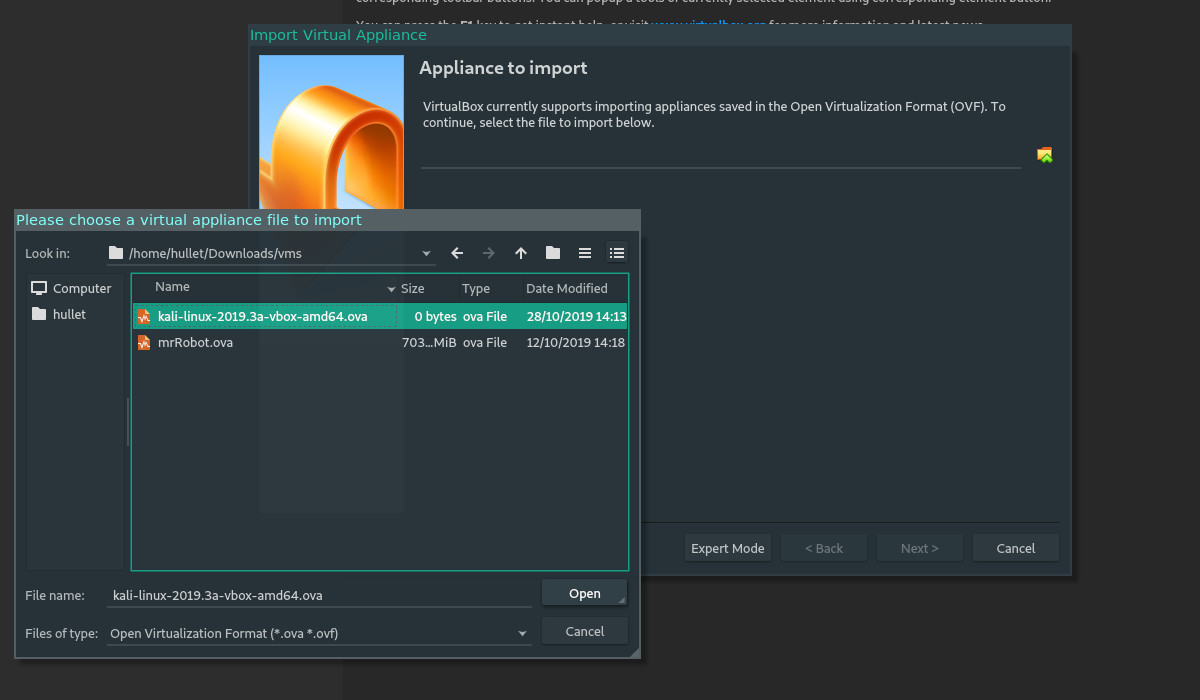
Follow the wizard through, pressing the ‘Import’ button, which will commence the importing of the VM. Once you have your VM imported, you may want to take some time familiarise yourself with the VM settings; you’ll notice below that the default RAM is 2GB and the default processor configuration is two cores.
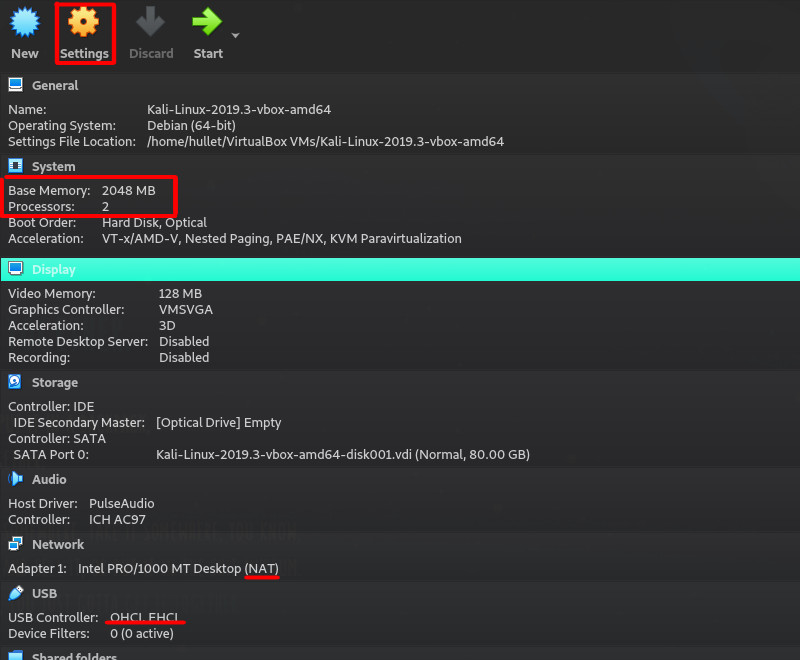
Kali will run far better with 4GB of RAM and 4 cores, if you can stretch to that with your hardware, so if you want to change these, press the settings wheel in the VM manager window. You should also take note of your network and USB settings; these are fine as default for now, but you may want to remember they’re there as you may need USB 3 support at a later date. More on issues with NAT adapters later.
Now you have an attacker VM! Power it on by pressing the big green ‘Start’ button, log in as root, with ‘toor’ as the password and you’re done!
Victim VMs
The next step is to get something to attack; the good news is that you already know how to import VMs, so all you need to do is download a victim machine.
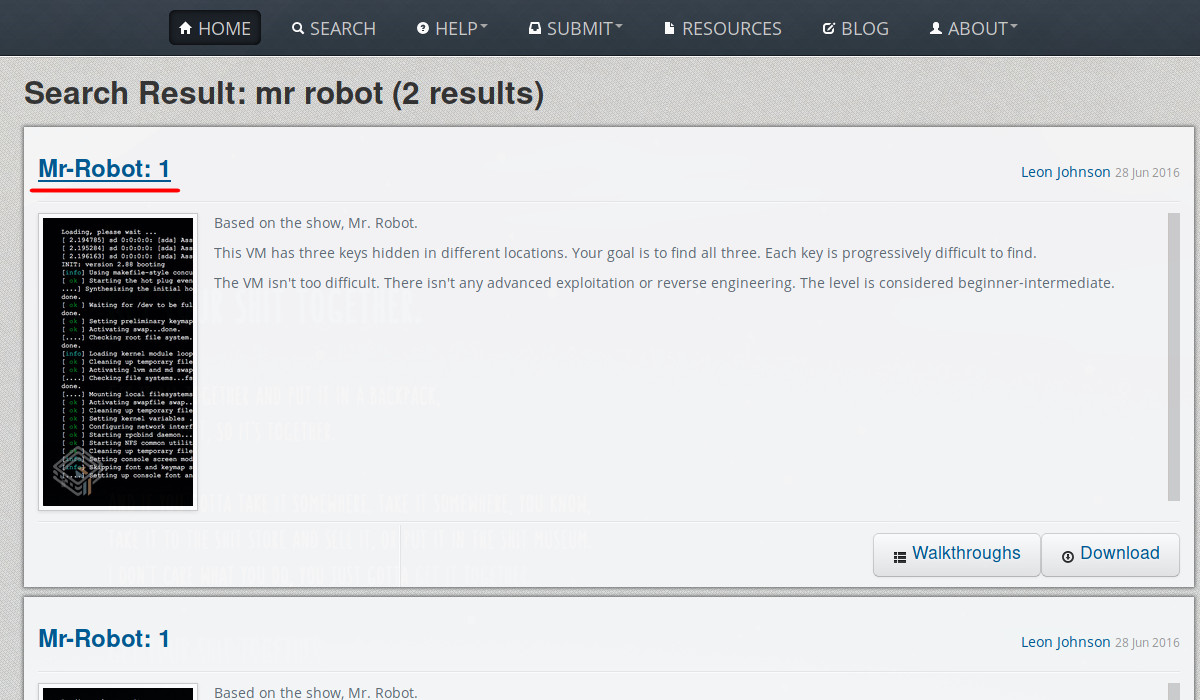
I like VulnHub VMs and I recommend looking for ‘easy’ VMs to start; a particular favourite of mine is ‘Mr. Robot’.
All you need to do is download the file and verify checksums as we did earlier, then import it; once you’ve done that do not turn it on yet! First, you should select the VM, hit settings and configure the networking as in the next section; once done power it on and you’ll save yourself some time getting things to talk to each other.
A Note on virtual networks
VirtualBox provides virtual networks for your VMs to use; you can select which one you want to connect your VM to and VirtualBox will handle the rest. There are several networking modes, including custom, but the three you should be most interested in are bridged, NAT and ‘host only’.
Bridged networking will put the VM on your network as if it were a real machine, this is bad if you don’t trust the network you’re bridging out to, but it’s good in that it’s simple, comparatively easy to troubleshoot and doesn’t use NAT (read on).
Host only mode is ‘safe’ compared to bridged, it lets you configure a virtual network in your machine that will allow your VMs to talk, but not reach the outside world. This is great if you want to avoid exposing vulnerable machines to any external physical network and also protects you from making errors (like attacking some public machine!) while you learn.
Network Address Translation (NAT) is another complicated topic, but all we need to know is that it translates network addresses using big tables of information. Using a NAT adapter will hide a VM behind your host’s IP address, this is good if you don’t want it to be visible to the wider network, but has a considerable downside - those big tables of information can fill up when we start using our tools.
NAT is fine for updating VMs or simple manual testing, but if you keep it configured while you use tools, you’ll probably run into phantom problems, dropped shells, lost packets, or worse.
Still confused?
Here’s the one-liner for what to do with network adapters: all vulnerable VMs should go host-only after import; bridge Kali for updates and then before you start work on a VM, switch Kali to host-only too.
As you learn and use your lab more, you’ll develop your own ways of working, but that will do for now!
Testing & Troubleshooting
After configuring all the networking, you have a lab!
Now what? Well before we start proper, let’s check it all works. I’ll walk you some tests you can carry out from within Kali, but they’ll help across all machines you install. Most focus around networking, since this is the area that trips most people up when configuring this lab.
Testing Internet Connectivity
From Kali, we’ll open a terminal window and start simple, ping out to the internet.
~$ ping -c 5 1.1.1.1
This address 1.1.1.1 is Cloudflare’s DNS service; it responds to ping and has a high availability, so it’s a good standard for us to use to test our connection. The argument ‘-c 5’ tells ping to wait for 5 replies before stopping.
If this is working, you’ll get something like the following output:
~$ ping -c 5 1.1.1.1
PING 1.1.1.1 (1.1.1.1)56(84) bytes of data.
64 bytes from 1.1.1.1: icmp_seq=1 ttl=60 time=12.6 ms
64 bytes from 1.1.1.1: icmp_seq=1 ttl=60 time=12.6 ms
64 bytes from 1.1.1.1: icmp_seq=1 ttl=60 time=12.6 ms
64 bytes from 1.1.1.1: icmp_seq=1 ttl=60 time=12.6 ms
64 bytes from 1.1.1.1: icmp_seq=1 ttl=60 time=12.6 ms
If it’s not, you may see all sorts, including this:
~$ ping -c 5 1.1.1.1
ping: connect: Network is unreachable
Here we get to solve some fun problems!
Remember that this is a network layer test, so you need to check Physical, Data and Network layer connectivity. Is there a physical network present (if in bridged mode)? Is an adapter connected to the VM? IS the adapter of a type that allows internet connectivity (bridged/NAT)? Does Kali detect the adapter? Are there any settings hard-configured in Kali? Is DHCP enabled and working? Have you got a valid IP address for the network you’re supposed to be on?
Ask yourself questions like this, google and if all else fails, you can always ask someone!
Testing DNS
Now we know the internet is reachable, let’s check if DNS works. DNS is something that can make your VMs misbehave, even when the network is present and working. A really simple test to carry out is to repeat the ping test, but with a hostname:
~$ ping -c 5 google.com
If you get a successful ping output like last time, it seems like DNS is working for you! If not, then you may want to try checking your resolvconf DNS settings:
~$ cat /etc/resolv.conf
If you still can’t get a successful ping, ask yourself whether DNS traffic can reach the internet? Have you got some firewall, NAT or other ‘cleverness’ in the way? What if you reconfigure DNS via resolvconf to something like Cloudflare’s 1.1.1.1? Are you using a VPN service on your host? How is that configured to use or manage DNS?
As before, keep googling and working on the problem, at least you know it’s DNS!
Testing Client-Client Communications
The last networking test I like to do is to quickly ping test another client. This is the same as the initial ping test, only now use the IP address of your Mr robot VM. If you can’t find this, you can run:
~$ netdiscover -p
If you’re still pulling your hair out, try:
~$ arp -e
To see what hosts are mapped to MAC addresses in Linux. If you still can’t see the Mr Robot IP address, check the adapters give the machines IP addresses on the same (or routable) networks!
The steps for troubleshooting this are similar to those for pinging the internet, only now you don’t know which VM it is that’s playing up, good luck!
Customise the Design for You
This Lab is a design that works for me and 9/10 of the people I work with, but you may want to customise or change parts of the design. Maybe your hardware isn’t up to snuff, maybe you want to learn something unique; the following are are some thoughts to help you work out what you want to customise and why.
Custom Hardware Considerations
How you build your lab can depend on what hardware you have and whether you can afford to splash on some new gear. If you think you’ll struggle virtualising this lab on a single machine, you could host victims on one machine and attack from another, either using Virtualisation on both hosts, or even going onto bare metal if you need to.
I would recommend that your victim machines always go into virtual machines, since they’ll fall over regularly and don’t use many resources; attacking from a bare-metal machine is a viable option for the resource scarce, however.
Custom Hypervisor Considerations
There are different types of hypervisors, which are often grouped into two types - simply called type 1 & type 2. Type 1 hypervisors run on hardware direct, as it they were their own operating system, but all they do is run VMs; type 2 are an application you run in an existing OS, which can run VMs.
The hypervisor Oracle VirtualBox, that we’ve been using so far, is a Type 2 hypervisor, as are many of those used in personal labs; you may choose a Type 1 hypervisor, however, as they enjoy high performance; if you split your VMs across old hardware (as suggested above), you may choose to use one like VMWare ESXI to host some victims, for example.
We used Oracle VirtualBox in our lab build, but there are loads of other type 2 hypervisors out there to choose from, including VMWare Workstation, VMWare Workstation Player, KVM and Xen.
VMWare workstation has some really nice features and just… works, but it costs a lot of money for an individual hobbyist, the player version is a cut-down free equivalent that has some good features. KVM and Xen are more Linux oriented options, for those who may take issue with getting their ‘free’ software from Oracle. You know who you are!
Custom Guest Configuration
Once you’ve got the hang of using your attacker and Victim VMs, you may wish to expand your lab, to get more functionality. This will help add more diversity to your lab and will help in the long run.
I keep one Linux VM and one Windows for attacking; the Linux machine is usually a security oriented flavour of Linux like Kali. Windows hacking toolsets don’t really come packaged like Kali, so we have to make a build ourselves. I usually complete a standard Windows install, apply some security settings, install Visual Studio, Wireshark, Nmap, Metasploit, NetCat, Python and Cain & Abel; everything else can just be installed as you need it.
Now what?

Now that your testing is complete and everything can talk, you’re ready to go! All that’s left is to actually use it! Catch up with my Mr Robot walkthrough to put your lab through its paces. Good luck!